Of all the Amps I've had over the years, I never had a pair of Mkiii's. And not to say anything for, or against them, for some reason I've always been curious of how they'd sound. Refurbished not as if money, or original design, were no barriers, but with respect to them. A very similar topology, well implemented. So, this is how I found them. Gotta love the single ccs phase splitter driver stage, led biased even!, 12bx7, feeding the 6550s directly 🤦♂️ Aside from that, and the added "heater voltage doubler" for -15v (now that ccs is working perfectly, I'm sure...) both of the amps are identical with stock iron. Couple weeks apart in '64 says the serials, so probably came from a store is what I'm thinking, as a set? I do know parts are starting to arrive, so it's time to do something with these dilapidated classics.
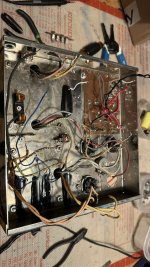
Yuck, what a mess under here. At least I won't have to worry about trimming the OPT secondary leads, they barely reach. Lot of extra wires for that heater based DC- supply too. If you look close, you can see that whoever made these "driver" boards was recycling them from some other board design. At least they were trying, I tell myself...
Alright now we're talking. Reduced to everything we're keeping on this one. Well, ok, maybe not Dynaco's venerable c-354. Does lamination lacquer come out of carpets if it drips? But seriously, they'll certainly find use elsewhere. And forever thank me for stopping the beating....Ok on to prep..
Ahh there we go. Every surface, every angle and hole. Used a single stage 220grit, which is more than sufficient for chassis like these, without any serious pitting problems. I don't know if you can see in first pic, but they had the chokes screwed in through the tube vent slats! This made one of them be shaped like they now all are. What a pain in the butt hand filing, but I'm glad they look as if they're supposed to be that way now 😅. Besides more ventilation is welcome on a 1.75" chassis with bottom plate (Hmm....more on that later..). I'm thinking close to stock for the transformers, and then a kind of aqua blue for the chassis.
I'll be using the Tubes4HiFi octal driver boards in these. Probably do the mod for the current source. The driver stage is going to have a fairly serious choke, but not decided yet on how much effort vs. gain with one beforehand for B+ as well, other than a beefier 1.5H. Definitely more C than stock, probably top can and underside. And, I'm going to play around with feedback to the cathodes from the OPT secondary. Another nice feature this thing came with 😅 I'll do bias meters (and t.p.?), be going with standard spacing and a switch for 4/8 and maybe 16ohm for the binding posts, and power tubes will be KT88 or 120, we'll see..
Any input is more than welcome, and I love seeing others' examples. I'll post more pics in the coming days as these take shape.
Loren
Attachments

You think so Peter? Feels like calling an uncle a distant relative. Different driver, LTP 6sn7, but still 3 stage. Power supply is linear, in fact very similar, just more capacitance and an added input stage choke, retaining 5ar4 rectification. The iron is original. The chassis is too (no new drilling). I would think distant relative is more like only using the original iron, or using the original circuit with different iron...With the suggested changes it is no Dynaco MkIII but something distantly related.
But even if it's completely unrelated...I have had Mkiiis come across the bench for repair, and know their stock sound. Nice, but I feel lacking in some departments. Especially, I think the LTP will be a far better driver than the split load was (especially with 6550's), and individual bias pots superior to a single shared pot. But also original filter choke, lower cap values, using chassis for ground bus....I do appreciate, and have much respect for, those who restore these "as new" condition. But personally, I like making sound quality modifications, while maintaining the original form factor. This of course is subjective (though surely measurable as well, in this case) and one of my favorite aspects of the hobby.
Hopefully painting things today🙏
Loren
Last edited:
Here's the pic that I forgot yesterday as well. Like I said I'm open to suggestions, and this is where I love seeing others' work. Definitely leaving this way though. And I think the brown covers give a nice contrast to this blue. That and the fact that the "front plate" of the Mkiii is fairly crowded with black switches and such.
Loren
About a year, maybe more, ago I did a pair of what started as Mk2's. Pretty much the same as yours but without the choke and no 4 ohm tap. Now they are very different. I bought an octal board with auto bias from an eastern European seller on ebay. I've used his auto bias boards before. Added a Triad choke and used one of Sheldon Stokes' cap boards. Quiet full underneath. I also got away from the 5V recifiers and used SS diodes for rectification feeding a damper diode for a slow voltage ramp. The auto bias board also has a slow ramp up of the bias current so altogether a gentle startup.
Have fun with your project.
John


Have fun with your project.
John
Very nice John, clean, thanks for sharing🙏 I really dig the 2-tone iron. I thought about going that way...but I already have one of his 2ch auto-bias boards. So, I got the tubes4hifi boards. The circuit is close to identical if I remember correctly. Shame that neither company seems to include the $1 worth of parts to temperature compensate the lm334 (or with Pavel's that little board he makes for it), but I get it, when you have stock of something...Anyway I might go this way down the road, and a single 2ch board isn't that much to add. Damper diodes are where it's at for sure, I've got quite a stash and use them. But I'm m not looking to take B+ much over 500v, if at all, and when I checked these (I just had to 😅) aside from that LTP not driving the amp past 1/2w, the tubes were biased around 50ma and my B+ was still 550. So I'll likely welcome the extra drop this time around.
Didn't get to paint today but I will in the morning. Did get the last spray can I needed.
Loren
Didn't get to paint today but I will in the morning. Did get the last spray can I needed.
Loren
I think the 6SN7 boards I got are very close, if not a copy of, the VTA board. I had a couple of issues. The wiring diagram for mine had the output tube drives signals reversed and I got positive feedback. I also think the feedback is too low. They were kind of mushy sounding. I reduced the feedback resistor by half and I think it sounds better.
Which is just fine - good iron, poor circuit.
Truer ignorance has never been spoken.
What? You think the Mk III circuit wasn't a victim of budgeting, and couldn't be improved? I think a bit of research will prove me correct on my statement.
I think a 6SL7 first stage would be even better to use more feedback. There was a kit called Dynamutt a few years ago that did this for the ST70. I have a couple of those boards. Should modify my Mk2’s for this.
What? You think the Mk III circuit wasn't a victim of budgeting, and couldn't be improved? I think a bit of research will prove me correct on my statement.
I wouldn't doubt he was talking about the good iron part. I've read threads all over the internet where people trash the quality of the iron. But if you take the time to research, often times it is people misunderstanding measurements. Yep, a 60w transformer isn't going to have as much high end extension, or as much inductance, or be as good as the Z565, or whatever.
And sure, the Z565 probably was Dynaco's best opt. But none of these things (should) subtract from the fact that all of Dynaco's OPT choices, and certainly the A-431, are average or better than average transformers. In a world where most new offerings are crap transformers (judging both pieces against the best, and worst)...well, I know I'm pleased with them.
Oh and if the OP doesn't think there were serious cost cuts, then I don't know what to say...
I have a 'Dynamutt' with the Classic Valve (ca.) board - lovely amp.
I did the same thing with the KT88 amp I built last year. Drivers stayed 6sn7 LTP the whole time, but for the input I played with n7, l7, and 6j5 (both the n7 and l7 I paralleled) I ended up going with 6sn7 in the end just because all of the l7 that I had around the shop were rather microphonic.I think a 6SL7 first stage would be even better to use more feedback. There was a kit called Dynamutt a few years ago that did this for the ST70. I have a couple of those boards. Should modify my Mk2’s for this.
Hung everything up today. Nice having this shed that I happen to be just finishing, I used metal tie wire for all the suspensions. Everything was already sanded, but I solvent cleaned these and started soon after.
Everything is primed. I like to use 2 light coats, quickly after one another. Temperature was kept around 70, and will be for the rest of the evening.
All turned out as well as I could have hoped for. I didn't see anything make it through the 3-4 quick coats I put on, save for stamped part numbers and of course some of the lamination areas on the transformer cores. What do you think about that blue? Only picture I edited, to get it as close as it actually looked to me. It reminds me of the old metal storage drawer things that I'm sure so many of us have...
I need to get the boards finished, so that'll probably be next. I thought about re-using the old hardware, but I have a bunch of new pan head Phillips stuff that I'll probably use for ease. More soon-
Loren
That's pretty neat having the shed to use and the "clothes lines" for hanging. I have to paint outside on a calm day and then take the parts indoors to dry under a box.
What sort of paint did you use? I like the colors too.
What sort of paint did you use? I like the colors too.
Nerdorama: What sort of paint did you use?
Nothing too fancy, I went with the "Rustoleum 2x ultra cover". Both for the primer, and for the "2 In 1 paint and primer" colors. Although the grey was about the exact same color as the primer, its satin finish was closer to glossy than the primer's was. I'll see what the color names were later, when I make it out to take everything down. Oh, and yeah I know, that's how the painting was for me too before I built this 🙏
Loren
Sheesh that edit option dissapears fast. I meant to also ask everyone's opinion about clear coating. I wasn't planning on it, but then I thought shoot while they're still hanging, if I was going to...Reason it popped into my head was I imagined that it might make the finish a little more durable, and resistant to scratches which affect the new paint color. I'd be wanting to go with crystal clear, but as matte as possible. I'm not a shiny fan. Thoughts?
Thanks again,
Loren
Thanks again,
Loren
Pretty simple boards. I made a few changes for carbon comp resistors (the c's on schematic) but for the most part values all looked good. But when I got to the driver 6sn7, the schematic as written didn't make sense to me. For example, 380 B+, 4.1ma, 44k. Doesn't that drop us down close to 199v, not 147 as listed? The halves are paralleled, and since I surely have the voltage after B+, wouldn't 420v B+ and these values be a little better?
Here's the 6SN7 graph, and I think this, or maybe slightly lower bias, looks like better idle spot than the stock one was. Anyone else changed this section from what the tubes' schematic says? Mine is the top operating point, stock is bottom.
Hope everyone's well,
Loren
- Home
- Amplifiers
- Tubes / Valves
- Finally building my MkIIIs, a pictorial thread