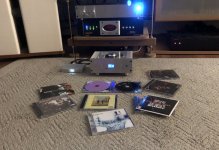
That installation is so Heath Robinson and matches the rest of the room that can be seen in the background.
Now you just have to put it in an enclosure! Then you could put that assembly in your pocket and have skip-free cd-playback while you move about.
Looks like you are have fun. Keep it up!!
Now you just have to put it in an enclosure! Then you could put that assembly in your pocket and have skip-free cd-playback while you move about.
Looks like you are have fun. Keep it up!!
Hello everyone,
I am glad that the Shiga story is still alive and there are many great machines born🙂
I have been out of participating very long time and during that period I developed the ,fourth ,fifth ,ohh ,I don't relly know ,which iteration of the transport.
In short ,the most natural sounding...
Organic Z Audio - Bamboo sticks - roller bearing supported cd transport lens assembly | Facebook
That installation is so Heath Robinson and matches the rest of the room that can be seen in the background.
Now you just have to put it in an enclosure! Then you could put that assembly in your pocket and have skip-free cd-playback while you move about.
Looks like you are have fun. Keep it up!!
Hahaha ,at least bungee jumping testing ,nothing less...
Yes I have it a lot and will keep going on 😉
I’ve been a bit busy dealing with renovations on the house.
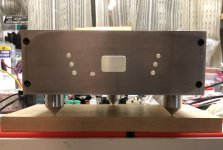
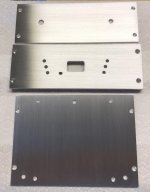
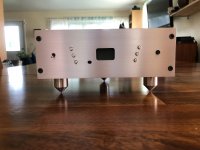
I did find time to wrap up most of the case fabrication. I’m still on the fence about whether or not I want to hinge the lid or just make it removable. I didn’t get a chance to take a lot of pics. I keep putting it together and taking it apart in order to test fit things and solve different problems.
I spent a few days doing nothing but wet sanding the aluminum. No finish on it yet, but that will be simple wax and buff.
Today I found some time to work on the electronics. I got the inductor removed along with C916, C952 and their bypass caps. I don’t think I’m gonna go further than that right now. I want to get it together for a test.
Damn trace started to lift right at the edge of the board on C916 positive pad. I lost the outside half of it when I removed the cap. When I replaced it I bent the leg of the new cap over and soldered it to the empty pad for the bypass and again at what was left of the through hole pad. Tested continuity and all seems ok. No Black Gates in my bins. I used Elna Silmic II.
Attachments
Finally!
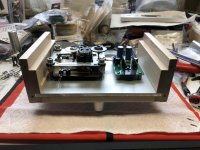
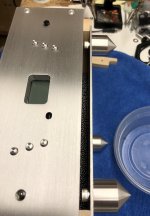
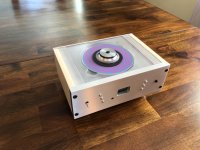
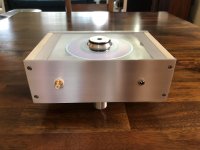
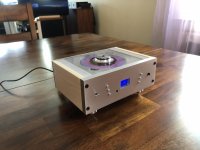
Well I managed to pull it together and got my Shigaclone assembled and working today.
I took a few more pics of final assembly as I was mounting, adjusting and wiring it all into my chassis. One of the last steps was loading the compartment in the bottom with lead shot to help damp vibration...while trying to not spill it all over.
Of course there was nail biting and panic involved during the first test in my system.
I had only been testing the player for function without sound previously.
I fired it up and immediately got unpleasant noise from my speakers.
It turned out to be a crappy SMPS. I ended up repurposing a router wallwort I had saved as a temporary solution. Actually, its dead silent...go figure.
But...again there was nail biting...there was no music.
Duh...the DAC was set to the wrong input.
I only currently have an SMSL M8 to try with it, but it does sound very good.
Now I’m finally sitting back and listening and enjoying my CDs again...for a little while anyway.
Now I have a real reason to get my D3 TDA1541 project together.
Attachments
-
 6471E37B-F1EF-4458-BD39-7D1740B07EC5.jpg926.9 KB · Views: 586
 -
 35D981EE-8691-4504-A675-430194216C0E.jpg491.7 KB · Views: 569
 -
 8344123C-3E7B-4DFE-AAED-A59CDA0F252D.jpg692 KB · Views: 357
 -
 0BE46F9A-66DE-45BD-A7B2-38E06879AFB0.jpg965.5 KB · Views: 553
 -
 8F7987E2-195D-4F04-8D73-24F7BCCC2C23.jpg827.6 KB · Views: 342
 -
 243E693B-102F-4445-A116-9895C89874F6.jpg672.1 KB · Views: 343
 -
 6F18C680-F2D0-429C-A3FC-96AB7B9E8078.jpg896.6 KB · Views: 349
 -
 47D9FE52-20A9-44CC-9D7E-57AA0533797A.jpg602.9 KB · Views: 388

Hi there!
Any idea why the transport has pretty much stopped reading records? The transport spins but does not read. It tryes but gives up after a while, when nothing is found.
A player that worked perfectly untill now. I've cleaned the laser and also the transport is not that old so that the wheels would be so worn that it couldn't find the CD tracks.
Any idea what to try? Can the laser be dead?
OK - the transport does work occasionally with certain CD's but mostly not. What is wrong with the thing and any way to fix it? 😕 Ideas?
I am the last person to ask. I had to rely entirely on the information in Peter’s threads and a few other sources to attempt this project.
However, I did experience the same problem when I was first testing the components from the boom box to make sure they functioned.
I was trying some 9 volt wallworts as a quick power source. The transport would spin up, but wouldn’t read the TOC.
After taking some measurements I realized the wallworts weren’t quite producing 9 volts...or even the 8 volts I was really after. They were down around 6 volts by the time I connected them and they were loaded by the circuit.
Once I found a 12 volt wallwort in my bin and connected it it finally spun up and read the TOC and would play tracks.
Of course, I needed to regulate that down to the 8 volts the circuit needed. The mosfet regulator board I had lying around happen to do the job.
So maybe check your power supply voltage going into the transport board?
chromenuts,
Thanks for the tip. Measured the output - was 7.82 VDC. One would think that is close enough - but no?
Edit: tried it with a 8.0VDC power supply and - no. Didn't make a difference.
Thanks for your input though! =)
Thanks for the tip. Measured the output - was 7.82 VDC. One would think that is close enough - but no?
Edit: tried it with a 8.0VDC power supply and - no. Didn't make a difference.
Thanks for your input though! =)
Last edited:
A wierd thing is also that after the transport decides that it can't find the TOC, it starts spinning the CD packwards(!) Only for a second but does it anyway... 😕
Sorry it didn’t help.
I have only heard of the “spinning backwards” symptom previously in relation to doing research while trying to fix my old Rotel 855 with the cdm4 mechanism.
It’s unrelated to this mechanism, I don’t know if something similar happens in different transport mechanisms to cause this.
There is a thread of a person on here who was trouble shooting this backwards spinning problem with his Rotel 855.
Last edited:
Actually...I’m having issues now with my transport reading some of my CDs. Fo some reason it won’t pull up the TOC for 3 out of 4 of my Thievery Corporation CDs. One of them is a bit scratched up, but the other 2 look perfect. I loaded other CDs I’ve previously played to see if the transport was glitching. They spin up fine.
So I did some troubleshooting on my transport.
I was trying to search the thread for posts about trouble reading the TOC.
Seemed like ppl were all over the place with this problem and solutions.
Some were talking about the suspension...others about builds with extensive mods.
I started by looking at the clamping puck I modified with my handle and removed it to see if it was causing a problem with vibration that might prevent the laser from reading. No dice.
I didn’t want to have to take the transport out right away and start changing the suspension.
On a lark, I decided to take another look at the power supply voltage.
I had issues getting the transport to read the TOC when I first tested it on my bench because I didn’t have a high enough voltage supply.
Sure enough, voltage was lower and was dropping quite a bit more to barely above 6 volts when I pushed the button for it to read the TOC.
I tried another wallwort that tested at about 14 volts. Bingo!...it started reading discs it couldn’t before.
Only issue...when I got it back upstairs in the system it started flaking out again.
Pulled the top to check voltages. Once the wallwort warmed up the voltage had dropped back down.
It managed to read one disc after 3 tries and another on the second that it hadn’t before.
It’s border line I think and probably can’t supply the current and sustain voltage needed at all times.
I’m not sure if it is in part due to the mosfet regulator board I am using to bring it the wallwort output voltage down or what.
Looks like I need to figure out a proper supply.
Thanks foe the effort again!
I tried the two different power supplies and also tried two different laser cartridges, but nothing helped. So I'm guessing here that there is something on the PCB that starts to fail - it's just made so cheaply I guess.
I've had a few of these transport mechanisms and have also found they have a hard time reading some CDs, especially self burnt ones, and usually it only gets worse. So I guess I give up on this.
But I do have a Tibi mechanism and PCB that I'll try to fit in the old enclosure. Will need quite a bit of moding though...
I’ve got myself up and running with a new wallwort I found in my stash that I bought when I built my turntable speed controller.
This wallwort is designed to deliver 15V up to 1A. Once it is connected to the mosfet regulator I am using in the transport I get about 10.5-10.7V out of the regulator.
I was a bit reluctant to try it, but gave it a shot.
The transport now reads the TOC of any and all discs I have in a fraction of the time it did previously on discs I wasn’t even having a problem playing.
Even on discs that are obviously scratched and hazed it will read the TOC. It will also play them.
However, it does reach points in the disc that don’t read properly and the result is loss of proper sound output.
The funny thing is that it still just keeps plowing through the disc until it clears up and starts playing music again...so I guess it can still track through the bad segments of the disc.
I am a bit worried that the possibility exists that the 10.5V I am putting through the circuit is not within tolerances it may have been designed for which may result in burning the laser or something else out.
Voltage during TOC reading still fluctuates and drops down to 9.25V or so. There must be a sudden demand during the process that perhaps is not being dealt with well by the mosfet regulator, the wallwort or both.
I am in the process of trying to figure out how to assemble a Salas SSLV v1.1 kit I bought a while ago for a phono project that I used a battery supply on instead.
Hopefully I can build it to produce an 8V supply that will meet any of the demands the transport can put on it.
BTW...I also embedded a blue LED in the bottom front edge of the Lexan CD tray. I was going to do this originally just for aesthetics, but then read a post in the thread that this can actually help with read problems.
Attachments
Last edited:
Interesting about the voltage...
I haven't measured the voltage when in use and the transport is dissembled right now... But my power supply is quite beefy. I have a 120VA transformer and a total of 3000uF giving power to the transport. I'd be surprised if that wasn't enough for all situations...
I haven't measured the voltage when in use and the transport is dissembled right now... But my power supply is quite beefy. I have a 120VA transformer and a total of 3000uF giving power to the transport. I'd be surprised if that wasn't enough for all situations...
The simple supply presented by PD at the beginning of this thread (Post#6) works just fine. The key is the oversized transformer- you need around 100va for best results. The original psu contains BG unobtainium and an obsolete regulator but buried somewhere in the thread are The best recommended modern replacements (can’t remember where, sorry). It’s simple but works just fine.
Commentary about the Psu for Shiga Black MKII has some recommendations regarding parts
https://www.diyaudio.com/forums/dig...e-mkii-black-builders-thread.html#post3918572
https://www.diyaudio.com/forums/dig...e-mkii-black-builders-thread.html#post3918572
@sthcoaster...Thanks for the input on the supply.
I was familiar with what Peter was originally doing with the power supply from his “The CD Transport” thread where he documented his build process.
I also knew Black Gates were not happening. I do have a supply of Silmic II, and have been using those.
I didn’t have any LM7808 on hand...only LM317 equivalent LM7805 and 7812. Go figure.
I didn’t even know the 7808 was obsolete. It looks like you can get old Fairchild stock on Amazon and the like.
I usually wait to do a large order of what I need for several projects at Mouser at once...so I didn’t bother trying to get the 7808 and just figured something else out. With Covid affecting just about everything, I didn’t know when I might get it anyway.
I put together a supply that would run the circuit with as little work as possible. I figured the mosfet regulator would have good filtering because it was designed for a headphone amp. It was already built and functional and I could just power it with a wallwort.
Obviously it hasn’t worked out the way I had hoped.
I came across that post you linked to while doing research. It seems he found a good solution. Again, it was based on parts and boards I don’t have.
So the next best idea I have is to build one of the SSLV kits I have on hand and see how it works set at 8V. I wanted to learn how to build them anyway because I want to build a D3 NOS TDA1541 DAC project next and they require more boards and power supplies when you only have spdif.
Salas has always been a great help with his projects. I built a DCB1 several years ago that I still use and love. He’s been helping me sort through the details since I’ve not built the SSLV before and am not good with calculations or spreadsheets.
Totally appreciate wanting to build solution only with parts on hand,
I use Ryan’s D3 TDA1541A DAC myself, my I/V choice was a B1
I’ve got a hot rod DCB1 soldered up ready for an enclosure - has been like this for quite a while 🙂
Have fun. Take care
I use Ryan’s D3 TDA1541A DAC myself, my I/V choice was a B1
I’ve got a hot rod DCB1 soldered up ready for an enclosure - has been like this for quite a while 🙂
Have fun. Take care
So the next best idea I have is to build one of the SSLV kits I have on hand and see how it works set at 8V. I wanted to learn how to build them anyway because I want to build a D3 NOS TDA1541 DAC project next and they require more boards and power supplies when you only have spdif.
Salas has always been a great help with his projects. I built a DCB1 several years ago that I still use and love. He’s been helping me sort through the details since I’ve not built the SSLV before and am not good with calculations or spreadsheets.
Nice work Chromenuts! Beautiful.
So I just found the same, an RC-EX51. The first step to taking on this project which will serve as a transport for an upcoming IanCanada Pi stack.
I don’t even know where to begin. Looks like I’m facing a couple of weeks of thread reading but like most I’m time challenged. May I kindly ask someone well versed on this project to provide a few thread links that will help me get straight to the best approach for building a ShigaClone based on the RC-EX51
Thanks in advance
- Home
- Source & Line
- Digital Source
- Finally, an affordable CD Transport: the Shigaclone story