Recessing is not bad if it's planned for in the design. It definitely helps to center the driver over the hole if a bit of recess is accounted for in the design of the baffle. As even a minor leak at this point will greatly reduce LF output, recessing the driver a bit can minimize if not eliminate the possibility of this happening. For my POC3 I just bonded two 1/2" ply panels together to form the baffle, and made the cutout in one slightly bigger than the other to allow the driver to be recessed. It worked out very well.
Yeah but you have double thick panels. In this case the baffle is .75 inches (1.095 cm). If you start cutting into that you are going to end up with a VERY thin piece of wood (less than 1/2 inch) to fasten the driver to. Not strong enough and almost impossible to fix if it breaks.
In your example it makes perfect sense and it's functional too. I'd want at least 1/2 inch to fasten the drivers to, no less.
Hahah, sorry guy. Yes you caught me, CAD is very fun. I love to model as long as it's not on a runway 😉
Shoot away with the folding comments! I'll take a break 😀
Brian- I just looked it up, looks like something I could do relatively easily in Cinema 4D with the spline wrap deformer. I am a wiz with C4D and it has some very powerful modeling tools. Rhino is what I am using now, but it's not super necessary at an early stage like this.
I like the other way better, this new design bundles all the internal panels to either side whereas they were spread out more in the previous design. More spread = better natural bracing without actually adding bracing. This new design has a massive unbraced open area in the middle and it would be difficult to add bracing in there. You can't put any in front of the drivers or you won't be able to access them. You could put a bit behind the drivers but it still wouldn't be as well braced as the other design with no added bracing at all.
I'm somewhat in agreement here. That area you're referring to is at or near the horn's mouth, when tends to be less subject to panel flex than anywhere between S1 to S3. A simple cross-brace or two right behind the drivers may actually be all that's required to minimize flex to an acceptable level.
For best performance S1-S2 and a significant portion of S2-S3 needs to be properly braced. Like bifurcation or even trifurcation with hollowed-out 1/2" ply from S1 to S2 and bifurcation with hollowed-out 1/2" ply for a good portion of S2-S3. From there on, simple cross-braces should do the trick.
Brian- I just looked it up, looks like something I could do relatively easily in Cinema 4D with the spline wrap deformer. I am a wiz with C4D and it has some very powerful modeling tools. Rhino is what I am using now, but it's not super necessary at an early stage like this.
Lucky you. I put together my horn layouts in Excel.
It is.. challenging.
Yep, C4D rules. Something like this
Scale points are interpolated based on S & L values


Going to be doing all of my horn folding in C4D from now on
Scale points are interpolated based on S & L values
Going to be doing all of my horn folding in C4D from now on
Definitely cannot get the first way to fit within the 37.5/2 inner dimension, and already horn length is too long so I can't extend the box

This doesn't even take inner material thicknesses into account
This doesn't even take inner material thicknesses into account
Ok. Folding.
When you have a sim you like, click Calculate in the inputs window. (Make sure that if you have more than 1 flare rate that the segment marker (S2, S3 and/or S4) will end up in a bend or the plan will not match the sim - THIS IS IMPORTANT, more on that here - http://www.diyaudio.com/forums/subwoofers/175658-tham15-compact-15-tapped-horn-21.html#post2451737.)
From the Schematic window click File, then Export - Horn Data.
Set all the increments to .5 cm. If it won't allow that do 1 cm increments. Fill in the rest of the input boxes if you want. Or don't. Either way you will have to do a bit of calculation. I just leave everything the way it is with the exception of . If you do choose to fill them in you will have to research how to fill it out properly - I don't even know and it isn't necessary.
Click OK and name the file. Click save.
Retrieve the file from the Hornresp Export folder (this will be located wherever you installed Hornresp) and open it.
The only columns I even look at are the first two, length and area.
Start drawing out your plans. Oh look, you already did.
On the left I've added markings that are necessary for the advanced centerline method, on the right is the centerline method. I'll explain those methods more later.
Refer to the Horn Data export file. For now only pay attention to the right side (centerline method side) of the drawing. At each red line the cross sectional area from the export file needs to match the cross sectional area in your plans (divide the number in the area column by the internal height to find the width of the flare at that point). The length in between the red lines also needs to match the data in the export file. For the left side of the pic (advanced centerline side) the extra red lines are just drawn in so you can see where to draw the path length line. Those lines won't match the export data file for cross sectional area vs length.
Continue this through the length of the horn until you get to the end.
Find out it doesn't fit right in your desired dimensions, make changes and do it all again.
Centerline vs Advanced Centerline
Centerline method shown on the far left, advanced centerline method in the middle. Advanced centerline is more accurate. It will only amount to a few cm difference but sometimes it's worth the extra work.
Basically, just make sure the cross sectional area at the beginning and end of the horn and at each point before and after each bend are what they are supposed to be or your finished product won't match the sim.
Folding is a big topic and I've covered only the absolute basics, and probably not very well. If you have any questions just ask. Not sure if you were already using the Horn Data export file or not, but I'm not sure how you were doing this folding without it if you weren't.
When you have a sim you like, click Calculate in the inputs window. (Make sure that if you have more than 1 flare rate that the segment marker (S2, S3 and/or S4) will end up in a bend or the plan will not match the sim - THIS IS IMPORTANT, more on that here - http://www.diyaudio.com/forums/subwoofers/175658-tham15-compact-15-tapped-horn-21.html#post2451737.)
From the Schematic window click File, then Export - Horn Data.
Set all the increments to .5 cm. If it won't allow that do 1 cm increments. Fill in the rest of the input boxes if you want. Or don't. Either way you will have to do a bit of calculation. I just leave everything the way it is with the exception of . If you do choose to fill them in you will have to research how to fill it out properly - I don't even know and it isn't necessary.
Click OK and name the file. Click save.
Retrieve the file from the Hornresp Export folder (this will be located wherever you installed Hornresp) and open it.
The only columns I even look at are the first two, length and area.
Start drawing out your plans. Oh look, you already did.
An externally hosted image should be here but it was not working when we last tested it.
On the left I've added markings that are necessary for the advanced centerline method, on the right is the centerline method. I'll explain those methods more later.
Refer to the Horn Data export file. For now only pay attention to the right side (centerline method side) of the drawing. At each red line the cross sectional area from the export file needs to match the cross sectional area in your plans (divide the number in the area column by the internal height to find the width of the flare at that point). The length in between the red lines also needs to match the data in the export file. For the left side of the pic (advanced centerline side) the extra red lines are just drawn in so you can see where to draw the path length line. Those lines won't match the export data file for cross sectional area vs length.
Continue this through the length of the horn until you get to the end.
Find out it doesn't fit right in your desired dimensions, make changes and do it all again.
Centerline vs Advanced Centerline
Centerline method shown on the far left, advanced centerline method in the middle. Advanced centerline is more accurate. It will only amount to a few cm difference but sometimes it's worth the extra work.
Basically, just make sure the cross sectional area at the beginning and end of the horn and at each point before and after each bend are what they are supposed to be or your finished product won't match the sim.
Folding is a big topic and I've covered only the absolute basics, and probably not very well. If you have any questions just ask. Not sure if you were already using the Horn Data export file or not, but I'm not sure how you were doing this folding without it if you weren't.
Yep, C4D rules. Something like this
Scale points are interpolated based on S & L values
Going to be doing all of my horn folding in C4D from now on
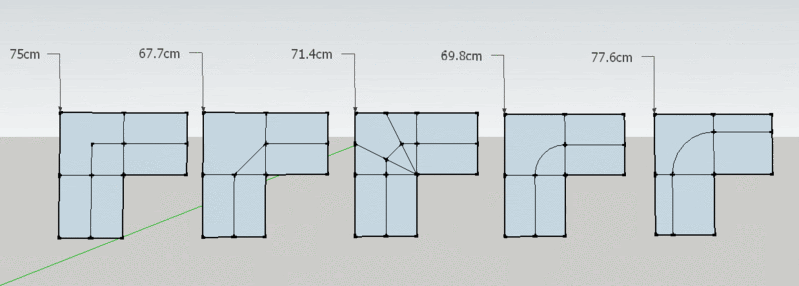
I have no idea what's going on here but it looks like Soho54's Sketchup folding method which is not accurate (plans don't match the sim).
But as long as you export the Horn Data chart and make sure that all the cross sectional areas vs lengths are correct at each important point (beginning and end of horn and before and after each bend) that's all that matters.
Why is this not a straight line? Did you switch back to manual? This pic doesn't match the folded pic in this post, there's no bend at the driver tap points in the folded pic.
This is great stuff! Applying it 🙂
However I can already see the horn is not going to fit, and if I make the aspect ratio higher (make the box taller), then I run into issue with S3

However I can already see the horn is not going to fit, and if I make the aspect ratio higher (make the box taller), then I run into issue with S3
I'm somewhat in agreement here. That area you're referring to is at or near the horn's mouth, when tends to be less subject to panel flex than anywhere between S1 to S3. A simple cross-brace or two right behind the drivers may actually be all that's required to minimize flex to an acceptable level.
Depends what you consider acceptable. I wouldn't do a mouth that big with no bracing.
Definitely cannot get the first way to fit within the 37.5/2 inner dimension, and already horn length is too long so I can't extend the box
This doesn't even take inner material thicknesses into account
Again, not sure what's going on here. Assuming you are using the same sim and same external dimensions how are you getting it to fit inside the box with the other layout but not this one?
I could make this S1 in the middle layout work with some changes to the fold. But if that's not what you want to do that's fine.
Yeah I changed it to manual, I was tweaking it
Can't do that. Sim doesn't match the drawing.
There are ways to fold it so you can have bends in those areas but in the end the sim has to match the drawing.
Sorry I meant I tweaked it in the sim, the C4D interpolation points match the simulation in hornresp

okay taking your advice and doing the incremental export from hornresp. I'm going to input this to my c4d scale spline

Depends what you consider acceptable.
I use no discernable improvement to the impedance plot with the addition of bracing as my benchmark for whether or not bracing is required at a particular location. Too much bracing decreases the horn's volume and increases its weight for no discernable improvement. See my tests for my POC#2, which I deliberately built without bracing and then added it afterwards by choosing select points along the horn and observing the improvement if any to the impedance plot. For POC #3, I didn't add any bracing at all between S4 and S5 to address panel flex, and I used 1/2" ply in that area for the horn's construction. What little bracing was added in that location was included for a different reason - to strengthen the box. With no bracing at all in that area, the panels may be subject to warping.
Sorry I meant I tweaked it in the sim, the C4D interpolation points match the simulation in hornresp
Not sure how to explain this. Every single point in the finished plans should match the data from the Horn Data file. I guarantee your drawing does not match the sim. The differences won't be large but if you want it accurate the drawing HAS to match the Horn Data file.
There are many ways to fold. This method won't be accurate and I can prove it. When you have the fold drawn up and finalized post a picture of it and the Hornresp inputs from the sim. I will mark a few lines on it and if you can give me accurate dimensions at those points I will show you that the drawing does not match the sim.
It all depends how accurate you want to be. Usually anything that saves a bunch of time during folding (like this software) isn't going to give you an accurate result.
okay taking your advice and doing the incremental export from hornresp. I'm going to input this to my c4d scale spline
I don't mean to be a pain but this still isn't going to work. When you get the drawing finalized I'll show you why.
The previous models I just eye'd it to get it to fit. It was probably way off from the simulation now looking at it with my cinema4d setup. I was basically making it an exponential flare, I think.
The bracing is an interesting issue. I think I could get away with minimal bracing in the middle, with cutouts so the drivers can be accessible.
However now I'm not sure if either of these sims will fit my desired dimensions 😛
The bracing is an interesting issue. I think I could get away with minimal bracing in the middle, with cutouts so the drivers can be accessible.
However now I'm not sure if either of these sims will fit my desired dimensions 😛
- Home
- Loudspeakers
- Subwoofers
- FaitalPRO 15HP1060 vs 3015LF for tapped horn?