Hi everyone, I recently came upon a 400A (dismantled!) which seemed an attractive project for me.
Someone's partially completed amp, which they'd dismantled and done some work on.
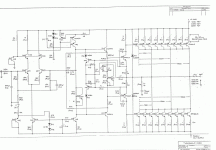
When I got it home and began a parts inventory, I noticed this amp has driver boards which don't agree with published 400A schematics
and are labeled “520683 Mod II”.
I've been searching high and low since then for info about the mod, and I did find that Threshold offered upgrades to their older amps to the Stasis technology at some point.
The only other thing I found was a reference saying it could have been upgraded to a S-300.
I tried creating the schematic of the board I have, but that quickly became quite a chore.
I did find tracing the initial input seems to agree with the schematic of the S-300, but there are differences too. (or maybe I'm just interpreting it wrong)
Long story short, this amp is a good candidate for the new Stasis FE, which I'll pursue, but I'd like to play with this first.
I'll post some pics.


Someone's partially completed amp, which they'd dismantled and done some work on.
When I got it home and began a parts inventory, I noticed this amp has driver boards which don't agree with published 400A schematics
and are labeled “520683 Mod II”.
I've been searching high and low since then for info about the mod, and I did find that Threshold offered upgrades to their older amps to the Stasis technology at some point.
The only other thing I found was a reference saying it could have been upgraded to a S-300.
I tried creating the schematic of the board I have, but that quickly became quite a chore.
I did find tracing the initial input seems to agree with the schematic of the S-300, but there are differences too. (or maybe I'm just interpreting it wrong)
Long story short, this amp is a good candidate for the new Stasis FE, which I'll pursue, but I'd like to play with this first.
I'll post some pics.
I've been looking at the input's resistor values (3.3K) a 300pf cap followed by a resistor which at 820 ohms, agrees with the S-300 schematic.
It lacks the 4.7K resistor at the base of the 6251 transistor and the RCA input's ground has an 82 ohm resistor in series.
I've also noted there are U10 & U60 devices where the C2592 & A1112 driver transistors are.
I've made inquiries to Threshold, but they have no records.
So, has anyone come across such a beast? I'd like to rebuild in this iteration, then proceed with the New Stasis FE later.
Thanks,
Robert
this amp is a good candidate for the new Stasis FE,
just go for it
Ha Ha! Thanks ZM, but rabbit holes are still good learning experiences for me, cut my chops on the old, make a clean iteration of the New FE.
I'll attach the old S-300 schematic I'm looking at which shows these values.
The resolution's bad, but it looks close.
I'll attach the old S-300 schematic I'm looking at which shows these values.
The resolution's bad, but it looks close.
Attachments
I have been involved in 3 Threshold rebuilds now (with some help from ZM), and all three had the new Nelson Pass Stasis front end boards installed with existing Output stages - usually upgraded with new output transistors, and all three have worked very well for the three owners. As ZM says - go for it. These amps are worth upgrading. At least the existing FE board you show is not damaged by heat or burnt components like many are.
Jon Soderberg at Vintage Amp Repair in Utah might be able to help with the existing FE board as he was the tech at Threshold in the glory days.
Jon Soderberg at Vintage Amp Repair in Utah might be able to help with the existing FE board as he was the tech at Threshold in the glory days.
Yes, Jon was very helpful with information. He is a member here on the forum - VintageAmp, so you could send him a PM, or his email is: vintageamp@surewest.net
He was always generous with email replies with questions I had.
He was always generous with email replies with questions I had.
Thanks all, Jon verified it's Stasis upgraded, but not E-line. S-300 similar.
I also discovered I can't seem to read a resistor value, as I posted there was an 80 ohm to ground on the RCA input.
It's really marked 10 ohm, but measured 78 and I just wanted to read the colors in a way (backwards) that would correlate! Ugggg!
Sooo, I just pick which Gerbers I want, and send them off to this place? https://jlcmc.com/ ?
I'll probably use Nelson's boards. Do I have to be concerned about fit/finish? Meaning they're drilled for the 4 stand-offs, or if I drill, no conflict with the traces?
The mounting holes on Nelson's FE boards should line up with existing mounting bolts on the OS. Most people just used 2 to secure it to make it easier.
I assume you meant JLCPCB for the board house in Hong Kong. They do a good job.
I assume you meant JLCPCB for the board house in Hong Kong. They do a good job.
Hmmm, yes JLCPCB.
Evidently JLCMC is a branch of the same Co.
I'm not sure where the link I posted came from.
So, Gary...
Here's something puzzling to me.
Not having disassembled this amp, I'm ready to re-assemble, but the heat sink grease used is clear (Not for the transistors).
Everywhere I look comes up with regular thermal paste (White). Is there a specific name for clear thermal gel/paste?
I assume it's electrically non-conductive, but..... I also happened to notice an absence of anodization on each heat sink at mating bolt holes which doesn't seem to have any other purpose than to allow electrical conduction.
???
You must have disassembled it to be able to reassemble. Anyway, there must be mica washers under each output transistor to isolate it from the heatsink. Yes, you use heat sink thermal paste - usually white or silver depending on brand. Also there must be insulating bushes on both output transistor mounting screws where they pass through the heatsink - that is the collector connection to the OS board of the TO3 case.
If you are installing new output transistors (or changing any) after you do each one check with a DMM on resistance range that there is an open circuit between each of the 2 transistor pins and its case to the heatsink. If not you need to undo it and see whare the contact to the heatsink is and fix that.
The heatsink body must not touch any part of the circuit, as it is earthed being bolted into the chassis. There must be no electrical connection to the heatsink at all.
No, I bought it disassembled.
And I meant to say it's not the transistors to heat sink interface, It's where the aluminum spreader bar attaches to the heat sinks and where the 3 part heat sinks come together.
And I meant to say it's not the transistors to heat sink interface, It's where the aluminum spreader bar attaches to the heat sinks and where the 3 part heat sinks come together.
OK, now I get it - so, put heatsink compound between the spreader bar and the heatsinks for sure.
Yes of course, and fully prepared to do so, but I'd like to use the same heat sink grease that was used to mate the heat sinks (Edit: they're 2 part, not 3) together. (Better?), and am curious about the lack of anodization on the heat sinks at specific bolt connections which implies ground continuity via? missing pins? missing washers?
Seems doubtful, but... I don't know...
Maybe Jon, but I don't want to bother him with really basic questions.
I've Googled this 9 ways to Sunday, and you know... Algorithms... The results are all high tech CPU compound...
I'm 75% sure this is just Silicon paste of some sort with no Zinc. 40% sure it's petroleum jelly. 10% sure it's KY....
Back in those days, they did not bother to anodize heatsinks. Just bolt them up with washers/spring washers using good quality heat sink compound..
OK, I took some pics.
In the 1st pic, is clear heat sink gel where it's smooshed out from between the spreader bar and the black finned heat sink on a different amp.
In the 2nd pic, you can see un-anodized rings around the bolt holes with the heat sinks oriented in their normal position.
3rd pic I've turned it on it's side to show the un-anodized ring on the finned heat sinks bottom where it will meet the bottom panel of the chassis.
Last edited:
The unanodized rings around the bolt holes are to make sure the earthing is maintained once everything is bolted together between all plates, heatsinks etc.
Normally anodizing is non conductive.
Normally anodizing is non conductive.
OK, as I suspected.
The through-bolts from the internal heat sinks/spreader bars to the big black external sinks ensure good contact there, but the chassis plates to heat sink junctions would just be flat to flat and there's no sign of any compound there (clear or white).
I'm just concerned there could have been small washers/spring washers or something at those junctions to ensure the earth continuity.
Anyway I can easily apply regular white heat sink compound at those junctions to allay that concern I suppose, but there's no tell tale white residue anywhere if it was used before.
The clear gel compound is still a mystery.
Heatsink compound is only required between the aluminium heatsinks and output devices and spreader bar to heatsinks and any other ally pieces - no heatsink compound is used between any aluminium to mild steel chassis plates connection.
I always use flat washers and spring washers on all chassis screws.
I always use flat washers and spring washers on all chassis screws.
- Home
- Amplifiers
- Pass Labs
- Factory Modified Threshold 400A: