Sequence :
Not sure why the Loudspeaker relays are on in standby mode. The regulator relays should be the ones powered.
Not sure why the Loudspeaker relays are on in standby mode. The regulator relays should be the ones powered.
Yeah. I am not too sure either. Just not sure which to check first.
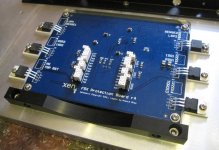
Out of the 25 first batch subscribers, how many have done up their complete working amp (includes the all working protection board)? Maybe you can help write up a build guide.
My F5X is working since Christmas 2013. Are you sure you are using the last version of the protection board? There were some mistakes in the first release.
D.
D.
I remember that I had problems in soldering. That's why after this experience I decided to buy a microscope. One thing that I remember that I failed to properly isolate one of the regulators: results, the board was working properly, until I connected another component. As soon as I was connecting something else, the output voltage protection was kicking in.
D.
D.
Two suggestions on SMD soldering if I may.
1) There are very good learning videos on youtube explaining the various techniques of SMD soldering
2) If you are not sure first experiment with a dummy board before you go to the real one. I always have some scrapped old PC boards etc. around for this purpose. With the hot air gun you could easily take out the parts you have choosen to use for your excercise. Clean the solder pads with a braid and then try to solder in the part you have taken out before. After some excercising if you are confident you know what you need to do to get nice results you to for the real one.
Some may think this would be waste of time but having the soldering process under control saves you lot of time with fixing messed up solder joints, trouble shooting and repairs, not to mention extra parts logistics effort if you have scrapped parts. In turn, if it works and if you get good results after some experimenting SMD soldering is just fun as is should be.
Hope this was helpful also for bringing the moral up a bit 🙂
Markus
Thanks Markus,
I have a hot air gun but ot kept blowing the components away.😡
I have check through the soldering with a magnifying glass but it all seems okay to me. I think I will reflow some joints which doesn't look so good.
Edit : wrong image.
I have a hot air gun but ot kept blowing the components away.😡
I have check through the soldering with a magnifying glass but it all seems okay to me. I think I will reflow some joints which doesn't look so good.
Edit : wrong image.
Attachments

Last edited:
Out of the 25 first batch subscribers, how many have done up their complete working amp (includes the all working protection board)? Maybe you can help write up a build guide.
also It Is Interesting to know version of protection board used
building guide does not cover protection set up - but how can be started F5X then
Is there anyone to offer alternative to that not user friendly protection board
I have a hot air gun but ot kept blowing the components away.😡
Pmchoong, the hot air gun I recommended for taking out parts from your dummy board. You need a small nozzle (approx. 8 mm diameter) to do selective soldering / de-soldering. It will not work well with the standard 20 mm diameter nozzle.
Once again, let me recommend to first try things out on a scrapped board.
You could even consider to buy a solder exercise board if you prefer
RE711001-LF | RE711001-LF, Single-Sided SMD Soldering Exercise Board FR4 for 57 Multiple Types Packages 100 x 140 x 1.5mm | Roth Elektronik
but scrapped boards are for free.
All the best and good luck.
Markus
Last edited:
Thanks, Markus. You've been very helpful.
Samoloko. You can just use the back panel 'On/off' switch to power up the amp.
Samoloko. You can just use the back panel 'On/off' switch to power up the amp.
Last edited:
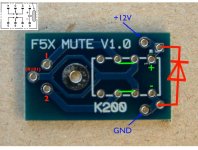
One other item, the automotive/speaker relays also need a protective diode, if they don't have one internally.
I now can switch on the amp but with no standby mode. The speaker senses are workin fine. With 3.5vdc it shut off the amp completely.
1) turn on back panel switch....few seconds later the MR led turn on
2) pressed front button.....nothing happen.
3) pressed another time....Blue Led turn on and so does the rest of the LEDs.
1) turn on back panel switch....few seconds later the MR led turn on
2) pressed front button.....nothing happen.
3) pressed another time....Blue Led turn on and so does the rest of the LEDs.
Last edited:
I now have the standby mode but lost the MR led. I can now toggle between standby and on but the main relay is off. I measure across the MR and get 1.3Vdc. I suppose it should be 2.4Vdc. Any help is greatly appreciated.
Alazira, this is the first time I hear of a diode for the speaker relay.
You can see the mute and regulator relays (D4) using protective diodes. Some automotive relays have built in diodes. If they don't, you should add one somewhere.
Attachments
DI I need to put the protection board onto the heat sink to test it? It seems that sometimes it is okay and then it's gone again.
- Home
- Amplifiers
- Pass Labs
- F5X -- the EUVL Approach - The Build Thread