No, you can mount it directly over the plastic base. Thats how I used a similar one with my old router.
Ok, I have some good news and some bad. Good ones - I am 99% ready to bring the jigs for anodizing, managed ot chamfer the mounting holes today and increase the bore to 4mm. The spare bolt (which is used as the guide in the center) extra two holes I managed to thread too so almost done. The bad one - the remaining 1% came because my father has given the 12mm threader to someone and never got it back so I will have to buy one tomorrow and do the auxiliary handle thread on the jigs. Then, they`re ready for anodizing which should take no more than a week and I will be ready to start sending them.
I have completed my end of work on the jigs, yesterday did the large 12mm threads for the optional handles. I`ve packed them and will bring them for anodizing tomorrow so hope to be sending them next week.
Ok, jigs are with the finishing company, they said i`d have them anodized Wednesday and will start dispatching.
Hi Mario
Sounds great. I have a subwoofer project were the next thing to do is to cut out the resessed hole for the woofer.
So I will put it to use immediatly.
Uwe
Sounds great. I have a subwoofer project were the next thing to do is to cut out the resessed hole for the woofer.
So I will put it to use immediatly.
Uwe
I may be the first due to postage delay on your side, I have a TL project which is short of schedule 😛
The anodizing company called me (just) - jigs are ready. I cannot pick them up today as am visiting a SQL course this evening but will pick them up tomorrow and will dispatch either Thursday or Friday, more likely Friday.
Guys, I was abroad last week up until Sunday evening and couldn`t pick up the jigs. I did today, looking good so will dispatch them Friday, as tomorrow is another complicated day. I will include a set of spacers in the envelope to be used for the under-router holes (diameters which require a hole that is under the base). Those will be M4 to M4 of this type: | 六角 スタンドオフ RS Pro スチール M3 x 5mm | 【通販RS】 These can be screwn in the router base and then easily to attach the jig to them.
All jigs but the one that goes to Bulgaria have been dispatched. Inside the envelope there is also a set of spacers for the POF-series routers (M4). The one going to Bulgaria I will send today in the evening.
Lol, that`s been quick, please do share your feedback. If all is fine, I will post the files on here should anyone want to make his own.
Got mine yesterday as well, but probably won't be able to test it until later.
Two questions for you Mario:
- How do you read the scales (just to be sure I understand it)
- Any ideas where to get a proper handle that fits in the "aux handle" hole?
Two questions for you Mario:
- How do you read the scales (just to be sure I understand it)
- Any ideas where to get a proper handle that fits in the "aux handle" hole?
Hi, good questions.
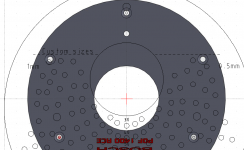
The scales in the middle show the radius for a 16mm bit. If you use an 8mm bit, you have to subtract 16-8=8mm, so on a 8mm bit the 100 scale will actually be 92mm. The two sides from the center hole scales are 1mm and 0.5mm resp. That means the radius to the left where it says 1mm is reduced by 1mm for every consecutive hole. So, 100 - 99 - 98 ... 9N (so diameter changes by 2mm for each step). The 0.5mm solves the problem so they go to the right as following 100mm - 99.5mm - 98.5mm ... 9N.5mm, hence the even diameter numbers go to the left and the odd diameters go to the right. Every step is 2mm on both sides, just the left is even (so d= 200 (center), 198, 196...19N) and the right is odd (so d=200 (center), 199, 197, 195...19K).
The handle is any standard plastic handle (spherical ones work best) M12 bolt. I have threaded all, including the spare 4mm leading pieces holes (so you can keep them on the jig, I always lose them around in the mess whe nI build something). To make it work best, you may add a nut first which can then be tighted against the jig to provide counterforce and keep the handle away of unwinding when you rotate the router to cut the hole. See this one for example: https://www.kipp.com/gb/en/Products...elements/Grips-and-knobs/Spherical-knobs.html Such handles are easily available from shops specialized in selling bolts/screws amd are cheap, EUR2-3 each.
The handle I added as optional. The reason was that in some rare cases I would need to push the jig so it doesn`t lift off from one side. So I put this to add either a knob or a ounterweight. Gives more control but has a drawback - the cable of the router may become entangled into it and that would be annoying.
More to this, if you`re using like a 1000-1200W router, you might operate it with one hand but I wouldn`t recommend doing it. On more powerful routers just avoid using it and keep your hands on the router, a few months ago I routed a piece of hardwood with a 2kW router and on one occasion it pulled me like a toy, so be carefull if using this with a more powerful tool. I would really abstain of using the handle unless the job really requires it (sometimes I does, unfortunately).
As noted in one of the first posts, the jig will cut slightly larger diameters than the radius shown on it, by 0.5mm in diameter larger. Reason is tollerance is loudspeaker basket design. It should enhance fitting and will reduce any andpaper grinding required. That said, when you do a 200mm diameter, it should really be 200.5mm.
Last edited:
Hi Mario
Did not receive mine yet.
Do you have any track and trace number?
Which company did you use for the delivery?
best regards
uwe
Did not receive mine yet.
Do you have any track and trace number?
Which company did you use for the delivery?
best regards
uwe
Jig received
Hello Mario
Jig Received.
Delivery guy drop it of in the wrong mailbox.
best regards
Uwe
Hello Mario
Jig Received.
Delivery guy drop it of in the wrong mailbox.
best regards
Uwe
Hi all,
Rather late to the party, but is there any chance of getting one of these?
Let me know price and who to send it to.
Thanks,
Chris
Rather late to the party, but is there any chance of getting one of these?
Let me know price and who to send it to.
Thanks,
Chris
Uwe, I just sent you a PM and now see you`ve got it...
Can anyone confirm it fits well the Bosch series of routers? I had to transfer their base manually and would appreciate any input if it fits as required.
Chris, I have none left as this was a one off. However, I was asked by others for more jigs and I sent them the files. Would that work for you?
The jig required its 12 o`clock hole to be moved to the left and down, when it was perfectly symmetrical it didn`t fit the DW625 base. I got edition 5 of the router. There is a possibility that the casting is not precise enough but it could also be on purpose - mentioning all this to keep it in mind. Before to proceed, I would suggest to print the .pdf file which is a real size export of it, punch the holes and see if it fits your tool
I will post them on here anyways for download but want a confirmation that the jig fits well with the Bosch base.
Hi Mario
Sorry to say but the jig does not fint My Bosch 1400.
Also the numbers on the sale are approximately 20 mm off.
Best regards
Uwe
Sorry to say but the jig does not fint My Bosch 1400.
Also the numbers on the sale are approximately 20 mm off.
Best regards
Uwe
I don`t understand, one of the recipients told me in a PM that it fits ok. I have attached the base of the POF1400 put against the jig below?
Are you mounting it using the screws that hold the plastic base plate (5 screws, 3 are used to mount it) or are you using the other 3 holes on the router base (these are for table mount)?
Are you mounting it using the screws that hold the plastic base plate (5 screws, 3 are used to mount it) or are you using the other 3 holes on the router base (these are for table mount)?
Attachments
- Status
- Not open for further replies.
- Home
- Group Buys
- EU: Router circle jig 56mm-420mm in 1mm step