Thank you Bud! So let me see if I understand this correctly.Here is the data sheet....or paper dolly sheet..... The pics are of ring placement on drivers. The dolly rings need to be cut out. The very thin rings actually sit above the ring sets you need to apply. This is easier than it sounds. You do not have to be perfect in applying these dots. Ask questions as you become confused.
1. Woofer & Tweeter Outer rings: I need to place the cutout of this ring over the cone and apply the dots just above the circumference of the cutout. Correct?
2. Woofer Mid, Woofer & Tweeter Inner rings: These need to be cut along the outer and inner circumference of the rings - like a donut, right? And the dots need to be applied along the inner circumference of the cutout. Correct?
3. Tweeter Mid ring: These need to be cut along the outer and inner circumference of the rings - like a donut and the dots need to be applied along the outer circumference of the cutout. Correct?
And a happy 2015 to you and all reading this!!!
#1 Yes. If you have OCD tendencies do consider using the thin red line as a start point and point all of them at the same local target. The applied rings are most correct with the spacing between bottom of applied pattern and placement ring top, equivalent to the same horizontal distance between the inner and outer placement rings.
#2 Yes. Use the picture from the PDF to guide you on actual placement of the rings that cover the join between dome and cone.
#3 Hmmmm. For ring pattern #5 the inner cut ring is to allow for the possibility that the tweeter domes have been resurrected, other than that it works like the outer ring. This #5 pattern is just the likeliest spot. You can learn the tap test and confirm or scale the PDF or send me the new dimension measured across the cone again. For ring pattern #6, use it as you will ring pattern #2.
An interesting part of the learning experience is to listen to a stereo presentation, 24 hours after you apply a pattern ring. The acrylic flat paint takes that long to properly set up. Do not apply any microgloss....yet.
Oh, and I have not been able to source the Microgloss locally yet. There might be an equivalent available but it may involve a lot of searching.
So, if I don't manage the Microgloss, would there be any point in going ahead with the dots?
So, if I don't manage the Microgloss, would there be any point in going ahead with the dots?
Oh yes. The micro gloss is there to help with phase issues and to quiet the cone fibers and reduce the small eruptions that you see in the Brit film. However, the dots do the heavy lifting here and since the tap tests took over ring placement, we use a lot less micro gloss.
Nearly as I can tell the micro gloss is an acrylic, industrial strength, floor polish and there are consumer materials, used by the plastic model makers, that duplicate the characteristics. Johnsons "Klear" and "Future/Pledge" floor finishes are prominent in modeling how to publications.
Nearly as I can tell the micro gloss is an acrylic, industrial strength, floor polish and there are consumer materials, used by the plastic model makers, that duplicate the characteristics. Johnsons "Klear" and "Future/Pledge" floor finishes are prominent in modeling how to publications.
Ok, so will I also need to treat the "0.5" woofer mounted at the back of the speaker enclosure?
Is that an actual driven woofer or is it mass load passive radiator?
For a driven cone a pattern like the mid woofer on the front and, usually a single pattern ring set on the back.
For a passive radiator, I haven't a clue, though I am certain a ring on the back will do no harm. For 7 inch and larger frame sizes with motor, another ring right at the cone edge will help with Raleigh wave propagation elimination. A backside damping strip of ever sticky glue is also needed for that purpose.
It's not a passive radiator but is driven. I will attempt to replicate the pattern on the front woofer on the back woofer too. Thanks Bud for your responses and guidance. I will report back when I'm done or if I have more questions.Is that an actual driven woofer or is it mass load passive radiator?
For a driven cone a pattern like the mid woofer on the front and, usually a single pattern ring set on the back.
Pictures
Pics PLEASE?!
I've seen several posts requesting pics.
Sifted through hundreds of pages of several different threads hoping to catch glimpse of what I've imagined you all are doing but...
Pics PLEASE?!
I've seen several posts requesting pics.
Sifted through hundreds of pages of several different threads hoping to catch glimpse of what I've imagined you all are doing but...
Pics PLEASE?!
I've seen several posts requesting pics.
Sifted through hundreds of pages of several different threads hoping to catch glimpse of what I've imagined you all are doing but...
They're painting little dots on their woofers and marveling at the difference in sound. I agree it is a little hard to imagine...but it sure as hell makes for some hilarious reading!
Pics PLEASE?!
Sifted through hundreds of pages of several different threads hoping to catch glimpse of what I've imagined you all are doing but...
planet_10 hifi | drivers
dave
They're painting little dots on their woofers and marveling at the difference in sound. I agree it is a little hard to imagine...
It does stretch the mind that those little spots are capable of doing the good things they do. I quit worring about it and just enjoy the results.
dave
my gratitude
thank you planet 10 for being a constant in the enable universe. My thanks also go to the no lesser stars like SOONGSC, DR MAMBONI, FRANCO LARGO, ALEX OF OZ, ED LAFONTAINE and many others who took interest, investigated, noted how murky the water is but took the plunge anyway and emerged to find out how green the grass is on the other side. Most of all to Bud P who unselfishly and without expectations of personal gain shared this idea with us, the DIY community. A week ago I took the plunge. Hold your breath with me. I will soon report.
thank you planet 10 for being a constant in the enable universe. My thanks also go to the no lesser stars like SOONGSC, DR MAMBONI, FRANCO LARGO, ALEX OF OZ, ED LAFONTAINE and many others who took interest, investigated, noted how murky the water is but took the plunge anyway and emerged to find out how green the grass is on the other side. Most of all to Bud P who unselfishly and without expectations of personal gain shared this idea with us, the DIY community. A week ago I took the plunge. Hold your breath with me. I will soon report.
Hi. Introducing "mini me". It is an eminence 15a crossed at around 4khz to a Vifa BC25SC06-04 in an open baffle. Bottom end is handled by 4 Hawthorne audio augies in two separate baffles. on a previous ob project, my son removed the alpha dustcap to install a tweeter and make a coax out of it. Didn't work very well. So after practicing laying the the pattern on a couple of smaller throwaway drivers I enabled the alphas. I used the generic pattern because I have trouble finding the zones as described by bud in the tap test directions. I have also laid 1 pattern on the back of the cine. No conformal coating had been applied yet. I will listen to them later today and will share with you my impressions
Attachments
it's 5 in the morning and i am giddy with my last listening session. i stayed up all night listening to my newly enabled speakers playing one cd after another. i was that little 6 year old again playing with a home made toy car that i made out of tin cans because my parents can not afford a mini tonka. that was a long time ago, growing up next to a rice paddy, in the philippines. forgive me for getting off track. back to what we've heard.
i have not applied the gloss coat yet but i definitely heard an improvement in the way the speakers convey harmony. the soundfield lost some of the grunge that used to mask the leading edges. i can also hear deeper into the decay. the most notable change i noticed is the silence between each individual note and there are times when i get startled with the arrival of an individual note even when i know that it is coming. i guess you can call that an improvement in prat. another improvement is the amelioration of that pesky shrillness at around 2khz to 3khz (i don't know exactly where and i have no way to find out). although it had not been eliminated it had been reduced to a level that is more tolerable. i would like it gone completely. maybe a pattern on where it resides (i honestly don't know where) or the conformal coating will completely resolve that issue.
i have not done anything to the tweeters yet. also, i would like to implement enable2 on another pair (dustcaps untouched) and i'd like to do a better job next time around.
dave, i know you were planning to treat an alpha 15 but you postponed the process. can you please guide me as to where i should locate the patterns for enable2? also, how should i enable the vifa tweeter with its 1 inch silk dome?.......later today i will apply the conformal coating on the pattern only. then i will listen for changes.
OK, here I am again post EnABL'ing my drivers.
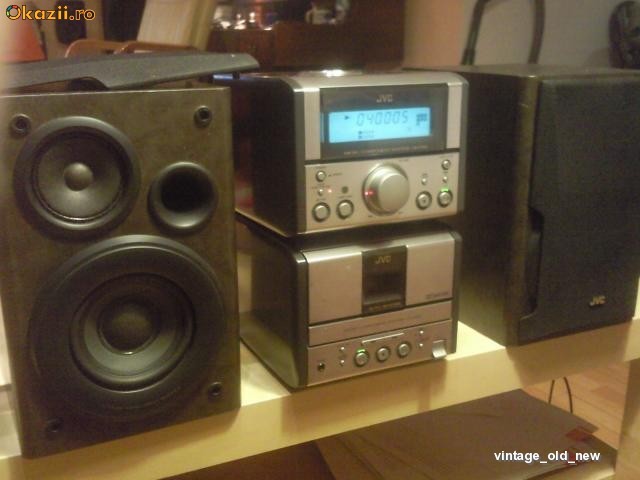
Back towards the end of 2014, I had explained what I did to my JVC micro component speakers. That post is here. Basically, I'd applied PVA to strictly lo-fi speakers and raised them up several notches.
I then got the itch to EnABL them and so, after some posts, Bud very kindly created the templates for the patterns for the mid-woofer and the tweeter and also drew up where they needed to be applied. That post is here.
The mid drivers are just 3 inchers and drawing the patterns seemed a daunting task which I had put off till 3 days ago when I mustered enough courage to apply the patterns as Bud had drawn up for me. I EnABL'd both the tweeter and the mid and it's now 48 hours since I applied the last EnABL pattern. Here's what has happened:
Strings are clearer and cymbals have more splash to them. Vocals seem better and harshness has receded. Separation has increased and the whole sound stage has more depth. That's the good part.
The bad part is that the bass is gone. PVA'ing the drivers had increased both the quality and quantity of bass - it was eerie that so much bass was coming out of such a small box. But it's all gone. According to my sonic memory the bass is now back to what it was before the PVA treatment. It is so weird that just some dots caused so much of a change.
Any ideas/suggestions on how I can get the bass back? Without the bass, they don't sound very enjoyable at all.
Did you remove the drivers to EnABL them? Box not properly sealed backup?
Nothing about EnABL should change the bass alignment.
dave
Nothing about EnABL should change the bass alignment.
dave
No the drivers were not removed from the box to EnABL them.Did you remove the drivers to EnABL them? Box not properly sealed backup?
Nothing about EnABL should change the bass alignment.
dave
I am going to assume that the box is ported.
EnABL will correct the phase structure of the wave front you receive. Were you to measure before and after, the data would show you have the same amount of bass as before. What you no longer have is time alignment in the "onion" of sound you are hearing. The mid/highs are now as coherent as they can be when still mounted in a box. The port is no longer in alignment. EnABL the port. This should bring the bass back the needed three or four degrees of phase, or, time alignment. Your hearing mechanism focuses on leading edge and if the mid high drivers are leading the bass in the onion of sound, you will have difficulty in "hearing" the bass.
A pattern around the outside of the port first. You can tap radialy away from the port to find a sonic discontinuity that will be an ideal place to put that outer port pattern. Or, you can just allow about a quarter inch between port and pattern inner edge. This may be all you need. OR, you may have to place a pattern on the inside too. Let's hope not!
I have eventually ended up with patterns all around the boxes, some at edges, some at mid wall position, just to completely free the sound from edge diffraction's, which then causes the box to sonically disappear. Lately I have eliminated boxes entirely, but still pattern the front plate and side edges of the open baffle I utilize.
In other respects, what you describe about the character of mids and highs is exactly as it should be.
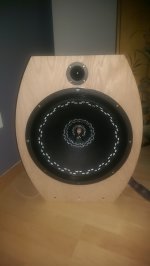
Thanks for posting Bud. Please take a look at the speakers. There's absolutely no way I could draw the patterns a quarter inch around the outside of the port. I think I could manage drawing the pattern on the "lip" of the port. Would that help?
- Home
- Loudspeakers
- Multi-Way
- EnABL - Listening impressions & techniques