I've had the "enabl" kit for a long time and now am ready to give it a try. Is there a general, updated, application guide?
My driver is a 4" paper cone mid/tweeter. No dust cap, but phase plug. The back of driver is a closed, dampened chamber but I can take it apart.
I am worried that the enabl process may decrease the driver's exceptional dynamics... thoughts on that?
Herman
My driver is a 4" paper cone mid/tweeter. No dust cap, but phase plug. The back of driver is a closed, dampened chamber but I can take it apart.
I am worried that the enabl process may decrease the driver's exceptional dynamics... thoughts on that?
Herman
I am worried that the enabl process may decrease the driver's exceptional dynamics... thoughts on that?
Don't be, unless you do something that's not recommended.
jeff
I've had the "enabl" kit for a long time and now am ready to give it a try. Is there a general, updated, application guide?
There are 3 consecutive posts early in the thread (of Bud's) i copoed from another forum that are a good guide, and later Bud explains the tap test that you use to figure out where to put the ring-sets (EnABL 2)
dave
Last edited:
Every waterfall plot we have available shows that the minor peaks and valleys are sharper and maintain their trajectory angle better with EnABL.
What you should hear is a more composed transient, across all transients, all at once. Means that one sudden bleat isn't going to cloud the rest of the complex signal, like it does in an untreated driver. Overall there will just be less confusion.
It will make a 4 inch driver competitive with much larger and more complex speaker systems, until they too are EnABL'd. At that point comparison audio goes up in smoke and the music takes over, center stage. Pretty soon you won't care what was or wasn't done, they will be that good at making you forget that you are listening to music through speakers.
That is, of course, if you follow the treatment guides and learn how to listen throughout a tap on the cone, to find out what must be placed just where. Once you learn to do that, no speaker system or box will present an insurmountable challenge.
How's that for hyperbole?
Once you have found the tap test sweet spots, obtain a drawing set dual pin, scissoring, measurement device and a dial caliper, to allow you to provide me with the exact diameter measurement for each needed ring. I will return that with a sheet you can print, cut out, place on the cone and use as a placement guide for the patterns.
You will likely need four rings on the cone, total. One near the center and three spaced fairly close together, out on the outer 1/2 of the cone. There have been surprises here.
You can place a single ring on the back side, it isn't required, it will help with information depth and slightly with propagation from the front, high frequency versus angle off center. With or without, expect room hot spots and nulls to disappear, regardless of frequency.
I am worried that the enabl process may decrease the driver's exceptional dynamics... thoughts on that?
Herman
Consider that the mass you are adding is nearly negligible, while the 'confusion' you are subtracting is not.
In my experience, the ear one develops through this process can influence one's tastes. I imagine we sound a bit religious, but the typical verbal imagery for sound that one learns to take with a grain of salt? It seems inadequate... I tell my friends that they are not so much hearing the instruments as "the space around the instruments". That's for well-engineered recordings, of course, while poor recordings are ever more obvious...
At the moment I am missing listening to my EnABL'd JBL's, which benefitted mightily! [It stands to reason that each driver will show a different amount of benefit.] My DIY electronics are 'in the shop' for upgrades, and the new house deserves nicer looking enclosures - a 'his-hers' compromise that I am happy to undertake.
Cheers,
Frank
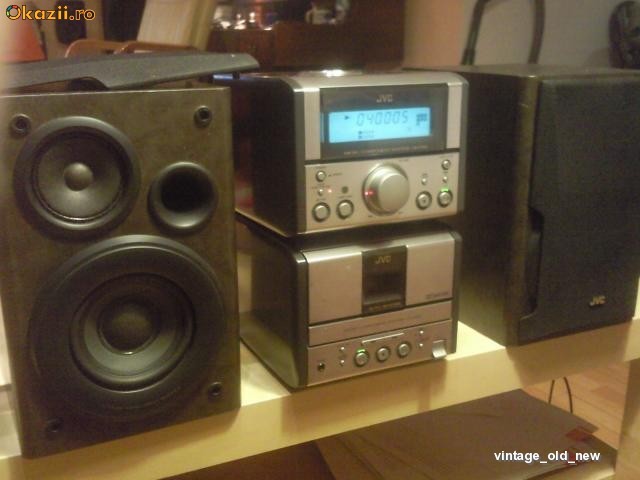
EnABL of micro component speakers
I have an old JVC micro component system which I use in the bedroom. Strictly lo-fi speakers but towards the end of last month, I applied 2 coats of diluted PVA glue on the mid-bass drivers [3 inchers]. The first coat was too dilute [50% water]. It penetrated the paper cone a little - didn't show through the back of the cone. This made a considerable difference to the sound. They just sounded more cohesive with the highs. For the next coat, I diluted the glue with only about 25% of water and applied a thin coat. Post drying, the sound changed even more. More better!!! They are now ALMOST hi-fi and I am enjoying them thoroughly 😀
I was wondering if EnABL would take them up a notch and I'm willing to try it.
First, a couple of pictures of the speakers linked from what I found on the internet.

The rear driver is identical to the front driver and is implemented as mentioned by Dave in point # 5 here.
Attached is a picture of what the front driver now looks like. I have some questions:
1. I have not coated the dust-cap. Would there be any benefit in coating this?
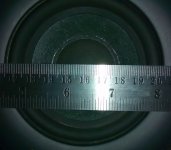
2. I have downloaded the generic EnABL pattern pdf drawn up by Dave. If I want to apply this pattern, where should the outer line of blocks start? At A or B marked in the attached picture?
3. I'm in India so the closest to the Floquil paint I have found here is this which I think should be OK. What do you guys think?
4. I had some of the acrylic paint lying around so to test it, I first used it straight off the bottle. Dipped an old fountain pen nib in it to draw a block on brown paper. The paint had a thick consistency but applying it into a block was not too difficult and it formed a skin quickly. I then diluted it with 50:50 ratio of water to paint and tried it. Was too dilute but I noticed that if I drew an outline of a block and then dropped a small drop of this dilution inside the block it would spread nicely within the outline. But, when this dried, the block didn't form a "bump" like with the undiluted paint. How critical is the "bump"? Should I be even diluting the paint in the first place? Should I dilute it with a lesser percentage of water?
5. I read that after the blocks are applied, a coat of Microglass needs to be applied. I have no clue what Microgloss is so can someone point me to a link describing this or if any of you know, can you let me know what it is made of? I will have to see if I will be able to source an equivalent here in India. If not, do you think I should go ahead with just the EnABL blocks sans the final coat of Microgloss?
I have an old JVC micro component system which I use in the bedroom. Strictly lo-fi speakers but towards the end of last month, I applied 2 coats of diluted PVA glue on the mid-bass drivers [3 inchers]. The first coat was too dilute [50% water]. It penetrated the paper cone a little - didn't show through the back of the cone. This made a considerable difference to the sound. They just sounded more cohesive with the highs. For the next coat, I diluted the glue with only about 25% of water and applied a thin coat. Post drying, the sound changed even more. More better!!! They are now ALMOST hi-fi and I am enjoying them thoroughly 😀
I was wondering if EnABL would take them up a notch and I'm willing to try it.
First, a couple of pictures of the speakers linked from what I found on the internet.
The rear driver is identical to the front driver and is implemented as mentioned by Dave in point # 5 here.
Attached is a picture of what the front driver now looks like. I have some questions:
1. I have not coated the dust-cap. Would there be any benefit in coating this?
2. I have downloaded the generic EnABL pattern pdf drawn up by Dave. If I want to apply this pattern, where should the outer line of blocks start? At A or B marked in the attached picture?
3. I'm in India so the closest to the Floquil paint I have found here is this which I think should be OK. What do you guys think?
4. I had some of the acrylic paint lying around so to test it, I first used it straight off the bottle. Dipped an old fountain pen nib in it to draw a block on brown paper. The paint had a thick consistency but applying it into a block was not too difficult and it formed a skin quickly. I then diluted it with 50:50 ratio of water to paint and tried it. Was too dilute but I noticed that if I drew an outline of a block and then dropped a small drop of this dilution inside the block it would spread nicely within the outline. But, when this dried, the block didn't form a "bump" like with the undiluted paint. How critical is the "bump"? Should I be even diluting the paint in the first place? Should I dilute it with a lesser percentage of water?
5. I read that after the blocks are applied, a coat of Microglass needs to be applied. I have no clue what Microgloss is so can someone point me to a link describing this or if any of you know, can you let me know what it is made of? I will have to see if I will be able to source an equivalent here in India. If not, do you think I should go ahead with just the EnABL blocks sans the final coat of Microgloss?
Attachments
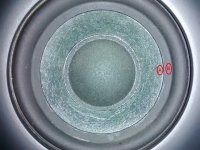
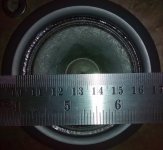
Had the time, so here is the first pic. Use it to tap test the driver to make certain you hear a change in decay direction of the tap, for the mid dome ring set. The others are generic, would be there regardless of gen 1 or 2. Gen 2 would likely have another ring set out on the cone, closer to the outer edge rather than in the mid point. Again a tap test will pin point that location.
As for Gloss, it is an industrial acrylic floor wax product. There are many to choose from but the one used by the plastic model builders will likely be the best. I assume India has plastic airplane and car models available and that store is where I would go for the Gloss (Micro Gloss commercially) or equivalent. Must be acrylic based material no matter the brand.
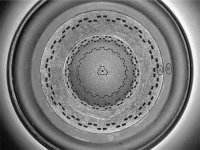
If you can take another picture like the woofer pic , one of the tweeter, I can show you where to put the patterns for it too
As for Gloss, it is an industrial acrylic floor wax product. There are many to choose from but the one used by the plastic model builders will likely be the best. I assume India has plastic airplane and car models available and that store is where I would go for the Gloss (Micro Gloss commercially) or equivalent. Must be acrylic based material no matter the brand.
If you can take another picture like the woofer pic , one of the tweeter, I can show you where to put the patterns for it too
Attachments
Thanks, Bud. If you can provide answers to some of my other questions (below), I'd appreciate it:
I have not coated the dust-cap. I'm assuming that the EnABL treatment needs to be done after coating the dust cap. Is this assumption correct?
The acrylic paint used to draw the blocks - should ii be used straight off the bottle or is it to be diluted with water? If diluted, by how much?
I will post a picture of the paper cone tweeter today. I'm assuming that this cone will need to be coated too before EnABL'ing it, correct?
I noticed this earlier if it helps..
Don't
Put Gloss on ANY driver and not also place the patterns on it. Instead you can use PVA only to coat the cone, dust cap and foam surround and end up with a much better sounding driver than one that has only gloss on it.
Thank you Allen. I guess that means I have to coat the dust cap too.I noticed this earlier if it helps..

Do not coat the dust cap until the patterns have been applied. Don't coat it with the modge podge / elmers white glue / PVA material in any case. Once the outer rings on the cone and dome rings are in place and everything has cured for 48 hours, you can then make some judgements about higher than piston produced frequencies. The outer cone ring provides a return to phase normal for higher frequencies and while I doubt this driver is used above 2 kHz it's still going to have output above the nominal cross over frequency, as cross overs only cut the signal by about 40 dB.
Don't dilute the acrylic paint that you make the EnABL pattern with. You want that 0.002 high bump.. Not because it is a bump, but because it provides variable stiffness to the spot on the cone that transverse waves rise from as they bounce around within the diaphragm, until they are fully damped.
If you post the pictures with and without a ruler laid across the top of the basket, centered, with the measurement edge just above the cone center point, I can make up the ring set guides that will allow you to apply the patterns in the correct places. I use the same tools for generating the PDF you can print out and cut the pattern guides from. Drop them onto the cone, center and apply the pattern just above the guide.
The quote that Allen provides comes from using PVA as an alternative to EnABL. Applied over the entire woofer it will provide just the benefit you have noted. Trust me, considerably better performance awaits application of the patterns.
For the tweeter do not coat it with anything until all of the patterns have been applied. The mid cone pattern might well move out larger in diameter or might not be needed, so leave it till last and listen carefully to the tweeters in that condition.
Then, probably, a 10 to 30% gloss to distilled water coat on the cone only, but not in a soaking coat, rather in a one side well drained brush load. If there is still beaming from high frequencies you may need another ring, on the center dome and a spot in the center of that dome. I doubt you will want more than a 10% gloss to distilled water mixture on the center dome and that not applied as a soaking coat but as almost a dry brush application.
So, these things go together in layers of application with listening for phase coherence, even dispersion of higher than 4 kHz frequencies and perceived sound field.
Attachments
For the tweeter do not coat it with anything until all of the patterns have been applied.
A little 'arm chair chemistry', speculating on this point... I wonder what you all think:
1) Cellulose is very hygroscopic. At 5% humidity, cotton fibers (composed of cellulose), are estimated to have a hydration layer of about 500 water molecules thick. This hydration layer improves water absorption in cellulose-based materials - e.g. cotton bath towels and many other cellulose-containing media like paper napkins or paper towels.
2) Cellulose is easy to do chemistry on because of charged hydroxyls on the hexose rings. They can be exploited in many ways for many purposes, as in the manufacture of specialized paper, cardboard, etc. in addition to speaker cones.
3) Water-bourne resins such at the PVA model paints used for EnABL Gen 1 patterns can soak into the cone paper, stiffening it more than if each dot rests merely on the surface.
Hence:
4) If you first seal the cone with Acrylic you limit penetration of subsequently-applied PVA patterns into the fiber matrix of the cone. ...and then most likely each dot will have a smaller effect (on intra-cone wave transmission velocity?).
Mostly correct Frank. Certainly the chemistry is impeccable.
However, these funny spots work even better on metal cones, without absorption being a factor.
However, these funny spots work even better on metal cones, without absorption being a factor.
- Home
- Loudspeakers
- Multi-Way
- EnABL - Listening impressions & techniques