Hello, I have a Electrocompaniet Ampliwire 250 that is having relay issue with one of the output channel. I know the relay is bad but the issue is how to get it off the PCB without destroying the board. It looks like some sort of glue or epoxy was used to adhere the relay to the pcb.
Has anyone here removed those relays without damage to the pcb?
Has anyone here removed those relays without damage to the pcb?
This is older post of mine but wondering is anyone here has any info on how to remove these relays safely from this amp without damaging the PCB. The relays were glued or epoxy into place. I tried removing them but looks like it with break the pcb, If I have to, I will use a Dremmel blade to cut them off but that is last resort. The leads are not soldered onto the pcb but are hard wired out of circuit with the relay housing glued to the pcb.

I was thinking of that too, just don't want to ruin the PCB since its a nice amp and other components around it. I could try sound shielding around relay to not hurt other components close by.
from what I see, it seems to be possible to simply remove the two heatsinks from the main pcb, once done, you can weaken the epoxy with a cutter blade and quietly, patiently you will end up taking off the relay.
I will be very surprised if it is epoxy but I have never seen the innards of this amp with my eyes.
the hot air gun will have no effect on the epoxy (if any)
I will be very surprised if it is epoxy but I have never seen the innards of this amp with my eyes.
the hot air gun will have no effect on the epoxy (if any)
I have had decent success using the back side of a broken off xacto blade, scraping away.
If it is a urethane adhesive, then heat may help to loosen it up.
Would be nice to have a soldering iron with an Xacto attachment.
Good that you aren’t in a rush, that would be the worst thing!
If it is a urethane adhesive, then heat may help to loosen it up.
Would be nice to have a soldering iron with an Xacto attachment.
Good that you aren’t in a rush, that would be the worst thing!
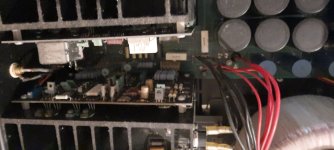
Here's what my Relay looks like in my AW-250. There are different versions so here is what I have.
You can barely see some sort of adhesive attaching the side of the relay to the PCB and the leads connected to the wire that go to the speaker connector.
You can barely see some sort of adhesive attaching the side of the relay to the PCB and the leads connected to the wire that go to the speaker connector.
Attachments

Actually, it's different from what I've seen on the net.
me, in a case like yours, I will leave the cover of the relay in place and I will only replace the interior.
me, in a case like yours, I will leave the cover of the relay in place and I will only replace the interior.
I will give this a try also, but I have the box cutting blades that may work even better.I have had decent success using the back side of a broken off xacto blade, scraping away.
If it is a urethane adhesive, then heat may help to loosen it up.
Would be nice to have a soldering iron with an Xacto attachment.
Good that you aren’t in a rush, that would be the worst thing!
@huggygood Yes, mine is different from the ones you see on the net. The one's on the net are AW250-R and relays are soldered to the PCB. This may have been a late revision change that lead to the R model. Hopefully the replays haven't been modified. The LEFT channel is fine, it's the RIGHT channel that is measuring bad. Resistance is all over the place, while the LEFT is measuring OPEN when the amp is off and CLOSED when the amp is on. RIGHT Never changes when amp is on or off.
If I can get this issue fixed and working fine I will have a very nice amp! 😉
If I can get this issue fixed and working fine I will have a very nice amp! 😉
Nah, that's just the dust. I went back and double checked it and cleaned it, it's fine do discoloration. I remember when I first looked at this amp with better eyes for stuff like that just in case it was something else that cause the relay to go bad. But I remember a Carver "The Receiver" 130 MX I had fixed had a bad channel and would come in and out. It was the same thing, a bad relay. Just replaced the relay and all was good. You would think relays would handle this type of circuits. If I'm correct with my memory, the side that is stuck to the PCB is the side with the P/N and other info which sucks if I can't read it for replacement or upgrade to a better relay. Electrocompaniet will not help either, before they were sold they would help but not anymore.
I had a Hafler amp which had a relay that was constantly chattering. It turned out to be the resistor that determined the threshold that was bad.
You only need to know its supply voltage and its number of channels, then you can buy a reputable brand model and then check, as Phase tells, if it is not the control circuit that is the problem .
Nah, not in a rush. This one of a few amps I need to repair that I have had for years.I have had decent success using the back side of a broken off xacto blade, scraping away.
If it is a urethane adhesive, then heat may help to loosen it up.
Would be nice to have a soldering iron with an Xacto attachment.
Good that you aren’t in a rush, that would be the worst thing!
Well, today I got into this and found out there is more to this amp than just the relay. Looks like the right channel has been mess with around this relay. I will remove that pcb with the relay and get to the bottom PCB that its plugged into and see what going on. I always thought it was just the relay but there is more. I really hate working on something that someone else has hacked up but at least I have a good working channel and schematic to help me out.
I tried removing the Clear plastic cover on the relay but it will not come off so I will have to be very careful and cut away that adhesive that is holding it on the PCB. I did get to see a green label inside the relay cover saying 60V DC. The good channel has the same thing. Good thing the pcb is small and easy to remove since it is a plug in module.
I will report back what more I find out.
- Home
- Amplifiers
- Solid State
- Electrocompaniet Ampliwire 250 output Relay problems.