I'll post some pictures when I have made a real PCB with this type of soldermask. The samples I have made by now contains a number of different tests.
Magura 🙂
Magura 🙂
jondavis said:have anyone tried flameproof solvent resistant spray paints which are usually used on engines?
I've thought about using that stuff (like the stuff mentioned here http://www.speco.com.au/vht.html), but I have a feeling (althought haven't researched it yet) that it may be conductive as it may contain metal particles to be able to withstand the temperatures found in the engine bay.
Mr Evil said:That looks really smart. Does it come in other colours?
Pretty much any colour you please.
Magura 🙂
Here's a list of all the colours:
http://store.allstainedglass.com/vit160pain.html
Thanks Magura (and Elkaid too for the original suggestion) for the pics. Looks really nice. Doesn't look homemade at all once the vitrea is on there doesn't it?
I can't wait to try it on my boards. I've got three different colours as I couldn't make up my mind what to use (I've got Pepper Red, Lacquer Blue, and Crimson).
Sorry, off-topic question, but Magura, just a quick question, do you use eagle for your PCB layout? If so, did you have to customise the libraries to include bigger pad sizes and smaller drill sizes for most components? I've noticed that the default Eagle resistors and capacitors have nowhere enough copper to properly solder some components and the drill holes are way too large.
Congratulations !
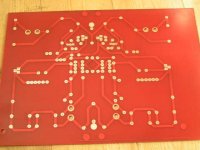
They're incredible ! Which method have you used to make your solder pads "shiny" ? I'm using liquid tin (like MG Chemical cat #421) before applying solder mask and that gives superb results.
great work !
Emmanuel
They're incredible ! Which method have you used to make your solder pads "shiny" ? I'm using liquid tin (like MG Chemical cat #421) before applying solder mask and that gives superb results.
great work !
Emmanuel
Emmanuel, I don't think Magura uses anything on the copper. It looks like the flash from the camera has made the copper look shiny. I could be wrong, but that's what it looks to me.
Which method have you used to make your solder pads "shiny" ? I'm using liquid tin (like MG Chemical cat #421) before applying solder mask and that gives superb results.
Here's another material you can use to plate the copper. You rub it on with a damp cloth with the result that you get a thin silver plate.
http://cool-amp.com/coolamp.htm
Elkaid said:Congratulations !
They're incredible ! Which method have you used to make your solder pads "shiny" ? I'm using liquid tin (like MG Chemical cat #421) before applying solder mask and that gives superb results.
great work !
Emmanuel
I have come to the conclusion that chemical tin plating is not offering the best adhesion to the copper. To get the best adhesion I use either tin bath and hot air to level it, or my preferred method for few boards, simply removing the oxide layer on the pads with a fine grind compound. The grind compound leaves the pads shiny as you see them on the photos. This should be done within a couple of hours before soldering, as the oxide will form will reform relatively quick.
Magura 🙂
I've also had good success with an ink eraser (those gritty grey coloured ones). Obviously, this is as Magura says, done just before soldering.
mangrovejack said:
Sorry, off-topic question, but Magura, just a quick question, do you use eagle for your PCB layout? If so, did you have to customise the libraries to include bigger pad sizes and smaller drill sizes for most components? I've noticed that the default Eagle resistors and capacitors have nowhere enough copper to properly solder some components and the drill holes are way too large.
No, I use PCB123, it makes no hole marks at all. I prefer it that way, as I have no problems drilling the holes freehand.
Magura 🙂
This is what I've been using...
Testors - 1601
Trans. Candy Green 3 Oz. Spray Can
Testor All purpose Enamels are fast drying, easy to apply and can
be used on many kinds of surfaces. Finely ground pigments mean
superb flow and coverage. All colors are carefully controlled from
batch to batch and each bottle color exactly matches its
corresponding aerosol spray color. Testor bottle and aerosol
spray enamels are all lead free. *****NOTE*** Enamels require
48 Hrs. to completely cure.
My only complaint is that it's slow drying. But It's easy to apply.
The film is transluscent and looks like pro when you're done. Can
solder right through the ccoating without difficulty (no masking
needed). Also... it doesn't melt if you want to iron on a layer of
toner silkscreen and TRF foils.
(Can also do the silkscreen in toner, then apply TRF foils, and THEN
paint it. Paint is translucent, can see right thru it.)
Wish I could pictures, but I don't have a working camera at the moment.
Testors - 1601
Trans. Candy Green 3 Oz. Spray Can
An externally hosted image should be here but it was not working when we last tested it.
Testor All purpose Enamels are fast drying, easy to apply and can
be used on many kinds of surfaces. Finely ground pigments mean
superb flow and coverage. All colors are carefully controlled from
batch to batch and each bottle color exactly matches its
corresponding aerosol spray color. Testor bottle and aerosol
spray enamels are all lead free. *****NOTE*** Enamels require
48 Hrs. to completely cure.
My only complaint is that it's slow drying. But It's easy to apply.
The film is transluscent and looks like pro when you're done. Can
solder right through the ccoating without difficulty (no masking
needed). Also... it doesn't melt if you want to iron on a layer of
toner silkscreen and TRF foils.
(Can also do the silkscreen in toner, then apply TRF foils, and THEN
paint it. Paint is translucent, can see right thru it.)
Wish I could pictures, but I don't have a working camera at the moment.
Metod used to protect the pads of Vitrea
Please Magura, can you tell me how to protect the pad zones of coating with Vitrea?
You use a manual metot, positioning little pieces of rubber.... hand-placed?
and can you tell me the name of vitrea colour the corrispond with the classical green used in industrial PCB's?"
(Sorry for my poor english)
thanks a lot.
Re: Metod used to protect the pads of Vitrea
I made a few tools, to stamp self adhesive pads of the respective shapes and sizes. Yes they're placed manually.
As for the number of the green color, sorry no clue. I am about as colorblind as they come.
Magura 🙂
qwerty said:Please Magura, can you tell me how to protect the pad zones of coating with Vitrea?
You use a manual metot, positioning little pieces of rubber.... hand-placed?
and can you tell me the name of vitrea colour the corrispond with the classical green used in industrial PCB's?"
(Sorry for my poor english)
thanks a lot.
I made a few tools, to stamp self adhesive pads of the respective shapes and sizes. Yes they're placed manually.
As for the number of the green color, sorry no clue. I am about as colorblind as they come.
Magura 🙂
- Status
- Not open for further replies.
- Home
- Design & Build
- Parts
- DIY solder mask