I trapped my single thread (but looped so in fact two ends) at the magnet, by the pressure from the magnet.....my magnet is screwed into a tapped hole in the arm. I would have created a knot and just dropped it below the magnet but the hole in my magnets are too large. I still do not know for sure how frank does this but I believe he drills his own holes in the magnets. Small holes, so that a few knots on themselves create enough of a knot to keep it from being pulled up through the magnet and arm....If so this has the benefit of ensuring the thread is perfectly centered and also at the lowest point possible (which I have understood to be desirable compared to locating the bottom pivot point of the thread higher up in the arm/above the magnet)
I still do not know for sure how frank does this but I believe he drills his own holes in the magnets.
No holes in magnets XXXXXX time!
I understand that you do not put holes in the magents. You create a space in the arm right above the magnet....but what does frank do regarding that bottom thread termination?
As I understand (and that is how I did it) there is a set screw in the pivot arm, right above the top magnet (which is pressed under the set screw) and this set screw has a small hole in the center where thread goes through. Knot is under the set screw and above the top magnet.
hmm, so this is similar to what zeonrider does but he just creates the space in the aluminum end tube itself......So what frank does is before the magnet goes in, that set screw is placed, the thread is tied off and then the magnet goes in? but I was under the impression all his parts are made to be disassembled which would mean he could not glue in that magnet.....if so what holds his magnet in place ?
As I understand (and that is how I did it) there is a set screw in the pivot arm, right above the top magnet (which is pressed under the set screw) and this set screw has a small hole in the center where thread goes through. Knot is under the set screw and above the top magnet.
Yes, finally.
Both magnets are (in my case) tight pressed, not glued, in the base and in the arm. To disassemble unscrew the set screw, no need to touch magnet, it should stay as is.
Last edited:
Both magnets are (in my case) tight pressed, not glued, in the base and in the arm. To disassemble unscrew the set screw, no need to touch magnet, it should stay as is.
really? I find it hard to imagine one could get a tight enough fit to keep either magnet from being pulled out of its socket due to the strong magnetic force. I believe you accomplished this, its just hard to imagine.
or maybe I am still misunderstanding. what setscrew are you referring to? Are you calling the allen type grub screw that is above the magnet and holding the knot, 'the set screw' and if so, how could that be accessed without first taking out the magnet in the arm?
really? I find it hard to imagine one could get a tight enough fit to keep either magnet from being pulled out of its socket due to the strong magnetic force. I believe you accomplished this, its just hard to imagine.
its called an interference fit. you drill a slightly smaller hole than the diameter that the magnet is going into then press fit the magnet into that hole. you can use bearing lock compound as well but usually not needed.
do you have any pics of your build?
I understand what a friction/interference fit is but still I am either misunderstanding some aspect of your build......the only way I could imagine a friction fit of the magnet may be if you heated up the aluminum prior to installing the magnet so it expanded and when cools down traps the magnet/ This is often referred to as a 'shrink fit'....But it sounds like you just pressed it in and it holds. the magets I've got have enormous pulling power and one would pull the other right out of any hole I drilled no matter how tight.
I understand what a friction/interference fit is but still I am either misunderstanding some aspect of your build......the only way I could imagine a friction fit of the magnet may be if you heated up the aluminum prior to installing the magnet so it expanded and when cools down traps the magnet/ This is often referred to as a 'shrink fit'....But it sounds like you just pressed it in and it holds. the magets I've got have enormous pulling power and one would pull the other right out of any hole I drilled no matter how tight.
Last edited:
Thank you sir. That is assuring that I am not getting carried away. (I do this to explore and little creative mental exercise 🙂) Here are two more modifications one is a metal tortion clip to hold the thread in place. Second is keeping the base magnet on a ball bearing. This I guess is for uneven magnetic attraction the two magnets may be having. So As tonearm moves the base magnet also moves so pull is even in all position.
Thanks again and regards. 🙂
Hello again after a long absence from this thread,
It looks like this thread is revisiting designs that were discussed years ago and were tested with very good results. This link takes you to photos of one of my very old designs that I found most satisfactory. Please go to www.apricot.com/~bgruhn/turntable/magarms.html . This arm still exists and works well.
Nice to see activity still going on with the magnetic bearing designs.
BillG
Last edited:
Hi Plexi,
An interference fit will be strong enough to hold the magnets in place if it deserves the designation 🙂 I do use an arbor press to assemble/disassemble both upper arm/magnet combo and the bottom magnet pot.
Only one grub screw in the original: above the top magnet, hole diam. same as thread diameter(less than half of what zeonrider mentioned above). And a zero-slack threaded hole for grub screw... no deviation from perpendicularity possible once perfectly aligned, even when magnet gap width or antiskating setting is altered.
Check out my patent drawings. Two options shown for attaching the lower end of the thread(see fig. 3...).
@ Bill. This version still suffers from easily avoidable friction between the thread and the side wall of the armwand/tube. It also raises the effective attachment point, generating a restoring force that is detrimental to the function of the arm. But, simple and easy to replicate, so ideal for DIYers that don't have access to elaborate maching tools.
Cheerio,
Frank Schröder
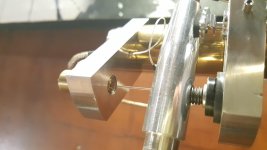
I had to use steel ball pivot to clamp the string with a bolt.
to a position above, I give a small bearing to prevent twist of string. quite helpful.


watch in my Schroeder version TA:
https://youtu.be/KGoU4lul5O0
to a position above, I give a small bearing to prevent twist of string. quite helpful.
watch in my Schroeder version TA:
https://youtu.be/KGoU4lul5O0
Attachments
- Home
- Source & Line
- Analogue Source
- DIY Schroeder Tonearm?