Hi Gents
I've read the interesting suggestions about a diy turntable bearing. A member mentioned that an OHC engine's shim could be used. From what I remember, such shims are case-hardened only on the one side (usually where the thickness is etched).
I reckon with a well-setup lathe in a home workshop, a turntable bearing and bush should be possible. In my own workshop at home, I have a Myford Speed 10 lathe - nothing fancy but I had some help from a friend to set it up perfectly and can turn and bore any part within the chuck's capabilities perfectrly dead-centre.
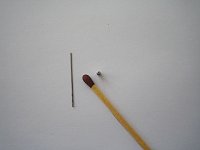
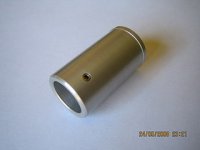
The little part shown here has 2 o/d's - 1.8mm and 0.5mm. Right through, I drill a hole of 0,3mm and at the thicker section at the back, another hole of 1.5mm.
I also show a Garrard 301 grease bearing's bearing shaft and other parts. The metal polish was not used on the chucked and turning shaft, only on a lintfree cloth and done by hand to avoid ovality or other problems.
bulgin
I've read the interesting suggestions about a diy turntable bearing. A member mentioned that an OHC engine's shim could be used. From what I remember, such shims are case-hardened only on the one side (usually where the thickness is etched).
I reckon with a well-setup lathe in a home workshop, a turntable bearing and bush should be possible. In my own workshop at home, I have a Myford Speed 10 lathe - nothing fancy but I had some help from a friend to set it up perfectly and can turn and bore any part within the chuck's capabilities perfectrly dead-centre.
The little part shown here has 2 o/d's - 1.8mm and 0.5mm. Right through, I drill a hole of 0,3mm and at the thicker section at the back, another hole of 1.5mm.
I also show a Garrard 301 grease bearing's bearing shaft and other parts. The metal polish was not used on the chucked and turning shaft, only on a lintfree cloth and done by hand to avoid ovality or other problems.
bulgin
Attachments

Bulgin,
that little shaft is quite amazing - real precision watchmaking stuff. Can you tell more about how you made it?
harwoodspark, the price for this kind of stuff has tumbled in the last few years, the digital slides and reader came to well under £400. I put any money from the arm kits into better equipment - new milling machine with the same digital readout is on the list next. Working to sets of x-y co-ordinates with these modern aids dosen't make you work any better (see Bulgin's pics for proof of that) but you do work much faster, especially when making more than one of something.
Hello Gents
The ideas given here in this interesting thread are of course all innovative and it would be a great idea to purchase or obtain two perfectly mating parts which can be used with no or minor mods for a turntable bearing.
I'm sure such a combination exists, somewhere - but I haven't discovered anything yet. An idea would be to befriend someone at a precision engineering workshop. Engineers are friendly people and may have a fresh take on what you need and where to find it.
The idea with posting the earlier pics was also to show what's possible to make for yourself on basic toolroom equipment.
In every day life, I cannot imagine what difficulties and frustrations I will encounter if I didn't have a lathe or mill, cannot weld or braze things and I am reminded every day about how much money I save by being able to make things for myself.
More than a 100 years ago, some men got together in England and founded the Model and Experimental Engineer's Society.
Here in Cape Town, we also have a branch - also more than 100 years old - which you will find in cities in other countries as well.
Being a member of such an organisation will give you access to advice, machine tools and ideas to make almost anything you need.
The above is OT but the point I'm trying to make is that it is perfectly possible to modifiy existing parts or machine your own tt bearing on modest home equipment and the advice needed to do a proper job is out there for the asking. Either on this forum or from the blokes from the engineering societies.
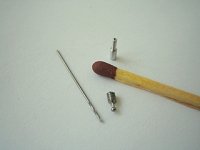
The little parts shown here are bits from a moving coil cartridge. Almost 10 years ago, I couldn't afford one, so I decided to try and make one. By chance, I heard about the CTSMEE (the local Society for Model and Experimental Engineers) and this was where I learned about lathes and mills.
My angling partner is a toolmaker. After I bought the machines, he helped me to set them up for great accuracy in machining small parts.
The things I make are insignificant compared to what I have seen on this very diy forum. I don't want to mention names. You know who the gents are, and they come from all corners of the globe. It is from them that we should take inspiration and learn from their ingenuity.
bulgin
The ideas given here in this interesting thread are of course all innovative and it would be a great idea to purchase or obtain two perfectly mating parts which can be used with no or minor mods for a turntable bearing.
I'm sure such a combination exists, somewhere - but I haven't discovered anything yet. An idea would be to befriend someone at a precision engineering workshop. Engineers are friendly people and may have a fresh take on what you need and where to find it.
The idea with posting the earlier pics was also to show what's possible to make for yourself on basic toolroom equipment.
In every day life, I cannot imagine what difficulties and frustrations I will encounter if I didn't have a lathe or mill, cannot weld or braze things and I am reminded every day about how much money I save by being able to make things for myself.
More than a 100 years ago, some men got together in England and founded the Model and Experimental Engineer's Society.
Here in Cape Town, we also have a branch - also more than 100 years old - which you will find in cities in other countries as well.
Being a member of such an organisation will give you access to advice, machine tools and ideas to make almost anything you need.
The above is OT but the point I'm trying to make is that it is perfectly possible to modifiy existing parts or machine your own tt bearing on modest home equipment and the advice needed to do a proper job is out there for the asking. Either on this forum or from the blokes from the engineering societies.
The little parts shown here are bits from a moving coil cartridge. Almost 10 years ago, I couldn't afford one, so I decided to try and make one. By chance, I heard about the CTSMEE (the local Society for Model and Experimental Engineers) and this was where I learned about lathes and mills.
My angling partner is a toolmaker. After I bought the machines, he helped me to set them up for great accuracy in machining small parts.
The things I make are insignificant compared to what I have seen on this very diy forum. I don't want to mention names. You know who the gents are, and they come from all corners of the globe. It is from them that we should take inspiration and learn from their ingenuity.
bulgin
Attachments
Hi
@ Jeff
That little tube is turned and drilled on the Myford from apiece of aluminium roundbar. There were many false trails when I started making them eg high speed @ 20K rpm needed for drilling with a .3mm drillbit and of course the tool I bought was hopelessly inaccurate, so - it was back to see what the Myford could do.
Nice website you have😀 Now, can we please have a Rega arm with a secure-fitting detachable h/shell😀 😉
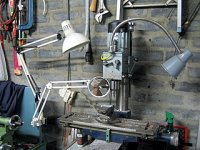
Don't laugh, but here is the little mill. I've recently also fitted an articulated truck mirror so I can see the inside of the nearside vice jaw. The lathe lamp also swings over towards the mill so the job is lit from both sides.
bulgin
@ Jeff
That little tube is turned and drilled on the Myford from apiece of aluminium roundbar. There were many false trails when I started making them eg high speed @ 20K rpm needed for drilling with a .3mm drillbit and of course the tool I bought was hopelessly inaccurate, so - it was back to see what the Myford could do.
Nice website you have😀 Now, can we please have a Rega arm with a secure-fitting detachable h/shell😀 😉
Don't laugh, but here is the little mill. I've recently also fitted an articulated truck mirror so I can see the inside of the nearside vice jaw. The lathe lamp also swings over towards the mill so the job is lit from both sides.
bulgin
Sorry, can't upload a pic on the last post for some reason, tho' it is the correct size for here.
Cheers
bulgin
Cheers
bulgin
Bulgin, like you and many others who post here, I couldn't imagine what life would be like if I couldn't make the things I want. If I can make it myself I will. I have a well equiped workshop but I've only had my lathe a short time. It's old and not very accurate but it works. When I've grasped the fundamentals I'll buy something better. Threads like this are very encouraging!
Jeff, I've just realised who you are. I post on the Crossover as Chopsaw. Have those Rega armtubes arrived yet?
Si.
Jeff, I've just realised who you are. I post on the Crossover as Chopsaw. Have those Rega armtubes arrived yet?
Si.
Hi Guys,
At the risk of hijacking this thread even more, I've heard this morning that I should have a supply of brand new RB251 arms within a week or two now at a price well below the second hand rate, so I'll pass them on at cost as part of an arm build.
Bulgin, I definitely take my hat off to you for making such tiny parts on the Myford!
Detachable headshell? How about interchangeable armtubes - I can do that one, if I built an arm with a Hadcock-style connection instead of taking the wires down through the base the whole cartridge/armtube/counterweight assembly could swap by undoing the bearing caps.
Vinyl-Addict,
I'm in the same boat as many of the posters here, trying to make a decent bearing with only a mini-lathe and an inability to surrender easily. Most of the machinists in this area wont touch the tolerances we're discussing, and the aerospace shops that will, understandably laugh it off or want big $$$. I know you're a machinist, so I have some questions.
If I were to drill a pair of bronze bushings undersize, then ream very slightly undersize, how would you go about "honing" the hole w/out very special tools? If I actually tried honing the hole, I'd be concerned about the abrasives used getting stuck in the bronze. Someone suggested reaming undersize, then reversing direction, and using the final sized reamer, to burnish the hole. My other concern would be getting a square hole and one not tapered, at the tolerances I would be working at. I can only align the lathe so well. Any ideas?
Zach
Capt Zach said:Vinyl-Addict,
I'm in the same boat as many of the posters here, trying to make a decent bearing with only a mini-lathe and an inability to surrender easily. Most of the machinists in this area wont touch the tolerances we're discussing, and the aerospace shops that will, understandably laugh it off or want big $$$. I know you're a machinist, so I have some questions.
If I were to drill a pair of bronze bushings undersize, then ream very slightly undersize, how would you go about "honing" the hole w/out very special tools? If I actually tried honing the hole, I'd be concerned about the abrasives used getting stuck in the bronze. Someone suggested reaming undersize, then reversing direction, and using the final sized reamer, to burnish the hole. My other concern would be getting a square hole and one not tapered, at the tolerances I would be working at. I can only align the lathe so well. Any ideas?
Zach
Capt. Zach, Since you can't hone the bushings I would suggest buying oil less bronze bushings from McMaster-Carr. They are really inexpensive so you could buy a few in case you have problems installing them or obtaining the correct fit. There are issues with the oil less bushings because they are porous so machining them after installing them is not really recommended but it can be done if you use a very sharp boring tool.
The key is to make sure the pores are still open to allow the oil to seap from the bushing through the heat generated by spindle rotation. I would never ream the bushings (only as a last resort), boring is much more accurate provided you have a lathe that is capable of doing the job.
http://www.mcmaster.com/
Your other option is to just finish bore the bronze bushings after you press them into the bearing housing. Honing is really icing on the cake (so to speak) because you can better control the diameter, straightness, and cylindricity of the bore.
How much machining experience do you have and what is your lathe capable of turning?
Vinyl-Addict,
Thanks for all of your help. I have a few years as an amateur machinist, so I have a decent understanding of these things, but am also aware of my limitations. I have a decent mini-lathe that I've progressively modified to be more accurate. The main issues I would run into would be first the question of alignment accuracy, and the natural limits the lathe would have. I believe that my ability to do a precision bore at the right finish would be limited by the overall stiffness of the small lathe.
You're suggesting using the oillite bushings, right? I could press them into the bearing housing so that they were undersize. Another possibility could be to bore ream regular bearing bronze undersize, then hone the rest of the way. I've been warned though by one machinist I spoke to that the abrasive would embed itself in the bronze. Would you agree that normal abrasive honing techniques wouldnt work in this case?
Thanks,
Zach
Capt Zach said:Vinyl-Addict,
You're suggesting using the oillite bushings, right? I could press them into the bearing housing so that they were undersize. Another possibility could be to bore ream regular bearing bronze undersize, then hone the rest of the way. I've been warned though by one machinist I spoke to that the abrasive would embed itself in the bronze. Would you agree that normal abrasive honing techniques wouldnt work in this case?
Thanks,
Zach
Zach, Forget about honing. You need the proper machine to do this. Bronze can be honed successfully using the right equipment.
Oil lite bushings can be pressed in so that they compress the proper amount to obtain the desired clearance.
www.symmco.com/smcogrfx/pilot-drvr.pdf
Obviously there are more accurate methods but this is an example of how it can done. It's up to you to decide if it is satisfactory.
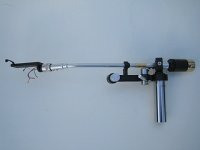
And a spacer bush so I could use my other Micro MA505 arm interchangably with a Grace G-727 Gyro Master. There are two locking grubscrews for firm fixing and adjustment up or down.
As a matter of interest, in Aussie, there's a gent by the name of Vince Da Man (Vince Hamilton of Once Audio) who makes the most exquisite tt parts. I'm not sure if he posts here but perhaps you should take a look at his website to see real quality maching.
bulgin
As a matter of interest, in Aussie, there's a gent by the name of Vince Da Man (Vince Hamilton of Once Audio) who makes the most exquisite tt parts. I'm not sure if he posts here but perhaps you should take a look at his website to see real quality maching.
bulgin
Attachments
Vinyl-Addict said:
........then hone the rest of the way. I've been warned though by one machinist I spoke to that the abrasive would embed itself in the bronze...............
Zach, Forget about honing. You need the proper machine to do this. Bronze can be honed successfully using the right equipment.
Are we mixing up honing with lapping?
Finish lapping is a traditional technique definitely available to the amateur and one that can achieve the level of finish and precision we need providing you have the patience to make the necessary split laps and then the time to practice. Because it's essentially a hand technique it doesn't depend on the precision of the machinery. Still widely used by makers of model steam and petrol engine cylinders, just very time consuming and dependent on the experience of the operator.
Just wanted to pass along some info i have discovered while constructing my turntable and bearing.
I chose the Shovel Head valve and guide idea from the Altmann turntable and remember someone saying that one of the problems with setting up this type of bearing is that the ball needs to be precisely in the middle of the shaft for the least friction and how the best way to achieve this would be.
I have discovered drill bits that have a small tip at the end that primes the hole for the larger diameter to enter. This prime tip sticks out about 1/8" or so and when I was drilling the hole to mount the valve guide, i realize once clearing the hole, that the bit created a perfect little pocket for the ball to sit in. This made alignment perfect. After spinning the platter on it for a while, i pulled the valve out to see that the ball had positioned itself perfectly where it should be.
The bits are made by DeWalt and I purchased them at Lowes. Shouldn't be hard to find, so if anyone decideds to go this route, this definietly makes things very easy to set up this bearing.
Hope this helps someone.
Joe
Be careful with drills!
A twist drill doesn't really make a hole that's round or accurate in engineering terms.
For bearings like this, I think we need to achive a pretty high standard of fit and finish - at most 0.002mm. and a surface of a few microns.
As Vinyl-Addict said way back, to get this you need to either have access to modern professional equipment or amateur equipment and a lot of time and patience (and be prepared to reject a few parts and many hours work!)
That might sound a bit stuffy but it would be a shame to spend weeks making platter and plinth to find that the turntable will never be great because the bearing, the most important component, isn't perfect.
Hi there, I just started a new thread on this but it applies here to to some extent.
This it the bearing to a 1950's -60's record cutting lathe turntable. It is quite thick at about an inch in diameter and also has a gearbox which spin a flywheel below a a greater speed. Very interesting. Lots of pics in this post too.
http://www.diyaudio.com/forums/showthread.php?s=&threadid=142734
cheers
- Status
- Not open for further replies.
- Home
- Source & Line
- Analogue Source
- diy bearing idea