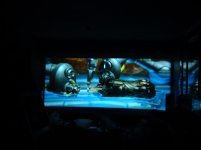
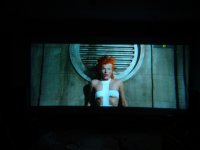
Bud Bray said:Wow! Those pix DO look good, even the Kill Bill which we noticed wasn't nearly as sharp as the superbit. Ya, we now have bowing on all sides so i'm going to build another housing for the twin medium lenses & try that. The tilting down IS the solution but I think right now I have the lens too far away from the projector...tonite i'll fix that.
Getting closer!
Thanks again ROAR, sorry it was a bit late last nite, great camera work!
Bud
Never a problem Bud! Had fun, Fifth Element looked AMAZING! I'll try and find you the Japanesse version of Kill Bill so you can watch it in all its intended glory 🙂
Mark Techer said:
I loved those films, but I couldn't remember them as scope 😕 as the last time I watched them was before my CIH system...
I think I am going to have to shout myself a treat soon with KB 1 and 2...
Mark
Mark, I'm a huge fan of the of Kill Bill movies, but I haven't bought them yet... I had heard once that he planned on re-releasing them as one movie and I thought I might wait for that, I also had heard there was supposed to be a box set released for them that I'd like to get if the full version never comes out... I'd love to pick up the Japanesse box sets, but those things cost a fortune on ebay!
OK, just built a new housing for the 2 dual-medium prism sets, angled downward & closer to the PJ lens. NO top or side bows, SLIGHT bottom bow. BUT WOW! What a picture! I have this housing mounted lower than yesterday's & using same-size lenses seems to have done the trick! I'll take some pix & post (they won't be as good as ROAR's but nobody's perfect.
Yes, i'm thrilled...it REALLY works!
Bud
Yes, i'm thrilled...it REALLY works!
Bud

Roar,
Isn't Japan part of R1? If so, why is it different? I do believe there is a box set for the KB films...
Bud Bray,
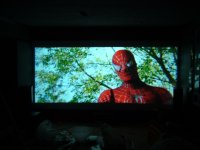
WOW that last shot of Spider Man is looking good 🙂 The others look good as well, but the SM just shows the whole screen...
The math for "scope video" is 1.7777777 x 1.3333333 = 2.3703702, so 2.37:1 is correct for video...
Mark
Isn't Japan part of R1? If so, why is it different? I do believe there is a box set for the KB films...
Bud Bray,
WOW that last shot of Spider Man is looking good 🙂 The others look good as well, but the SM just shows the whole screen...
The math for "scope video" is 1.7777777 x 1.3333333 = 2.3703702, so 2.37:1 is correct for video...
Mark
Mark Techer said:Roar,
Isn't Japan part of R1? If so, why is it different? I do believe there is a box set for the KB films...
Bud Bray,
WOW that last shot of Spider Man is looking good 🙂 The others look good as well, but the SM just shows the whole screen...
The math for "scope video" is 1.7777777 x 1.3333333 = 2.3703702, so 2.37:1 is correct for video...
Mark
I'm pretty sure Japan is region 2, but it is the ratings that changed the film for North America, MPAA strikes again...
This is from imdb's facts section kill bill...
The black and white photography is ultimately an homage to '70s and '80s US television airings of kung fu movies. Black and white (as well as black and red), were used to conceal the shedding of blood from television censors. Originally, no black and white photographic effects were going to be used (and in the Japanese version none are), but the MPAA demanded measures be taken to tone the scene down. Tarantino merely used the old trick for its intended purpose, rather than merely as an homage.
I know of two box sets for kill bill, both were only released in japan one for each of the movies, both push 100 or more US on ebay.
Any other box sets you've seen I'd guess are more of a 'bundle' then a box set... that is of coures Australlia a different release then noth america... which is of course entirely possible 🙂
If you know of one, please pass the info along, I'd love to get my hands on one!
Re: My First Post
Hi John,
Don't confuse Zoom range with "Throw Ratio" which is defined as projection distance divided by image width. In the case of the DT-200 it ranges from about 1.875 with no zoom to 1.519 at full zoom (1.2). For compatibility with anamorphic lenses, the higher the throw ratio the better. This reduces the chance of vignetting (cropping the edges) or other optical distortions near the edges of the image. Your projector should work fine but try to set it up with the least amount of zoom possible, this keeps the light beam as narrow as possible, allowing for the use of smaller wedges and less distortion. The somewhat protruding lens and shape of the cabinet on the Sharp would also be ideal. I suggest you try the "paper test" to help determine which size wedges to start with.
Keep us posted on your progress!
Tekdredger
johnstof said:My projector is a Sharp DT-200 which has a short throw of 1.2. I should say I think it's 1.2 since the spec sheet says the lens zoom is 1-1.2. Steve, I would like to know what your projector is and if you or anyone has a 4:3 projector with such a short throw. How does this affect the function of the wedges?
Thanks everyone.
John
Hi John,
Don't confuse Zoom range with "Throw Ratio" which is defined as projection distance divided by image width. In the case of the DT-200 it ranges from about 1.875 with no zoom to 1.519 at full zoom (1.2). For compatibility with anamorphic lenses, the higher the throw ratio the better. This reduces the chance of vignetting (cropping the edges) or other optical distortions near the edges of the image. Your projector should work fine but try to set it up with the least amount of zoom possible, this keeps the light beam as narrow as possible, allowing for the use of smaller wedges and less distortion. The somewhat protruding lens and shape of the cabinet on the Sharp would also be ideal. I suggest you try the "paper test" to help determine which size wedges to start with.
Keep us posted on your progress!
Tekdredger
Thanks a lot Tekdredger,
I'm sorry to ask another question that has probably already been answered many times but what is the paper test? Can you point me to a page number in this thread so I can read up?
Thanks.
John
I'm sorry to ask another question that has probably already been answered many times but what is the paper test? Can you point me to a page number in this thread so I can read up?
Thanks.
John
johnstof said:Thanks a lot Tekdredger,
I'm sorry to ask another question that has probably already been answered many times but what is the paper test? Can you point me to a page number in this thread so I can read up?
Thanks.
John
The paper test is easy. Just hold a piece of paper in front of the paper at about the place where the prisms will sit. Then you get a good idea of what the size of the image will be at that location. You can see what size prism you will need to make sure that the entire image passes through the prisms without getting cut off (vignetting).
I received 2 small lenses today, first results are mixed. I haven't spent too much time tweaking them, only about an hour or two. The CA is worse then I was expecting at the edges, perhaps I will try VC, perhaps it will help. The blue CA is really bad at the edges, perhaps about 1/4-1/2 an inch.
Current setup: Pana AEU900E 1280x720 LCDx3, Dalite DaMat 80x45 white screen 1.0 gain, lens is 12' from screen, HC with lenses.
Here are some pictures taken with a 3MP camera:
2.35 106x45 test pattern - on wall with lenses
lenses front
lenses top
16x9 80x45 test pattern - on screen no lenses
16x9 80x45 shot - on screen no lenses
wall/screen - this shot shows the difference between projecting on my wall and my damat screen, if you dont have a screen get one, it makes a huge difference.
I made these test images in PSP, feel free to use them. They can help you see moire effects, barrel distortion, CA, and subtle problems with image geometry or blurring caused by dirty lenses.
raw 1.78 test pattern
raw 2.35 test pattern
James
Your going to get CA no matter what type of lens you use - CA happens because your bending light so is there for both HE and VC...
0.5" to 1.0" sounds extreme, but so long as it on the edges, and not in the image, then you should not have a problems - your masking should cover it. I probably have a bit less than 0.25"
I can't open any of your links (wants notepad as default?) to comment on the images...
Mark
0.5" to 1.0" sounds extreme, but so long as it on the edges, and not in the image, then you should not have a problems - your masking should cover it. I probably have a bit less than 0.25"
I can't open any of your links (wants notepad as default?) to comment on the images...
Mark
OK. I am anticipating that I will make a two prism unit. I am assuming that the first prism should be as close to the lens as possible (correct?). Say that's 1 -2 inches. Then I estimate the next prism will be roughly 2-4 more inches away from the first. For those of you who have made these before, am I in the right ballpark for prism distances.
Regardless, am I correct in assuming that I want to do the paper test for the prism farthest from the lens?
Thanks again guys.
John
Regardless, am I correct in assuming that I want to do the paper test for the prism farthest from the lens?
Thanks again guys.
John
John,
When I did my first paper test, I placed the paper hard against the lens of the projetor. Then repeated the test at about 8". The lens I built is 8" deep and for my 1.3 throw ratio, I needed the front prisms (one facing the screen) to be no less that 7" wide, so the 5.5 x 7.5" prisms works out to be perfect...
Mark
z2895 said:I received 2 small lenses today, first results are mixed. I haven't spent too much time tweaking them, only about an hour or two. The CA is worse then I was expecting at the edges, perhaps I will try VC, perhaps it will help. The blue CA is really bad at the edges, perhaps about 1/4-1/2 an inch.
When trying to stretch 4:3 to 21:9, I also noticed the huge amount of CA on the edges. But that is an extreme amount of stretch exacerbating the CA in the image. When I stretched 4:3 to 16:9, the CA, while still present, was nowhere near as bad.
Since, with the AE900, you are only going 33% stretch, I am surprsied you see so much CA on the edge.
With respect to the test pattern that you show--it appears that there are focussing issues with the lens in place. Is that the camera, or is that what you saw? In my case, I noticed that the image was slightly defocused on the edges. Thanks for the test patterns--I will try these out next time I get the image up and running. (Incidentally, I am slowly getting my prisms together, and do a little bit more each night. I found a pretty good adhesive that is sticking, so I should be able to drill a couple of holes this evening, and get everything together.
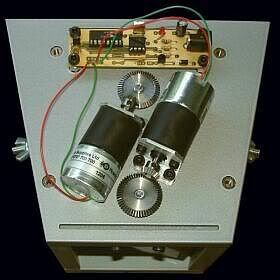
It would be great if this thing worked. I would sell my panamorph in a second. I may even take it a step further and try to hook up a motor/IR to automatically rotate between stretch and pass through. Anyone with some experience? It certainly doesn't appear that difficult, the only difficulty perhaps being the amount of rotation given to the motors--done by a circuit board in the Pr*sonic:
Incidentally, I don't think any color matters for the housing. You may want flat black to hide the apparatus better. I picked white, because I went with shelving--pre-coated mdf shelving from the local hardward store, and all they had was white or faux-wood. I thought, instead of having to paint it later, I would just use one that was already done...
Yes there were focusing problems with the lenses, I think this was caused by smudges though. I will take some up close pictures of the CA at the edges so you guys can see what I'm talking about. I think I'm going to relocate my projector slightly higher so that way I don't need to use the lens shift or leveler feet as much.
Mark: The pics shoud open fine in IE, I am using a .txt extension hack for geocities hosting, they are just .jpgs renamed to .txt. I was thinking the CA would be less dramatic in VC rather than HE, even though the ratio is the same 1.33, for VC you are only compressing the image 15" rather than expanding it 26" in my case, which should equate to almost half as much CA. Although this might not 'look' better as humans are more sensitive to vertical resolution rather than horizontal resolution.
Also it may be time to start a new thread, this thing is ungodly, perhaps a moderator can just split this whole thread in 2 at the point where steve suggested the crystal prism lenses. The whole discussion turned at that point quite abruptly.
I had thought that we needed out own thread for some time, but what can happen then is some one with some useful info then posts in the wrong thread, and then people might just miss out because they don’t check both. Besides I think it kind of cool that we are now into the 80's 🙂 making this one of the bigger threads here…
As for CA with your wanting to go VC, you get opposite effects to that of the HE. Steve, please step at any time🙂
To simplify this, instead of getting the CA at the left and right for the HE, you will more likely see it top and bottom for the VC.
When you project a panned image, you may notice that parts of the image seem to get slightly wider right at the edges of the screen using a HE, where you see the opposite happen with a VC for vertical panning - IE that is a slight compression of the objects in the vertical plain.
At some point in time, you have to accept a degree of compromise. After all, this is a DIY kit that can be had (for you guys in the States) for less than $100, and you're putting it together yourselves, so there is bound to be glitches along the way.
I have been doing this for over a years now, so am pretty confident that I can obtain a correct result that is pleasing to most. I'm sure the pincushion bothers some, as would the barrel if I had not corrected that already. Yes there is some softening of the images, it is too be expected with a HT projector that was NOT intended for this application.
If 100% perfection is your goal, then you need to spend big $$$ on systems like Runco CineWide that are purpose built for the task where the primary lens in the projector is modified for the fact that it will be used with an anamorphic lens later…
Mark
Sorry to say but Mark is right, a 2 prism lens system has a LOT more CA than a 4 prism system. With my 4 set, I have a slight line 1/8 inch along the right border. The difference between a 2 & 4 is quite substantial. Apparently, the supplier is out of stock till October but in my opinion, the purchase of 2 additional prisms is more than worth it.
Mark: You talked about creating a gap between the 2 prisms of one set, what difference would that make? Wouldn't it just act as if the two were side by side? I'll try it out & report back.
Mark: You talked about creating a gap between the 2 prisms of one set, what difference would that make? Wouldn't it just act as if the two were side by side? I'll try it out & report back.
Mark, quick question. I just noticed that SUPERMAN RETURNS will be released as 2.40:1 ratio! Should we all be setting up for THAT max ratio?? The THX seating post you did quotes 2.39 as THX standard. I realise it's personal preference but we DO want the best we can get.
- Home
- General Interest
- Everything Else
- The Moving Image
- Optics
- DIY anamorphic lens