Bud Bray said:Oh, another thing Mark. You suggested curving my screen, ya that would be a good idea but i've already secured it to the wall most of the length so a curve is out, at least on this screen, i'll curve the next one. I have noticed the slight stretch at the sides but you REEEEALY have to look for it.
The longer the throw, the less likely you will need a curved screen. I have seen an extremely long throw and a Prismasonic H1200 (4 prism lens) in action on a 3m wide scope screen, and there is NO edge distortion at all, where mine is the very opposite. It is a very short throw, so has larger amounts of pincusion and barrel. I find barrel more offensive than pincushion, so I did curve my screen to compensate...
I've just had a mate that is very technically minded over and we have just nutted out a whole plan for making a thread adjusted screen curvature system (that he'll no doubt go draw up on CAD 🙂) that is fixed in the centre. Depending on how your screen is fixed to the wall, and if you really need a curve, you might be able to wedge a small block of wood under the ends. Again only if you need to. Run lots of light tests (IE watch movies) to see how it goes...
Bud Bray said:Also, the LBX mode on the HD72 cuts some of the bottom off when watching 16:9 in anamorph mode. I know, you're NOT supposed to watch them like that but thought i'd check it out.
If your taliking about watching a 1.85:1 film in the 235 mode, then you chopping off about 25% (12.5% top and 12.5% off the bottom). Some films won't look bad this way, but if your losing the tops of the heads, then you need to change your projector back to the 4 x 3 mode so you can see the full vertical picture height...
If you talking about slight image clip from 235 films, then don't worry too much, I have found this as well. Basically the hoizontal squeeze that the horizontal expansion lens will offset is 33%, but the letterboxing is only 25%, so 33 - 25 = 8 / 2 = 4% image clip top and bottom. I did a A/B comparison with some shots from T2, and your supposed to see the top of Terminator's flat top, which gets cut off using the projector to scale the image...
In regards to your 4 prims lens and the light reflections - did you have the right angles facing in so that both Hypotinuse of each prism now faced out?
Mark
Mark Techer said:
In regards to your 4 prims lens and the light reflections - did you have the right angles facing in so that both Hypotinuse of each prism now faced out?
Mark
OK, don't have the hyp together? They must all face out? I'll try that. I did notice the picture seemed sharper with the 4, the 2 seemed almost the colours were bleeding a bit. Probably just my setup so far.
BTW, this is gonna be one HEAVY sucker! 4 Prisms about 3 lbs each!
Alignment is the key 🙂
By colour bleed, are you referring to CA (the blue red and yellow) on the edges of objects?
As has been stated, the 4 prisms lens is far superior to the 2 prism lens, so yes, will appear sharper as it has less CA...
If your prisms are anything like mine, they will be (in plan) a right angle triangle. For a 2 prism lens, face them in, and for a 4 prisms lens, I would suggest placing the prisms in pairs so that both HYPs face each other. The prism face will be slightly smaller than what you have for the 2 prism lens, but I think that you won't have to stagger them as much (well I think you know this already), so you shouldn't need the largest face anyway, but at the same time, you should have a rhomboid( irregular 4 sided shape?) instead of a triangle. It will be sysmetrical, with the small face now forming two faces. This will most def need covering. I'll get you to try the HYPs out as well, could be onto something here 🙂
What I found (back in the water prisms days) was that I could get a better stretch by placing the right angles (my water prisms were 30/60/90, where these prisms are closer to 15/75/90) to point in to the centre of the lens rather than out to the screen and projector. I found that by using the HYP of the triangle, I had a larger prisms face, and therefore had no vignetting issues. I also found that the side reflections (those that come off the smallest face) were greatly reduced. You still need to block off those small ends for which I used duct tape.
Yes these lenses are heavy. I had mine apart tonight (should have weighed them) and yes, a two prisms lens is heavey and a 4 prisms lens is going to need a very solid mount. I would say that my prisms way as much as the water prisms, but are about 1/3rd the size as they are no where as long or thick, but they are very heavy.
I played with the alignment tonight and got the best, most even stretch I have ever had. It turned out, I had to pan the projector slightly as well, but the image is sharp now on both sides with the slight CA only at the very ends now. I used text to check this...Very happy 🙂
Mark
Bud Bray said:
OK, don't have the hyp together? They must all face out? I'll try that. I did notice the picture seemed sharper with the 4, the 2 seemed almost the colours were bleeding a bit. Probably just my setup so far.
By colour bleed, are you referring to CA (the blue red and yellow) on the edges of objects?
As has been stated, the 4 prisms lens is far superior to the 2 prism lens, so yes, will appear sharper as it has less CA...
If your prisms are anything like mine, they will be (in plan) a right angle triangle. For a 2 prism lens, face them in, and for a 4 prisms lens, I would suggest placing the prisms in pairs so that both HYPs face each other. The prism face will be slightly smaller than what you have for the 2 prism lens, but I think that you won't have to stagger them as much (well I think you know this already), so you shouldn't need the largest face anyway, but at the same time, you should have a rhomboid( irregular 4 sided shape?) instead of a triangle. It will be sysmetrical, with the small face now forming two faces. This will most def need covering. I'll get you to try the HYPs out as well, could be onto something here 🙂
What I found (back in the water prisms days) was that I could get a better stretch by placing the right angles (my water prisms were 30/60/90, where these prisms are closer to 15/75/90) to point in to the centre of the lens rather than out to the screen and projector. I found that by using the HYP of the triangle, I had a larger prisms face, and therefore had no vignetting issues. I also found that the side reflections (those that come off the smallest face) were greatly reduced. You still need to block off those small ends for which I used duct tape.
Bud Bray said:BTW, this is gonna be one HEAVY sucker! 4 Prisms about 3 lbs each!
Yes these lenses are heavy. I had mine apart tonight (should have weighed them) and yes, a two prisms lens is heavey and a 4 prisms lens is going to need a very solid mount. I would say that my prisms way as much as the water prisms, but are about 1/3rd the size as they are no where as long or thick, but they are very heavy.
I played with the alignment tonight and got the best, most even stretch I have ever had. It turned out, I had to pan the projector slightly as well, but the image is sharp now on both sides with the slight CA only at the very ends now. I used text to check this...Very happy 🙂
Mark
Re: Alignment is the key 🙂
OK, just tried the 4 prism set again...put the HYP together...No CA. At least no where near what I was previously seeing (not seeing any at all now but that's just me). Still have vignetting at the side but it's still just testing so not too worried. Will try to take some pix now & post.
Bud
Mark Techer said:
If your prisms are anything like mine, they will be (in plan) a right angle triangle. For a 2 prism lens, face them in, and for a 4 prisms lens, I would suggest placing the prisms in pairs so that both HYPs face each other. The prism face will be slightly smaller than what you have for the 2 prism lens, but I think that you won't have to stagger them as much (well I think you know this already), so you shouldn't need the largest face anyway, but at the same time, you should have a rhomboid( irregular 4 sided shape?) instead of a triangle. It will be sysmetrical, with the small face now forming two faces. This will most def need covering. I'll get you to try the HYPs out as well, could be onto something here 🙂
What I found (back in the water prisms days) was that I could get a better stretch by placing the right angles (my water prisms were 30/60/90, where these prisms are closer to 15/75/90) to point in to the centre of the lens rather than out to the screen and projector. I found that by using the HYP of the triangle, I had a larger prisms face, and therefore had no vignetting issues. I also found that the side reflections (those that come off the smallest face) were greatly reduced. You still need to block off those small ends for which I used duct tape.
Mark
OK, just tried the 4 prism set again...put the HYP together...No CA. At least no where near what I was previously seeing (not seeing any at all now but that's just me). Still have vignetting at the side but it's still just testing so not too worried. Will try to take some pix now & post.
Bud


Seems my housing will be bout 8"x10"...not TOO bad. Thinking i'll have to do a FIXED lens since i'm combining 2 together. I'll try gluing something across top & bottom to see if they will hold together to do a rotation type.
I'm SOOOOO excited!
I wonder if Prismasonic or Panamorph read these forums?
WATCH OUT GUYS! DIY's RULE! Oh YA!
I'm SOOOOO excited!
I wonder if Prismasonic or Panamorph read these forums?
WATCH OUT GUYS! DIY's RULE! Oh YA!
Incase I haven't said it before & I probably speak for most of the people on this forum....THANK YOU MARK for all your input. NONE OF US would be doing this if it weren't for the efforts of people like you.
Bud
Bud
Bud Bray said:OK, here's a pic...I have to start using a tripod, guess i'm too shakey, out of 10 pics 2 are good. ANYHOW... aside from the bow at the bottom cuz its not angled down to match the light beam, I think it is turning out pretty good.
Bud, The images look pretty good. I try to always use a tripod for photo as well. It just gives you the same position when taking multiple shots...
As the bow at the bottom (barrel), this can be corrected by bending the screen. Your projector seemes to behave the same as mine - IE the image starts at either the top or the bottom and works up or down, depending on how the projector is set up. It does not start in the centre and work out is whay I am trying to say, so like mine, the bow is at the bottom only. My "curved" screen is almost straight at the top, and curve is applied to the bottom rail and correct the bow that you see now, which is why my images appear nice and straight...
But it is looking very good so far 🙂
Bud Bray said:OK, here's a pic of the prisms just in front of the lens on a board (and a box and a ladder!)
Is that masking tape? I used duct tape and will buy some black gaff tape first chance I get. That's a big *** lens 🙂 And to think the ISCO III boys thought their's were big and heavy 🙂
Bud Bray said:Couple more pix...remember it's a 3.1 megpix camera with a amature taking the shots! BE KIND!
Again very good. I noticed that you have CA only on the far left side of the image. Thats impressive, well done. See the 4 prism lens is worth the extra $$$...
Bud Bray said:Seems my housing will be bout 8"x10"...not TOO bad. Thinking i'll have to do a FIXED lens since i'm combining 2 together. I'll try gluing something across top & bottom to see if they will hold together to do a rotation type.
I'm SOOOOO excited!
I wonder if Prismasonic or Panamorph read these forums?
WATCH OUT GUYS! DIY's RULE! Oh YA!
Watch out indeed 🙂 Originally I was chasing 8" x 8" x 7.5" and I got that for the 2 prisms lens, but yesterday, it was confirmed that I would need to add at least another 1" to the front for a 4 prisms version...Anyone ever considered a 6 prism lens?
Bud Bray said:Incase I haven't said it before & I probably speak for most of the people on this forum....THANK YOU MARK for all your input. NONE OF US would be doing this if it weren't for the efforts of people like you.
Bud
Your more than welcome Bud and thank you 🙂
This has been a huge learning curve and I only hope this thread continues this strong for some time. It is amazing what some of us have achieved through sharing ideas and thoughts.
I only wish the thread starters would come back to see how big this has got. I mean this thread has almost doubled in the last 12 months with the largest growth spurt in the last few weeks.
Truly great and why I love DIY...
Mark
Had a chance to go by Bud's this evening... a most gracious host who was kind enough to answer all my questions and on top of that stood on his ladder for almost an hour to hold the prisms in place while he demoed the difference between 2 and 4 prisims. All I can say is WOW! Picture quality looks fantastic, I thought 11 feet may be too wide for me, but after seeing it in person, I'm not so sure, I may have to go 11 ft now too 🙂
Thanks so much for your time Bud, much much appreciated!
Thanks so much for your time Bud, much much appreciated!
The beauty of CIH is just that - you can go wider without strain on the senses. If your screen was an 11 foot 16:9, it would be huge and in most cases, unacceptable. The scope ratio of 2.37:1 works really well becuase that 11 foot screen is just over 4 1/2 feet, not over 6 feet high.
The optimal seating distance is going to be 1.54 x the screen width or just under 17 feet. You could also say 3.68 times the height as well which works out to be about the same. Intestesingly enough, that is the distance your supposed to watch a 16:9 screen (of the same height) from as well and I know that I prefer the back row in my cinema for all video AR images from just 12:9, 16:9 and of course 21:9...
So Roar, did you notice a huge difference between 2 and 4 prisms?
Mark
The optimal seating distance is going to be 1.54 x the screen width or just under 17 feet. You could also say 3.68 times the height as well which works out to be about the same. Intestesingly enough, that is the distance your supposed to watch a 16:9 screen (of the same height) from as well and I know that I prefer the back row in my cinema for all video AR images from just 12:9, 16:9 and of course 21:9...
a most gracious host who was kind enough to answer all my questions and on top of that stood on his ladder for almost an hour to hold the prisms in place while he demoed the difference between 2 and 4 prisims. All I can say is WOW!
So Roar, did you notice a huge difference between 2 and 4 prisms?
Mark
Mark,
Not sure I'd call the difference huge. Bud was pointing some things out, but to my untrained eyes I thought both looked great.
For the cost I think I'll go 4 just for the sake of argument. I was surprised with weight of these things, the medium ones certainly have some girth to them, 4 of them with some wood on them will make for quite the enclosure.
roar
Help! Mark & Steve! I'm still having a bit of a barrelling problem on the bottom. Still setting up on a board & tilted it downwards, like the pj beam, thinking it would correct it but not completely. It seems to be the same with a 2 or 4 prism set. Is curving the screen upwards the ONLY solution? If so, i'll just use masking on the very bottom...
Bud
Bud
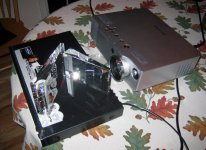
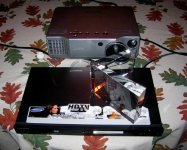
I got to play with the prisms tonight. I set up my AE900 on out dinette table with a Samsung HD960 right in front of it. I placed the prisms on top of the DVD player. I had about a 19.5 foot throw and the 2.35 image was 10 feet wide.
Awsome! Just totally awesome! I followed Marks 3 step plan and it worked perfectly.There was the ever slightest CA on the sides of the image. A very thin blue vertical line. I looked real close but I could not see it in the image though. I had a slight bowing on the top edge. Nothing that couldn't be tweaked out. I mean, All I did was set the prisms in front of the pj nothing scientific or measured AT ALL. Hopefully my attachments will make it.
Here are the pj/prism/DVD setup pics:
Attachments
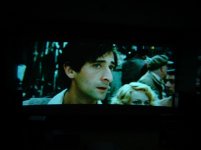
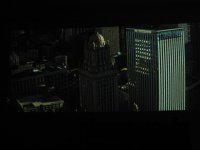
Screenshots of Batman Begins. They're not the best. I didn't adjust them at all except for resizing. I was sitting at 11 feet.
Alas my theater is still in the design phase so the images were projected on our living room wall which is an off white color. Maybe a .8 gain at best?
Shot 1:
Alas my theater is still in the design phase so the images were projected on our living room wall which is an off white color. Maybe a .8 gain at best?
Shot 1:
Attachments
- Home
- General Interest
- Everything Else
- The Moving Image
- Optics
- DIY anamorphic lens