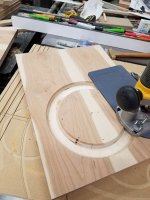
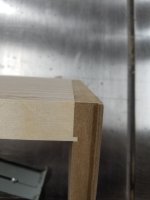
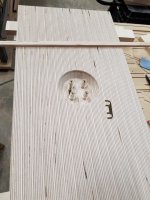
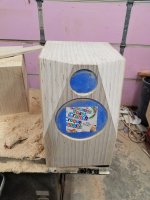
Here is a little work on the cherry veneered side panels for my InDIYana 2023 project, one side gets a Dayton DSA270-PR passive radiator and the other remains plain.
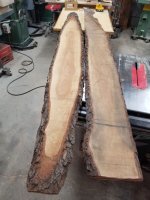
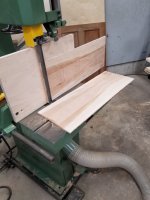
I knew I had been hanging onto some really gnarly cherry boards that were bought as part of a lot at an auction many years ago, and this was a good time to use them up as thick veneer for the sides of the translam enclosure.
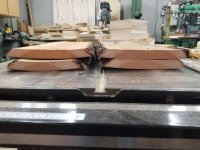
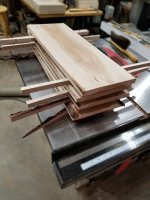
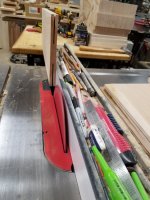
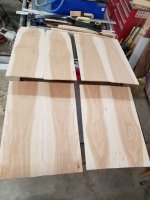
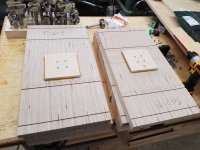
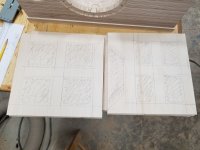
Dressed them and mostly resawed them with a 3/32" Freud rip blade, finished on the bandsaw. Book matched panels were glued up and surfaced on a drum sander.
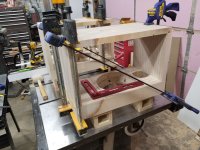
I don't have a vacuum press setup, so I made a torsion box and a platen to cold press the thick veneer onto the 3/4" Baltic birch sides.
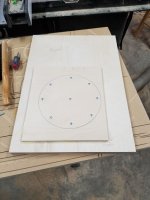
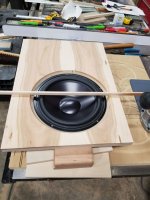
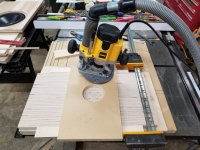
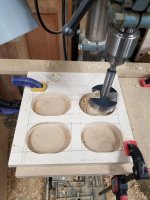
For ease of travel, I wanted the surround of the passive radiator to be beneath the surface of the panel, so I added a second thickness of 1/2" Baltic birch to the back of the sides to allow for a deeper rebate. Rebate was cut in with 30º bevel sign making bit.
I knew I had been hanging onto some really gnarly cherry boards that were bought as part of a lot at an auction many years ago, and this was a good time to use them up as thick veneer for the sides of the translam enclosure.
Dressed them and mostly resawed them with a 3/32" Freud rip blade, finished on the bandsaw. Book matched panels were glued up and surfaced on a drum sander.
I don't have a vacuum press setup, so I made a torsion box and a platen to cold press the thick veneer onto the 3/4" Baltic birch sides.
For ease of travel, I wanted the surround of the passive radiator to be beneath the surface of the panel, so I added a second thickness of 1/2" Baltic birch to the back of the sides to allow for a deeper rebate. Rebate was cut in with 30º bevel sign making bit.
Attachments
-
 44 - firewood 1.jpg210.3 KB · Views: 145
 -
 45 - firewood 2.jpg210.2 KB · Views: 131
 -
 46 - cherry jointed and planed.jpg188.4 KB · Views: 117
 -
 47 - start resaw on table saw.jpg221.6 KB · Views: 116
 -
 48 - finish resaw on bandsaw.jpg173.9 KB · Views: 124
 -
 49 - pretty book matched panels.jpg194.9 KB · Views: 115
 -
 51 - sand panels.jpg187.4 KB · Views: 118
 -
 50 - glueup cherry sides.jpg176 KB · Views: 117
 -
 52 - coldpress 1.jpg216.2 KB · Views: 111
 -
 53 - coldpress 2.jpg170.6 KB · Views: 114
 -
 54 - size thick veneer.jpg235.9 KB · Views: 113
 -
 55 - coldpress thick veneer onto ply.jpg252 KB · Views: 119
 -
 56 - flushtrim veneer to ply.jpg220.3 KB · Views: 112
 -
 57 - panels veneered.jpg192.9 KB · Views: 109
 -
 59 - sign making bit with added bearing.jpg119.4 KB · Views: 119
 -
 58 - making sides thicker for PR recess.jpg155.5 KB · Views: 113
 -
 60 - PR rebate.jpg206.7 KB · Views: 136
 -
 61 - PR inset in side panel.jpg199.6 KB · Views: 153
 -
 62 - mock up of side panel in place.jpg179.2 KB · Views: 160

It is well-known that such tweeters avoid cabinet edge diffraction problems, albeit at the cost of narrower dispersion.
That controlled narrowing of the dispersion is the entire point of the waveguide to begin with!
Hi Dave, can you shown some responses of the Wavecor woofer? I believe it has a strange dip around 200-400hz.
Dave, full points on the nice concept and follow through regarding the book matched thick veneer - a much ignored procedure.
Since my last installment,
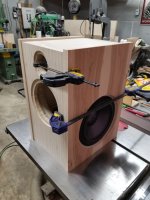
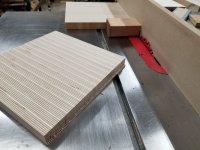
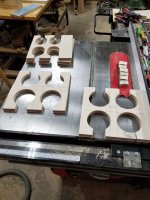
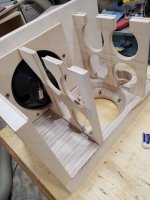
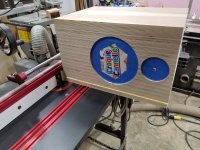
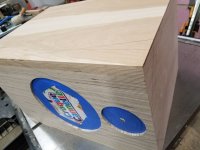
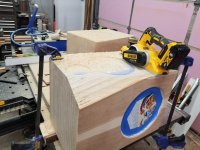
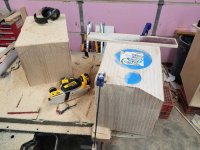
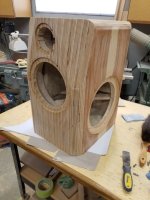
Lock rebates were used for the top, bottom and braces to the baffle and rear of the speaker, makes locating things easier during glue up. Tongue is cut with a 24 tooth flat top grind ripping blade as I rebate out the material and leave the tongue. Grooves are just a crosscut with the ripping blade, basically a 1/8"x1/8" tongue and groove joint. This joint is commonly seen in cabinet drawer construction and where I first started using it many years ago. Interesting to see that Troels Gravesen also uses this technique.
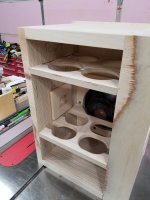
Because these have to travel with me, I didn't want binding posts that would stick out so I cut a "cup" into the back panel after making it a little thicker.
Cross braces were made, you can see I changed my mind on how I was going to make them with all the different pencil marks on them. The furniture maker in me would not allow me to just glue the braces to the front and back of the speaker with the one long tongue due to different rates of expansion between flat plywood and stacked laminations of plywood. To put my mind at ease, I broke the 11" long "tennon" into three smaller tennons that would not constrain the front and back sandwiches.
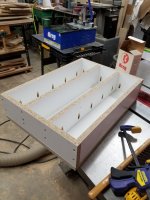
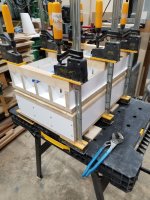
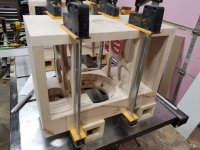
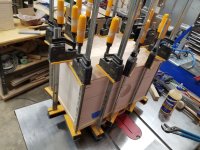
Rather than attempt to glue the whole box up in one shot, I broke it down as much as possible, starting with just one side of one end, then the one side of the other end, the middle braces on just one side, then the entire second side. Takes longer, but makes for less stress.
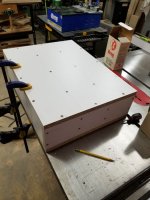
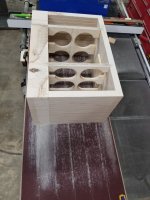
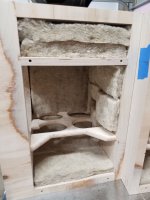
Before the sides get glued on, lap both sides of the cabinet on a large sanding block, glue one side on, add damping where it needs to go, glue on the second side and flush trim the sides to the box. Driver holes have been taped up to prevent the damping from getting polluted with sawdust.
Lock rebates were used for the top, bottom and braces to the baffle and rear of the speaker, makes locating things easier during glue up. Tongue is cut with a 24 tooth flat top grind ripping blade as I rebate out the material and leave the tongue. Grooves are just a crosscut with the ripping blade, basically a 1/8"x1/8" tongue and groove joint. This joint is commonly seen in cabinet drawer construction and where I first started using it many years ago. Interesting to see that Troels Gravesen also uses this technique.
Because these have to travel with me, I didn't want binding posts that would stick out so I cut a "cup" into the back panel after making it a little thicker.
Cross braces were made, you can see I changed my mind on how I was going to make them with all the different pencil marks on them. The furniture maker in me would not allow me to just glue the braces to the front and back of the speaker with the one long tongue due to different rates of expansion between flat plywood and stacked laminations of plywood. To put my mind at ease, I broke the 11" long "tennon" into three smaller tennons that would not constrain the front and back sandwiches.
Rather than attempt to glue the whole box up in one shot, I broke it down as much as possible, starting with just one side of one end, then the one side of the other end, the middle braces on just one side, then the entire second side. Takes longer, but makes for less stress.
Before the sides get glued on, lap both sides of the cabinet on a large sanding block, glue one side on, add damping where it needs to go, glue on the second side and flush trim the sides to the box. Driver holes have been taped up to prevent the damping from getting polluted with sawdust.
Attachments
-
 63 - cutting tongues.jpg245.9 KB · Views: 113
 -
 64 - all tongues cut.jpg174.9 KB · Views: 94
 -
 66 - cutting grooves in baffle.jpg194 KB · Views: 95
 -
 65 - test groove.jpg100.9 KB · Views: 95
 -
 67 - thicker for terminals.jpg260.9 KB · Views: 98
 -
 72 - jig for terminal cup rebate.jpg244.8 KB · Views: 94
 -
 73 - terminal cup rebate cut.jpg242.4 KB · Views: 99
 -
 74 - terminals test fit.jpg274.7 KB · Views: 87
 -
 76 - cuting braces 1.jpg225.6 KB · Views: 88
 -
 75 - laying out for braces.jpg187 KB · Views: 92
 -
 77 - cutting braces 2 lots of chips.jpg270.8 KB · Views: 107
 -
 78 - cutting braces split tennons.jpg245.7 KB · Views: 113
 -
 79 - test fit braces.jpg216.2 KB · Views: 105
Moar Pics...
Attachments
-
 80 - test fit.jpg197.8 KB · Views: 128
 -
 81 - glue one end one side.jpg251.8 KB · Views: 132
 -
 83 - glued up mostly.jpg234.4 KB · Views: 122
 -
 82 - glue up braces one side.jpg224.1 KB · Views: 127
 -
 84 - lapping sides of boxes.jpg218.6 KB · Views: 111
 -
 85 - glue one side on.jpg253.6 KB · Views: 125
 -
 86 - install sheeps.jpg171.2 KB · Views: 120
 -
 87 - glue on second side.jpg229.1 KB · Views: 125
 -
 88 - flush trim sides.jpg240.8 KB · Views: 135
Wow, that is a solid box for sure...
I was able to get my panels all cut yesterday for mine. I now have a glue up plan, but it was too cold yesterday to start it.
Keep it up!
I was able to get my panels all cut yesterday for mine. I now have a glue up plan, but it was too cold yesterday to start it.
Keep it up!
Member
Joined 2003
Poor Wavecor TW030WA11/12 is excluded from InDIYana competition due to arbitrary size limitation.I have checked the rules of the competition, and the Seas DXT and Morel CAT 378 are both eligible despite being shallow waveguides:
It was not arbitrary at all. We tried to eliminate most of the waveguide options this way, as per the theme title dictated it. There are about 4 options to my knowledge.
CAT378
DXT (Dave is using this one)
SB (Javad is using this one)
H26
However, you don't have to use a waveguide to make this work, and also work optimally.
CAT378
DXT (Dave is using this one)
SB (Javad is using this one)
H26
However, you don't have to use a waveguide to make this work, and also work optimally.
Member
Joined 2003
This horn is 103mm diameter, if anyone wanted to get creative.
https://solen.ca/en/products/cmp25_vhp-h-4
https://solen.ca/en/products/cmp25_vhp-h-4
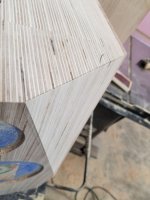
InDIYana 2023 continues...
-Shaping the cabinets-
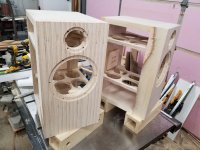
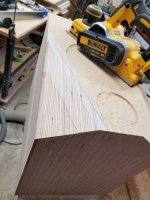
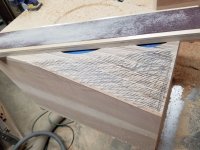
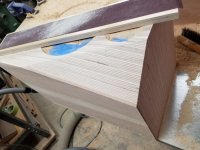
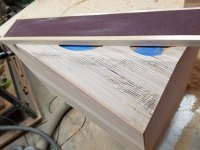
Building a square box was just the first part, next up was taking what I have learned from my tweeter bevel/roundover studies and shaping the box to allow for the smoothest frequency response.
The big bevels on either side of the tweeter flare back at 30º and taper by 2-1/4" back into the baffle (hence the 3" thick baffle). There is also 1-3/4" double 30º bevel rising on the front vertical edges of the box on either side of the woofer that fades into the tweeter bevel. There is a smaller 1-1/8" double 30º bevel on the top and back of the box for aesthetic reasons. All bevels are softened with the 150g tool.
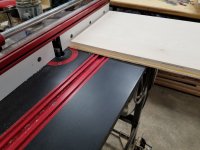
My original plan was to use a jointer plane for the bevels, but Baltic Birch plywood endgrain turned out to be a lot harder to plane than I expected. I wasn't so sure about using a power handplane (slow mistakes vs. very fast mistakes) but it turned out to work much better than I expected. I only planed within about a 1/16" of my lines and used a large 60g sanding block to clean up the plane marks.
The big bevels were tricky, but I would definitely do this again. If you plan on trying this at home, please practice on a test box, not one you have a ton of work into for your first try.
Next up, finishing...
-Shaping the cabinets-
Building a square box was just the first part, next up was taking what I have learned from my tweeter bevel/roundover studies and shaping the box to allow for the smoothest frequency response.
The big bevels on either side of the tweeter flare back at 30º and taper by 2-1/4" back into the baffle (hence the 3" thick baffle). There is also 1-3/4" double 30º bevel rising on the front vertical edges of the box on either side of the woofer that fades into the tweeter bevel. There is a smaller 1-1/8" double 30º bevel on the top and back of the box for aesthetic reasons. All bevels are softened with the 150g tool.
My original plan was to use a jointer plane for the bevels, but Baltic Birch plywood endgrain turned out to be a lot harder to plane than I expected. I wasn't so sure about using a power handplane (slow mistakes vs. very fast mistakes) but it turned out to work much better than I expected. I only planed within about a 1/16" of my lines and used a large 60g sanding block to clean up the plane marks.
The big bevels were tricky, but I would definitely do this again. If you plan on trying this at home, please practice on a test box, not one you have a ton of work into for your first try.
Next up, finishing...
Attachments
-
 89 - LN low angle 7.jpg187.9 KB · Views: 154
 -
 90 - marking for big bevels.jpg186.7 KB · Views: 130
 -
 91 - DW power plane getting there.jpg247.5 KB · Views: 132
 -
 92 - DW power plane 60g cheese grater.jpg276.6 KB · Views: 125
 -
 93 - DW power plane side two rough.jpg193.6 KB · Views: 131
 -
 94 - more 60g tool.jpg267.1 KB · Views: 118
 -
 96 - second bevel done.jpg208.4 KB · Views: 108
 -
 95 - 60g tool getting there.jpg241.8 KB · Views: 120
 -
 97 - bevel close to layout lines.jpg148.4 KB · Views: 115
 -
 98 - bevels done one box.jpg248.6 KB · Views: 123
 -
 99 - 30 degree other double bevels.jpg171.1 KB · Views: 116
 -
 100 - other bevels cut.jpg216.9 KB · Views: 142
 -
 101 - sanding for finishing.jpg220 KB · Views: 158
 -
 102 - sanding for finishing.jpg206 KB · Views: 153
Wow! A great work. A real labour of love.
How do you like the Dewalt power plane? What model?
I gotta get me one of these…
How do you like the Dewalt power plane? What model?
I gotta get me one of these…
Wow! A great work. A real labour of love.
How do you like the Dewalt power plane? What model?
I gotta get me one of these…
Thank you.
The DeWALT power plane is a 20v DCP580B, worked way better than I expected it to...
- Home
- Loudspeakers
- Multi-Way
- Dave's 8" woofer + 104mm tweeter speaker build