I enjoy building stuff and trying to learn in the process.
About 5 years ago I bought a pair of Audio Nirvana Super 8 Alnico drivers for a project that didn’t work out for me, open baffle. I ended up pulling the drivers and trashing the “cabinet”. The other day I was cleaning out the closet and found the drivers and got me thinking about a project to put them in.
I had built a couple of test cabinets to try out a pair of rebuilt JBL LE8T’s before I built my console around them. So I stuck the AN drivers in the cabinets and was pretty happy with the sound. So these new cabinets will go with a pair of KT-150 monoblock amps I built a couple years ago for my work room at home.
Based on the size of my room and the cabinet size chart at CommenSense, a 2.8 Ft3 cabinet size is a good fit for these drivers.
For the cabinet I’m using 3/4” double milled Medex bonded to 1/2” marine grade plywood. The Medex has a more consistent density throughout than typical MDF and the the marine grade plywood has tighter control on voids in the internal fill ply’s.
The cabinets will be 40 1/4” tall x 18 5/8” wide x 10 1/2” deep. Will be sitting on 5” legs with bottom firing ports.
Here is a pic of my test cabinet with the AN driver.

I sprayed both sides of each sheet of goods with a black 2 part primer

After drying sanded all with 80 grit on orbital

After tacking I spread my secret sauce (polyurethane based adhesive) with a 3/16 V groove trowel, laid the inner ply on top and put in the press

This adhesive stays permanently flexible, sets in 2 hours, and fully cured in 8 days. I laid it up on Saturday and started cutting it up today (Monday). Man this is heavy. Was a chore to get it into the panel saw by myself.

I sprayed both sides of each sheet of goods with a black 2 part primer
After drying sanded all with 80 grit on orbital
After tacking I spread my secret sauce (polyurethane based adhesive) with a 3/16 V groove trowel, laid the inner ply on top and put in the press
This adhesive stays permanently flexible, sets in 2 hours, and fully cured in 8 days. I laid it up on Saturday and started cutting it up today (Monday). Man this is heavy. Was a chore to get it into the panel saw by myself.
After cutting up the sheets into manageable sizes I cut everything to to size, 90 degrees, first. Then final cut at 45 degrees on the table saw. I also cut a 3/16” deep x 1/8” groove for the bracing to slip into.

Then on to assembly. Since it’s so thick 1 5/16”, I’m running 2 rows of glue

After attaching the sides, top, and bottom I started fiting the 2 braces. I will be cutting opening in the braces, obviously, but wasn’t planning on getting this far today and need to think out the openings before installation. I will also be covering the entire insides with 1/8” bitumen sheets and a min of 2” blue jean type insulation. This will have to go in prior to installation of the back panel.

I did a couple of “knuckle to wood” tests with a half sheet of my laminated wood versus just a half sheet of Medex. Definitely a difference in sound. The laminated sheet doesn’t “ring” like the Medex does. Anxious to see how this experiment works out.
That’s all for today

Then on to assembly. Since it’s so thick 1 5/16”, I’m running 2 rows of glue
After attaching the sides, top, and bottom I started fiting the 2 braces. I will be cutting opening in the braces, obviously, but wasn’t planning on getting this far today and need to think out the openings before installation. I will also be covering the entire insides with 1/8” bitumen sheets and a min of 2” blue jean type insulation. This will have to go in prior to installation of the back panel.
I did a couple of “knuckle to wood” tests with a half sheet of my laminated wood versus just a half sheet of Medex. Definitely a difference in sound. The laminated sheet doesn’t “ring” like the Medex does. Anxious to see how this experiment works out.
That’s all for today
... and the cabinet size chart at CommenSense...
Have been shown to be in need of a significant amount of salt -- a grain does not do it.
Do your own modeling.
dave
Thanks for commenting!Have been shown to be in need of a significant amount of salt -- a grain does not do it.
Do your own modeling.
dave
The reasoning behind the final size of my cabinet is way more simple than modeling and I didn’t follow the sizes from CommenSense. I chose the volume for the cabinet based on the CommenSense chart for their drivers.
I took the published cabinet measurements from a commercial speaker company, enlarged the height and width by 113% and added to the depth to get to 2.8 Ft3.
Not very “modeled”.
But should look good when done!
Last edited:
But will it sound good?
2.8 ft3 is way to large for the Super 8 and any reflex alignment looks quite ugly. The Common Sense boxes are not usually very good.
dave
2.8 ft3 is way to large for the Super 8 and any reflex alignment looks quite ugly. The Common Sense boxes are not usually very good.
dave
Really?! Specs say it has a ~ 90 L Vas, 0.82 Qts, so for vented, a huge TL is ideally required if true: http://www.commonsenseaudio.com/an8alnicospecs.jpg
GM
GM
Obviously we are talking about a different driver. He said old so i assummed the original Super 8 with the stamped basket. Q = 0.215 by the spec sheet. And that is similar to what i measured. See attached.
dave
dave
Attachments

OK, don't recall a low Qt AlNiCo, only the various high Qt ones, so wondered if you were using the low Qt ferrite motor specs.
Oh well, if he has a high output impedance amp the cab won't be too big, though ideally should be tuned to actual Fs; otherwise a BSC filter to mimic one.
GM
Oh well, if he has a high output impedance amp the cab won't be too big, though ideally should be tuned to actual Fs; otherwise a BSC filter to mimic one.
GM
Thanks guys for your time to comment on my project.
Here is the spec sheet for the driver from the website.

If my 2.8 cabinet is too large then the chart at CommonSense must be WAY off, as they show this driver works for a 13.6 size cabinet too.
In my previous posts today I detailed the actual cabinet dimensions. The plan is to install a pair of 3” down firing ports (cabinets on legs). And comments on port length?
Here is the spec sheet for the driver from the website.
If my 2.8 cabinet is too large then the chart at CommonSense must be WAY off, as they show this driver works for a 13.6 size cabinet too.
In my previous posts today I detailed the actual cabinet dimensions. The plan is to install a pair of 3” down firing ports (cabinets on legs). And comments on port length?
My bad, when he said old, i thot old, the Alnico isn’t all that old.
For the Alnico driver 2.8 ft3 is too small. Sealed gives a Q = 1,2, way underdamped for my taste, and nit at all good for vented.
The Common Sense enclosure suggestions are far from common sense. Best to forget they exist.
dave
For the Alnico driver 2.8 ft3 is too small. Sealed gives a Q = 1,2, way underdamped for my taste, and nit at all good for vented.
The Common Sense enclosure suggestions are far from common sense. Best to forget they exist.
dave
Looking further 4x the volume you have would be tolerable, still a bit undersamped.
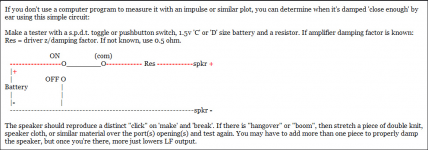
Be ready to start drilling holes in the back of the box (and damping them). Use GM’s clik test to judge whether you have enuff.
dave
Be ready to start drilling holes in the back of the box (and damping them). Use GM’s clik test to judge whether you have enuff.
dave
Thanks guys....... any comments on port length?
You're welcome!
Yes, the chart is way off, but in the [much] too small sizes since this driver's motor is so weak it takes a huge box compliance plus tuning it well below Fs to offset it and if you're going to drive them with a SET or similar tube amp, the driver's Qts' becomes [much] higher to where OB or IB is the only viable option, though not an issue if the F5 is used:
Qts' = Qts + any added series resistance: mh-audio.nl - Home
At most, this driver can only handle a watt or two down around its Fs, so not necessary to have a 3" vent, much less two unless packed with stuffing to severely damp them since as Dave noted it will take a lot of damping to flatten the huge peak at tuning due to such a small net volume [Vb] relative to what the driver wants to 'feel'.
Dual 3" dia. x 2-3/8" vents tunes 2.8 ft^3 net to ~published Fs, though consider up to 9" long and experiment with different stuffing densities in them to find the best overall in room response at the listening position [LP]. As Dave noted, the historical way to do this is to turn the bottom plate [in your case] into a pegboard or many narrow slots and add layers of damping as required, though some folks just stuff the cab.
Regardless, all we can do is give guidelines based on specs, but we all hear the same, yet not so much and there are folks that like a highly resonant speaker as this one will be based on published specs, so how much damping will be required in your app will have to be determined empirically.
Anyway, looking forward to what you wind up with and whether or not you found a satisfyingly 'musical' solution.
GM
Thanks again for your comments and suggestions.
I will have too much time and money into the cabinets to drill additional holes into the cabinets after completion, way more than the cost of drivers, so to start I’ll stuff the cabinets and see what happens. I have 6 rolls of denim insulation on the way.
Part of the goal of this cabinet build is to try out my idea of dampening the cabinet and choices of materials.
What other 8” full range drivers are available that would better match my cabinet size if these don’t work out?
You could always add a divider inside to get the proper volume for the AN, and high pass that at say 400Hz. Cut two more holes for a pair of nice 8in woofers (SB23NRXS45-8) and you would have a FAST system that would be pretty substantial - and benefit from the low rattle cabinet work. The SB23's can get 50Hz in a sealed alignment or much deeper as vented. Bushmeister used two of these in a sealed 45L cabinet and got these kinds of numbers for bass. very impressively low distortion and great reach (-40dB to -50dB from 50Hz to 30Hz at 100dB SPL):
http://www.diyaudio.com/forums/multi-way/285030-bookshelf-multi-source-horn-125.html#post4644522
http://www.diyaudio.com/forums/multi-way/285030-bookshelf-multi-source-horn-125.html#post4644522
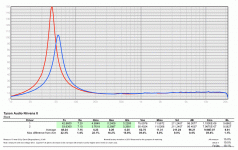
GM's click test?
Hi there Dave and/or GM: What is the click test mentioned above? I would like to try this with a AN-10(older stamped frame) that I have. ...regards, Michael
Looking further 4x the volume you have would be tolerable, still a bit undersamped. Be ready to start drilling holes in the back of the box (and damping them). Use GM’s clik test to judge whether you have enuff. dave
Hi there Dave and/or GM: What is the click test mentioned above? I would like to try this with a AN-10(older stamped frame) that I have. ...regards, Michael
Last edited:
Was held up waiting for the Denim insulation to arrive. For some reason no one sells it here in Hawaii, and I can find a vendor to ship from the mainland here either. So had to ship it to my place in Vegas and forward to here. Anyway finally arrived .
Today I cut the port openings on the bottom and the hole for the driver and installed the braces. Since this cabinet is ported I elected not to leave a center brace area in my cutout. I’m feeling that the 1 5/16” thick sides will be supported enough with the two 1 1/2” horizontal braces.
Then sprayed contact cement everywhere for sound deadening pads (1/8” self adhesive bitumen)

Then after sticking the deadening pads, and using pressure roller for complete adherence, I sprayed another round of contact cement and stuck the Denim insulation. The bottom 3rd is completely filled, less open area for the ports, the middle section is wrapped all around with one layer, and the top driver section is wrapped all around except for the front driver section.

I also stuck the bitumen pads to the back panel and one layer of insulation in all 3 sections before glueing the back panel onto the cabinet.

All sealed up now ready for some detailing to the cabinet with a router and then painting. These weigh a ton! The cabinets will be prepped and painted with Chromax automotive products. 4K primer and two stage base coat/clear coat.
I’m also making matching chassis for my F5 Turbo v3 mono blocks. Gloss black with a silver racing stripe right up the middle.
Today I cut the port openings on the bottom and the hole for the driver and installed the braces. Since this cabinet is ported I elected not to leave a center brace area in my cutout. I’m feeling that the 1 5/16” thick sides will be supported enough with the two 1 1/2” horizontal braces.
Then sprayed contact cement everywhere for sound deadening pads (1/8” self adhesive bitumen)
Then after sticking the deadening pads, and using pressure roller for complete adherence, I sprayed another round of contact cement and stuck the Denim insulation. The bottom 3rd is completely filled, less open area for the ports, the middle section is wrapped all around with one layer, and the top driver section is wrapped all around except for the front driver section.
I also stuck the bitumen pads to the back panel and one layer of insulation in all 3 sections before glueing the back panel onto the cabinet.
All sealed up now ready for some detailing to the cabinet with a router and then painting. These weigh a ton! The cabinets will be prepped and painted with Chromax automotive products. 4K primer and two stage base coat/clear coat.
I’m also making matching chassis for my F5 Turbo v3 mono blocks. Gloss black with a silver racing stripe right up the middle.
- Status
- Not open for further replies.
- Home
- Loudspeakers
- Full Range
- Damped enclosure 8” full range build