I seriously hope that, if you insist on using a router, you're using a 1/2" shank and bit. And if you're intent on the router consider the physical aspect: 1/4", or 1/2" router bit width, 2 carbide edges, crazy rpm vs 1/8" width, minimum 60 carbide teeth. The saw blade will, at any time, have a minimum number of teeth in the wood so the other teeth can cool off. The router bit edges will be constantly in the wood and will get hot. No doubt you'll see the dark colour of overheating, which means dull.
Hey, it's your wood, time, router and bits but I think you're doing this wrong.
Hey, it's your wood, time, router and bits but I think you're doing this wrong.
I was going to put some kind of block surrounding it, same in size I intend to cut. Theres only 2 joints needed, its for an 'H' shaped brace.
Router has a micro dial for lowering in tiny increments for cutting out inlays. Id start with that. If the thing struggled I would quit right then. A table saw would be best, that I don't currently have.
Router has a micro dial for lowering in tiny increments for cutting out inlays. Id start with that. If the thing struggled I would quit right then. A table saw would be best, that I don't currently have.
Regardless of the method used, whether table saw, circular saw or router, good blades and bits are an absolute must.
Most of my cabinet work is with either Russian Birch plywood, or solid hardwood for smaller projects, with either box-joint or dovetail corner construction. This plywood is particularly hard on all of my cutting tools due to the adhesive being very abrasive,and it kills lesser blades in short order.
On the table saw I use only FS Tool XL4000 series (mainly the SM6251) blades. They cost a lot, are Canadian made, and will outlive me. Their performance and durability is incredible.
On the Skilsaw I use the Freud LU79R007 blade. This is a great little blade for use on plywood & veneered plywoods with a circular saw. Not particularly inexpensive, but they are often on sale. If you have a good saw and a good guide, these can provide an outstanding finish that will rival any table saw.
My straight router bits are all carbide end mills, either 2-flute for plunging & fast cutting, or 4-flute for slower, fine-finish work.
For dovetail and form bits, Whiteside are my first choice.
A + on fresh / quality blades.
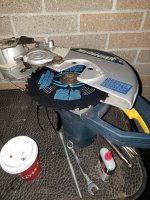
I found an easy way to bite clamps right to the surface. It only took minor zip wheel attention.
I'm more excited about using that router mount woohoo more than the saw. Plus I just bought a fresh Freud roller cutter for following straight guides or any kind of curves you can think up.
I'm biting off more that I can chew. I started getting back into stain glass to after repairing an old piece that fell and broke. Its very addictive once you try you'll understand what I mean. I bump into audio items where the two combine well. The trouble is it won't show all its true detail and vivid coulours inside the glass without sunlight. Its beautiful in front of sunlight.

I bought the best blades I had cash left for. That shouldn't make a mess of fine plywood veneer.
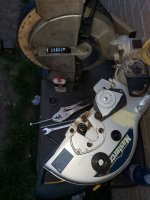
The radial is mostly rough for rough. That was in serious need of some lube too wow.
The radial is mostly rough for rough. That was in serious need of some lube too wow.
Attachments

That looks like my table saw. Ryobi BT3000?Nerding full out. Now ital cut the full 4"x2' strips and save some router for later..once I section a tad bit, or a bit tad..anyhow. 👌
I got mine from a family member for free. It had a bad bearing on the armature. Cheap to fix but lots of work. Been through three blades since I fixed it.
Boy, I count my lucky stars when it comes to ability to cut sheet goods. Having 3 SawStop Industrial Cabinet Saws with 7'x12' tables, a Sawteq B-400 CNC panel saw (with air table) and 5 table routers too. But, even with all that available I still want a CNC router able to handle 80" x 120" sheets.
But, a tablesaw is only as good as its fence and scale. Repeatability, rigidity, and maintaining square is the most important. Even a well designed job-site saw can handle big stuff if arranged appropriately.
But, a tablesaw is only as good as its fence and scale. Repeatability, rigidity, and maintaining square is the most important. Even a well designed job-site saw can handle big stuff if arranged appropriately.

Yes its a Royobi. It was vg shape when my dad owned it then it became a community saw of sorts and it was abused. When any kind of tools visit multiple users its demise is soon to follow.That looks like my table saw. Ryobi BT3000?
I got mine from a family member for free. It had a bad bearing on the armature. Cheap to fix but lots of work. Been through three blades since I fixed it.
The sled and the fence became non functional. I prefer a more common sliding T square. I have multiple complaints about the sled design. On the same token was an ok saw with good accuracy at one time.
The bearings would scream a little bit on start up. After a few drops of 3in1 they are good to go.
If I had the missing parts I'd get the sled to work but the fence is a goner.
Last edited:
My quick contraption fence cut okay, hardly great. Its a win I still have all my fingers. I wouldn't recommend doing this. If its off as slight as 0.15" it will grab and kick back, or worse. It was off by less, the maple stock had a tiny dip in it so it did less than perfect cuts, but acceptable. I had to get my hands closer to the blade than I liked.
They will suffice for acoustic panels.
I lived up to my name as I tend to. I crosscut at least half of the nice veneer. There was so many things to pay attention to and I over looked that detail, cough. The darker one stains very nice, too bad though.
I bumped into a question, thats pressing ot. A few already took on slight bowing. Do you take a measure to stabilize them? Its tricky this time because I planned on leaving the wood frame materal exposed, and simply cut windows like you see with some GIK treatments. Otherwise I would use some light gauge mesh, or similar. Maybe run thin 1/2 "+braces across the front. After some finish they would look right at home. But also add back some reflective surface, however slight.
Attachments
![20230521_160619[6519].jpg](/community/data/attachments/1084/1084349-5c7e1a16313e252b267bbd939533976d.jpg?hash=XH4aFjE-JS)
![20230418_070202[6369].jpg](/community/data/attachments/1084/1084350-bea8e343825de0cb084caab9f45916f4.jpg?hash=vqjjQ4Jd4M)
Last edited:
what I did for my last project:
- had the woodshop cut the panels for me at manageable size (100x45cm for instance)
- Trimmed them to exact size with a circular saw + clamped straight guide (2-3cm removed to account for joinery) => a table saw would probably be a better tool for this, but I don't have one. Also, I assumed the shop cut square pieces, which I know is probably not the case.
- Trimmed opposite facing panels to exact same length with a palm router and flush trim bit (clamped the two panels on one another), maybe less than a millimeter was removed at the edge.
I got the table saw cutting dead straight with a 1' x1 scrap of aluminum for the fence. I do prefer the crisp clean edge the router makes, not to mention sliver free. But it would of taken all day to cut 12 4" x 2' boards.
Why did they start calling it "dead straight, was straight not straight enough for them?
Same goes for "dead even". Even is Even!
Why did they start calling it "dead straight, was straight not straight enough for them?
Same goes for "dead even". Even is Even!
Last edited:
I was planning to cut out windows, on at least the side rails. I think I need a break from sawdust.
I thought working outside would limit how much of it gets lodged. In your eyes, sucks. And when it won't dislodge in from the back of the nose and throught. Gross as it may be. Its the reality of working with the stuff.
Natural woods don't seem to bother me as much as this one.
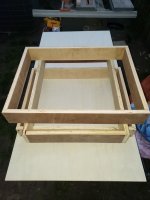
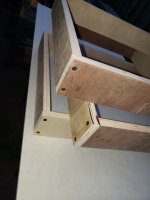
Enough wamming. The bulk of the work is done.
Ripped and framed. Instead of p!$$ing around ill textile complete.
The butt joints are dead on for crisp edges high waf.
textile with exception of the 1/4" plywood back boards. Since they will be tight against wall board.
I thought working outside would limit how much of it gets lodged. In your eyes, sucks. And when it won't dislodge in from the back of the nose and throught. Gross as it may be. Its the reality of working with the stuff.
Natural woods don't seem to bother me as much as this one.
Enough wamming. The bulk of the work is done.
Ripped and framed. Instead of p!$$ing around ill textile complete.
The butt joints are dead on for crisp edges high waf.
textile with exception of the 1/4" plywood back boards. Since they will be tight against wall board.
Attachments
I use a circular saw and judge by eye carefully to keep it straight.
For circular holes I use the jig saw, again careful cutting by eye.
For circular holes I use the jig saw, again careful cutting by eye.
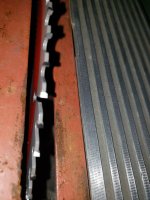
One issue I have run into is saw blades that are vacuum packed with a clear cover onto a piece of cardboard. These are shipped in a stack of blades in a cardboard box. Once the box is thrown or dropped in normal shipping and handling, the set of the blades will be damaged. One side of the blade will now have less set than the other. As a result the blade will want to cut a curve not a straight line!
The other issue can be when blades are resharpened. I once sent out a Dado set and all the blades came back sharp, but different diameters. I ship the blades in a wood crate made to fit and protect.
The other issue can be when blades are resharpened. I once sent out a Dado set and all the blades came back sharp, but different diameters. I ship the blades in a wood crate made to fit and protect.
The router bit i was thinking of follows precise patters exact, it's called a flush cut bit. I use top and bottom flush cut carbines often. This 6a Bosch handles 1/4" plywood and plexy glass easily. Its also good for doing cut outs for intricate inlay surfaces. Ill get the big dog at some point. I rigged up an accurate saw fence and a square slide. I'm golden for a while, no need to rely on the baby router unless it calls for the crisp edges like this. I did both 3/4 of ply after they were laminated lol. I went extra slow.That's an option. Some timber yards may offer that service as well. They can also say convert an 8x4 to 2 4x4 and then cut strips from those. When making a cabinet the top, sides and bottoms need to be the same width and parallel. If say the front panel was a bit over sized it can be fitted and then trimmed down with a router cutter with a ball bearing on the end. There is another type where the bearing is at the top intending to follow templates which can be some sort of straight edge. That might be a strip cut off an 8x4 or other size using the manufactured edge as that generally is straight and square. The store cuts can be as well.
I assume you mean it's fence where a width from the cutter can be set. They are intended to make the cutter run parallel to the opposite edge. It can be tricky to get the fence truly in line with the opposite edge at the start of the cut as they often aren't long enough to be sure.
The cutting depths I mentioned are from kitchen fitters who are routing every day. They are thinking about their tool life etc and will also want to avoid burning. Also on some rather expensive pro tools the power is electronically limited or with some sized cut the speed drops too much. It's not easy to explain. They feed the cut at a rate that suites the cutter and the speed it's running at. If the speed drop the feed rate wont be correct and each chip cut will be "thicker" than it ideally should be. This can cause burning. Slowing the speed down wont help unless the feed rate is reduced as well. Blunt and poorly designed cutters can cause this as well. Also glue build up on cutters when working on manufactured boards.
I forgot I transfered that one, will drop that jpg back later.
Last edited:
I remember my first speaker box well in 1980.
Used circular saw for main panels and jigsaw for speaker holes.
All went well until I tried to bolt in the speaker.
Spanner on nut and screw driver on screw head.
Slipped and screwdriver went right through the paper cone !
I managed to pull back the paper and a drop of super glue fixed it.
Lesson learned, take care !
One thing I haven’t seen mentioned yet is if you are only cutting 3/4” material on your table saw, use a thin kerf 7 1/4” blade rather than the standard kerf 10” This is especially a good idea when using the table top type saws that lack gusto.
Thats a good one to remember ^ the smaller blade will bump out more torque. It performs ok with the 10 as is. I had to rip a one inch maple plank, it didn't struggle with it. I'm a bit surprised it does cut as well as it does with the standard clock motors in these Ryobi saws.
Cal the line got crossed mind any confusion I might of made.
I was referring to using a mini router on the 3/4 stuff at that time. I go easy on it just like 1/3 bites x3, it easily handles that. I try to not to over work power tools since they cost money.
I'll probably stick to cutting 1/4" plywood and stuff like plexiglass with the mini colt. Good routers (worth price).
- Home
- Design & Build
- Equipment & Tools
- cutting panels down to size