Thanks Dave and Greebster - I'm going to tighten up the clearance to the magnet with wood shims - I cut the brace opening generously to make sure I wasn't above the mounting point, but probably went too far. Easy enough to add a perfect shim, harder to remove material to size once all is glued together...
Laminating the sides
Onto the next challenging piece of this little project - laminating the sides with bendy plywood. To do this, I built a clamping jig, and lined the edges with rubber weatherstripping to even out the pressure:

Four laminations done; 12 more to go! Once this is done, I should be ready to glue my cherry veneers on with 3M spray contact cement.

A strong internal frame is required to taking the clamping pressures. A vacuum press might be the way to go with something like this - though it might be more trouble than its worth. Trying to bag something like this and keep it in alignment before the glue sets would be an artform in itself.
Onto the next challenging piece of this little project - laminating the sides with bendy plywood. To do this, I built a clamping jig, and lined the edges with rubber weatherstripping to even out the pressure:
Four laminations done; 12 more to go! Once this is done, I should be ready to glue my cherry veneers on with 3M spray contact cement.
A strong internal frame is required to taking the clamping pressures. A vacuum press might be the way to go with something like this - though it might be more trouble than its worth. Trying to bag something like this and keep it in alignment before the glue sets would be an artform in itself.
A strong internal frame is required to taking the clamping pressures. A vacuum press might be the way to go with something like this - though it might be more trouble than its worth. Trying to bag something like this and keep it in alignment before the glue sets would be an artform in itself.
When Chris did the bent panels on these, he used a form to vacuum bag/jig for just the panels, then attached the bent panels onto the framework:
3 bent panels/speaker -- full-width back + 2 front pieces
http://www.diyaudio.com/forums/full-range/269393-p10-hifi-alpair-7-3en-sdx7en-fast.html
dave
Very cool & very impressive!
Yes, it probably would be easier to build the bent sides 1st, and then build the rest of the speaker around them... a vacuum bagging system and a nicely built jig could produce perfect sides, since you could cut the panels oversize, laminate them all at once (get a helper or two to get that glue on fast!!) and then bag them. Afterwards cut the finished panel to size for really clean edges. But squaring a curved panel on the table saw could be tricky; likely require another jig to hold it perfectly in place as you make the cut.
My approach seems to be working but does produce anxiety trying to get the panels in place before the glue sets up. It's also fiddly in that each panel layer has to be individually sized and test fitted before gluing up, since they get wider with each layer.
Have read and re-read the Clarity on .. and Curved Small Thor Redux, and related Thor re-build threads. I have built the standard Thor with premium Madisound parts. I chose Thor as I have heard what these Drivers are capable of in other cabs and XOs. Clearly Thor as spec'ed does not deliver upto expectations after it was built. I am far more concerned about the bright, read harsh, sound. This I believe belongs to the crossover's general inabilities. I intend first working to control this forward sound that tends to harshness with the volume turned up. My question is for JimAngie1973 whether the XO in the first post of this thread stands as the latest. It has a BSC on the 1.2 mH inductor, presumably reducing the overall gain while focussing on shaping the correction. Also as opposed to the earlier (1.0mH + 1.0mH) LR4 crossed over at about 1.5Khz, the first cap of HP section is now 12.47uF, instead of 9.0uF, it would appear that the tweeter would be handling more of the lower highs, than earlier., but the croosover frequency is unchanged. Please do let me know a bit more behind this change. In sequence I prefer to address Thor's sound first by the new XO, and then look at optimizing the cab on the back of some excellent effort evident in these discussion-threads. Thanks to all..
Closing in on the Finish Line
Been a while since I last posted, for many reasons!
Besides enjoying the summer and lots of other distractions, I ran into a problem with veneering the sides of these curved beasts. I originally planned to cut my own veneers for the sides to 1/16", and lay them up horizontally. This proved very tough to execute. Cutting veneers that thin requires a drum sander, which I was reluctant to purchase for $$ as well as workshop room reasons.
The solution was to find a professional woodworker in town, who routinely cuts his own veneers with a huge bandsaw and a fantastic drum sander. I ended up with a really nice set of 1/16" veneers.🙂
However, when I attempted to lay these babies using my clamping jig, I ended up with a wavy warped surface the next morning when I removed my jig. 😱 The Titebond glue had saturated the wood and expanded the grain. Only a vacuum press could have held that surface flat.
While I contemplated getting a press at that point, that wouldn't work with all the holes in my speakers - the plastic film would just expand into a hole and break once under vacuum. So there is no doubt that a vacuum press is the way to go to build curved surfaces when finishing with a veneer - but you need to build all the curved surfaces 1st, and then fit the speaker together.
I then had to chisel the veneer off and rebuild to a smooth surface- not a fun process.🙁
I then tried a 2-ply cherry veneer, glued with contact cement. This turned out to also resist laying on smoothly as I bent the veneer over the curve, since the backing ply was going in the wrong direction. Again, a wavy surface that was removed with a heat gun, chisel, and a lot of swear words.😡
I then ordered what I should have done in the 1st place - premium paper-backed veneer. Went on perfectly with contact cement. I then had to edge trim the front curved edges with my router spinning my large roundover bit to bring the front baffle and sides together - a slip at this point could have been disastrous. So I built a jig for my router and clamped guides on the ends of the cabinets - resulted in a very smooth surface. Planning to use the paper-backed veneer in the 1st place would have made the entire project a lot easier.
Next steps were sanding and finishing with several coats of wipe-on poly. Sanding paper-backed veneer is needless to say stressful; the cherry surface is only 10 mils thick. But I got her done without mishap.

I then took the cabinets, along with templates I constructed for the top and bottom plates, to a metal worker in town, who cut the tops and bases out of 1/4" steel plate-to perfection. Then over to a powder-coater - total cost for cutting the steel plates was $360; powder coating was $65. The bases are designed so I can use either spikes or felt pads to support the speaker. The bases are screw mounted with brass inserts to allow access to the xover recess.

Then on to mounting the drivers, and moving the cabinets into my media room. Break-in for both the drivers and the xovers is now in progress. I will be testing the Madisound xovers against the final jimangie1973 design, and the winner will then be mounted internally to the speaker to see how that affects the sound.


Have been listening to the speakers for several hours now, and I have to say I am very impressed even though they are not broken in. Bass response is excellent - not sure I will need subs with these babies. Midrange and highs are smoother, cleaner and more transparent compared to my stand mounted Odins. The Odins were quickly retired to the basement!

Will next report on the results of the xover testing...

Been a while since I last posted, for many reasons!
Besides enjoying the summer and lots of other distractions, I ran into a problem with veneering the sides of these curved beasts. I originally planned to cut my own veneers for the sides to 1/16", and lay them up horizontally. This proved very tough to execute. Cutting veneers that thin requires a drum sander, which I was reluctant to purchase for $$ as well as workshop room reasons.
The solution was to find a professional woodworker in town, who routinely cuts his own veneers with a huge bandsaw and a fantastic drum sander. I ended up with a really nice set of 1/16" veneers.🙂
However, when I attempted to lay these babies using my clamping jig, I ended up with a wavy warped surface the next morning when I removed my jig. 😱 The Titebond glue had saturated the wood and expanded the grain. Only a vacuum press could have held that surface flat.
While I contemplated getting a press at that point, that wouldn't work with all the holes in my speakers - the plastic film would just expand into a hole and break once under vacuum. So there is no doubt that a vacuum press is the way to go to build curved surfaces when finishing with a veneer - but you need to build all the curved surfaces 1st, and then fit the speaker together.
I then had to chisel the veneer off and rebuild to a smooth surface- not a fun process.🙁
I then tried a 2-ply cherry veneer, glued with contact cement. This turned out to also resist laying on smoothly as I bent the veneer over the curve, since the backing ply was going in the wrong direction. Again, a wavy surface that was removed with a heat gun, chisel, and a lot of swear words.😡
I then ordered what I should have done in the 1st place - premium paper-backed veneer. Went on perfectly with contact cement. I then had to edge trim the front curved edges with my router spinning my large roundover bit to bring the front baffle and sides together - a slip at this point could have been disastrous. So I built a jig for my router and clamped guides on the ends of the cabinets - resulted in a very smooth surface. Planning to use the paper-backed veneer in the 1st place would have made the entire project a lot easier.
Next steps were sanding and finishing with several coats of wipe-on poly. Sanding paper-backed veneer is needless to say stressful; the cherry surface is only 10 mils thick. But I got her done without mishap.
I then took the cabinets, along with templates I constructed for the top and bottom plates, to a metal worker in town, who cut the tops and bases out of 1/4" steel plate-to perfection. Then over to a powder-coater - total cost for cutting the steel plates was $360; powder coating was $65. The bases are designed so I can use either spikes or felt pads to support the speaker. The bases are screw mounted with brass inserts to allow access to the xover recess.
Then on to mounting the drivers, and moving the cabinets into my media room. Break-in for both the drivers and the xovers is now in progress. I will be testing the Madisound xovers against the final jimangie1973 design, and the winner will then be mounted internally to the speaker to see how that affects the sound.
Have been listening to the speakers for several hours now, and I have to say I am very impressed even though they are not broken in. Bass response is excellent - not sure I will need subs with these babies. Midrange and highs are smoother, cleaner and more transparent compared to my stand mounted Odins. The Odins were quickly retired to the basement!
Will next report on the results of the xover testing...
Oh my, those are sweet!
I am impressed with the quality of the craftsmanship. A man after my own heart, as the saying goes. Very, very beautiful. Keep them away from any heat source, contact cement has a bad habit of re-wetting when warm. I did the dash and doors in my BMW once and later used epoxy to finalize.
Those are some magnificent speakers lanetim, you should be very proud of your accomplishment.
When the sun colors the cherry..................it only gets better! Mine have darkened considerably.
How do they sound? (I know) 🙂
Thanks, Renron, for your comments! Now working on getting the crossovers tuned up. As mentioned in the 'Clarity' post, my initial impressions are the tweeters are way too hot for both the Jimangie crossover and the SEAS version, but the SEAS version is less so. Confirmed by Audiotools RTA and Impulse FFT measurements using my iPad.
Will be swapping the series resistor in the tweeter network with higher values next week, per advice from Jimangie. Will try a 2.7, 3.0, and maybe a 3.3 ohm if still too hot. Jim says he is using a 2.7 in his current setup. Jim exceptionally helpful, BTW - many thanks!
Woofers probably need to break in some more as well...plus all the wires coming out of the port may be breaking up the port's contribution - will tidy that up and add a quick connect system to make it easier to swap parts and crossovers during the testing phase.So a couple more weeks of playing around...
I think I ended up with 3.3 Ohms . Everyone has different ears and environments.
I have to tell you again, those are magnificent speakers. You have done the DIY community proud. Outstanding.
Ron
I have to tell you again, those are magnificent speakers. You have done the DIY community proud. Outstanding.
Ron
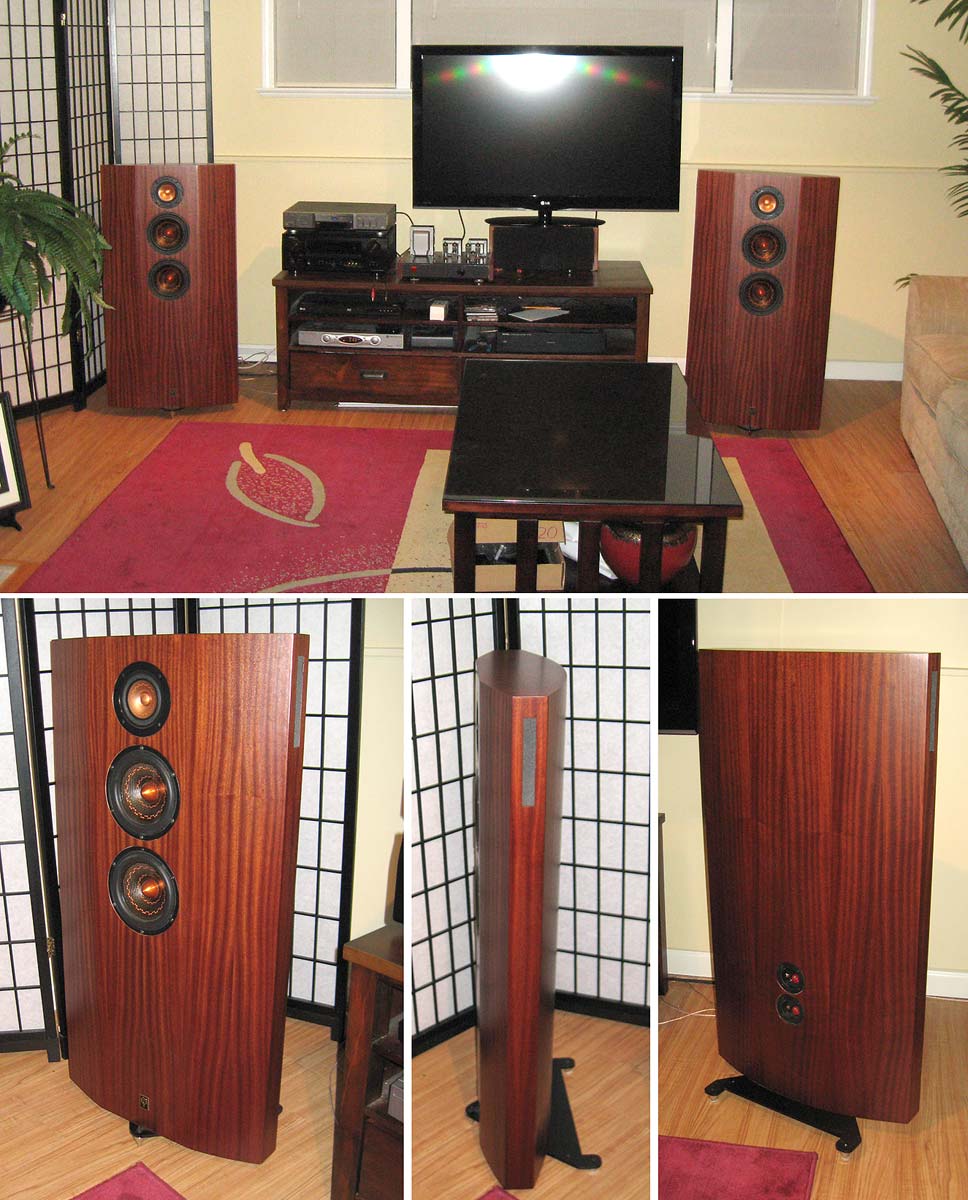
Finished!!
After a lot of experimentation and break-in time, I finally settled on the crossover design.
Maybe not surprising to most, these speakers & crossovers need a considerable amount of time to break in - looks like about 100 hrs is the minimum. Until then, there is little point in experimenting with crossover components; the sound is still evolving. Initial sound was OK in the bass, but the treble sounded bright and brittle at times, esp. on female vocalists like Emmylou Harris. Emmylou's voice is a bit high and dry at times, and she did not sound particularly good on 1st play...which was a bit depressing after spending so much time building these babies. 😱
But after a lot of run-in time this problem slowly went away. Not sure if it was the tweeter that mellowed, or perhaps the resonance of new, stiff woofers was higher than the notch frequency? Regardless, the upper range has smoothed out very nicely. At the same time the soundstage expanded in both depth and width...they sound truly wonderful! 😀
Piano music is one of the most difficult to realistically reproduce...listening to George Winston's 'Night Divides the Day: The Music of the Doors' provides some challenging, well recorded pieces...particularly when he begins to pluck the bass strings by hand. I've never heard this album sound this good; if you close your eyes you could swear there is a grand piano in the room. And now Emmylou sounds just right.
I ended up using jimangie1973's crossover with a 2.7 ohm resistor in the tweeter network, this seemed to give the best balance.
Testing the crossover both outside and inside the speaker did not reveal any difference I could discern, so I decided to leave it mounted internally.
Anyway, it was a really interesting project, and I gotta say, I learned a lot from the whole experience. Some things I would do differently, so if anyone is interested in further thoughts, let me know.
Again, thanks to all who contributed to this forum, like Ron and Jim who inspired me to take this project on...if you decide to build a set of Thors, you won't be disappointed!
Now on to a new set of subs to complement my Thors...I've decided to build a pair of Rythmik Audio's DS1200 12" servo subs...I'm hoping they'll provide solid performance down to 25 Hz or so. We'll see!!
Some things I would do differently, so if anyone is interested in further thoughts, let me know.
Yes.
dave
Lessons Learned
OK, Dave quite rightly egged me on, so here's a summary of things I've learned...though I'm not claiming what I learned is necessarily right!
1. As you might have gathered from reading my earlier posts, making a speaker with curved sides the way I did was a real test in patience, to put it politely. Because each lamination changes the radius of the curve as you build it up, you've got to deal with modifying the clamping jig for each layer, or risk possible voids or unevenness in your finished product. The net result is it takes forever to get the speaker finished.
So the best way to build one of these is to bite the bullet and invest in a vacuum bagging system if you don't have one already. For me, I had a hard time justifying that investment, since I couldn't see any other projects coming down the road that I might use it for. But if you have a compressor already, you can put together a bagging system for $300-400, so it might be worth it.
And then there was the veneering hassles I went through. I really wanted to use my own veneers to get the thickness of the cherry up to 1/16" or so on the curved sides. That would allow me to sand the sides to perfection without worrying about sanding through.
But again, without a vacuum press I was unable to get my veneers to lay flat through the glue-up...the veneer absorbed the water base glue, swelled a bit and warped...the clamping jig was unable to overcome those forces. The net result was I had to chisel off my carefully cut and sanded veneers the next day.😡 At least it was only one side of one speaker...but it was a real drag.
So then I had to go to conventional paper-backed veneer to get the job done, and being very careful about sanding that less-than-the-thickness-of-a-piece-of-paper product. It came out fine in the end, but I could have saved gobs of time, effort, and some $$ if I had planned to go with the paper-backed right off the bat.
So considering all the hassles involved in building a speaker with curved sides, why bother? Well, acoustically they have some significant advantages which are not too hard to understand. If you subscribe to any of the audio magazines lately you can see a parade of curved speakers being commercially offered. And they do look pretty cool, which was one of my design objectives stated at the beginning of this thread. And all of my friends and acquaintances have really marveled that anyone could build such cool looking speakers! 😎
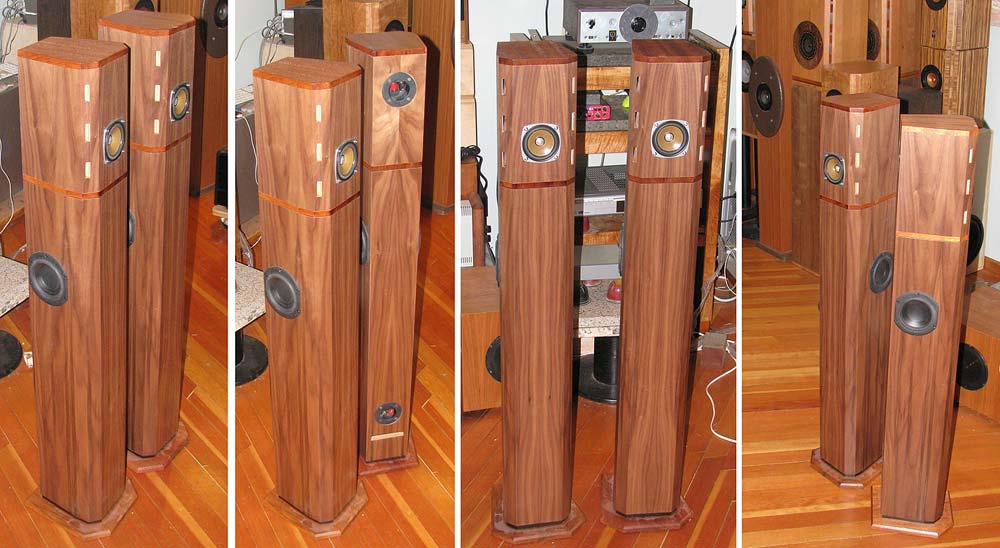
But you could save yourself a lot of grief if you built your Thor with angled sides instead of curves. Acoustically I'm pretty sure the differences would be minor. Bryston Audio has taken this route for some of their speakers:

If I were to build this speaker again, I would design along these lines. You would eliminate the need for fancy clamping jigs, or a vacuum bagging system...plus I would have been able to use my hand-made veneers without a problem!
2. The steel plate top was both a design feature and an attempt to keep the height of the speaker as low as possible. If you look at my construction plans, you can see that the top to the base dimension is 48" on the outside. The design for the Small Thor actually called for 48" on the inside dimension. 48" top to bottom is a convenient dimension when it comes to workworking, since a lot of plywood is dimensioned to that length, or to 96". If you keep the 48" internal dimension, your sides would need to be 49.5"+.
So I cheated a bit and shortened the internal dimension by 1.5". In order to make up for this, I swiss-cheesed the top, reasoning that once I epoxied my 1/4" steel plate to the top, I would have a very rigid, acoustically dead boundary layer.
When I finished the speaker and fired it up, I put my hands lightly on all sides of the speaker to feel for any resonances. You can imagine I was surprised to find the only place where a little vibration was coming from was the steel top. Of course, this is the length where the internal standing waves will be long and powerful.
So I fixed this by filling all the swiss cheese holes in the tops with Iron Nails glue. It took about a week for the glue to cure, but those who have used this product know that it is very hard but also slightly flexible once it has cured. That significantly reduced transmitted vibration to an acceptable, minimal level.
Fortunately the bases don't seem to exhibit any negative behavior. That's likely because the entire mass of the speaker (about 90 lbs) is resting on them, and they are ever so slightly tensioned by the 4 steel spike footers.
So the lesson here is to remember that steel plate will ring like a bell if you let it, so be careful and ensure it will be deadened and non-resonant in your application.
3. I fretted about putting the crossover inside the speaker, given advice not to do so. I went to a lot of trouble to test both having the crossover inside and outside the speaker. The problem is it is very difficult to be definitive about which sounds better. You've got to depend on memory for this test to remember what the speaker sounded like, and the time gap is not insignificant.
All I can say is the speakers sound great with the crossovers mounted internally, and they sounded great with them mounted externally. I couldn't tell the difference, but that doesn't mean there wasn't one. Sure, I get that internally you are subjecting the caps to significant acoustic energy, and there is a chance a component could be microphonic. But I couldn't tell if this was happening, so I went for the clean look and mounted the crossover inside the speaker, using the recess I planned for that purpose.
OK, better post this before it gets lost. If have any other thoughts I'll follow up. Feedback or questions welcome!
OK, Dave quite rightly egged me on, so here's a summary of things I've learned...though I'm not claiming what I learned is necessarily right!
1. As you might have gathered from reading my earlier posts, making a speaker with curved sides the way I did was a real test in patience, to put it politely. Because each lamination changes the radius of the curve as you build it up, you've got to deal with modifying the clamping jig for each layer, or risk possible voids or unevenness in your finished product. The net result is it takes forever to get the speaker finished.
So the best way to build one of these is to bite the bullet and invest in a vacuum bagging system if you don't have one already. For me, I had a hard time justifying that investment, since I couldn't see any other projects coming down the road that I might use it for. But if you have a compressor already, you can put together a bagging system for $300-400, so it might be worth it.
And then there was the veneering hassles I went through. I really wanted to use my own veneers to get the thickness of the cherry up to 1/16" or so on the curved sides. That would allow me to sand the sides to perfection without worrying about sanding through.
But again, without a vacuum press I was unable to get my veneers to lay flat through the glue-up...the veneer absorbed the water base glue, swelled a bit and warped...the clamping jig was unable to overcome those forces. The net result was I had to chisel off my carefully cut and sanded veneers the next day.😡 At least it was only one side of one speaker...but it was a real drag.
So then I had to go to conventional paper-backed veneer to get the job done, and being very careful about sanding that less-than-the-thickness-of-a-piece-of-paper product. It came out fine in the end, but I could have saved gobs of time, effort, and some $$ if I had planned to go with the paper-backed right off the bat.
So considering all the hassles involved in building a speaker with curved sides, why bother? Well, acoustically they have some significant advantages which are not too hard to understand. If you subscribe to any of the audio magazines lately you can see a parade of curved speakers being commercially offered. And they do look pretty cool, which was one of my design objectives stated at the beginning of this thread. And all of my friends and acquaintances have really marveled that anyone could build such cool looking speakers! 😎
But you could save yourself a lot of grief if you built your Thor with angled sides instead of curves. Acoustically I'm pretty sure the differences would be minor. Bryston Audio has taken this route for some of their speakers:
If I were to build this speaker again, I would design along these lines. You would eliminate the need for fancy clamping jigs, or a vacuum bagging system...plus I would have been able to use my hand-made veneers without a problem!
2. The steel plate top was both a design feature and an attempt to keep the height of the speaker as low as possible. If you look at my construction plans, you can see that the top to the base dimension is 48" on the outside. The design for the Small Thor actually called for 48" on the inside dimension. 48" top to bottom is a convenient dimension when it comes to workworking, since a lot of plywood is dimensioned to that length, or to 96". If you keep the 48" internal dimension, your sides would need to be 49.5"+.
So I cheated a bit and shortened the internal dimension by 1.5". In order to make up for this, I swiss-cheesed the top, reasoning that once I epoxied my 1/4" steel plate to the top, I would have a very rigid, acoustically dead boundary layer.
When I finished the speaker and fired it up, I put my hands lightly on all sides of the speaker to feel for any resonances. You can imagine I was surprised to find the only place where a little vibration was coming from was the steel top. Of course, this is the length where the internal standing waves will be long and powerful.
So I fixed this by filling all the swiss cheese holes in the tops with Iron Nails glue. It took about a week for the glue to cure, but those who have used this product know that it is very hard but also slightly flexible once it has cured. That significantly reduced transmitted vibration to an acceptable, minimal level.
Fortunately the bases don't seem to exhibit any negative behavior. That's likely because the entire mass of the speaker (about 90 lbs) is resting on them, and they are ever so slightly tensioned by the 4 steel spike footers.
So the lesson here is to remember that steel plate will ring like a bell if you let it, so be careful and ensure it will be deadened and non-resonant in your application.
3. I fretted about putting the crossover inside the speaker, given advice not to do so. I went to a lot of trouble to test both having the crossover inside and outside the speaker. The problem is it is very difficult to be definitive about which sounds better. You've got to depend on memory for this test to remember what the speaker sounded like, and the time gap is not insignificant.
All I can say is the speakers sound great with the crossovers mounted internally, and they sounded great with them mounted externally. I couldn't tell the difference, but that doesn't mean there wasn't one. Sure, I get that internally you are subjecting the caps to significant acoustic energy, and there is a chance a component could be microphonic. But I couldn't tell if this was happening, so I went for the clean look and mounted the crossover inside the speaker, using the recess I planned for that purpose.
OK, better post this before it gets lost. If have any other thoughts I'll follow up. Feedback or questions welcome!
But you could save yourself a lot of grief if you built your Thor with angled sides instead of curves. Acoustically I'm pretty sure the differences would be minor. Bryston Audio has taken this route for some of their speakers
And that we have been doing since 2011. An example:
dave
LaneTim,
Very happy you enjoyed the Thor journey. I still love my Thors and their about to be moved upstairs to the theater for their new home. Awesome sound in a small room.
My new project also has angles Dave. 🙂 I'll see yours and raise you a few. LOL
Dave,
Have you had a chance yet to hear one of your creations?
Ron
(is speaker building a hobby or an addiction)? 🙂
The Audio Beat - CES & THE Show 2010 - Hot Product - Avalon Time speakers
Dave,
Have you had a chance yet to hear one of your creations?
As in Thors? No.
dave
Yes, as in Thors.
You guys did such a great job with these, I really hope someday you get an opportunity to here one.
Thanks Dave, Scott
Ron
You guys did such a great job with these, I really hope someday you get an opportunity to here one.
Thanks Dave, Scott
Ron
Really nice build quality. I'm happy with my bracing, but that's exceptionally professional and much prettier.
I think I like the cherry baffle more than the black ones I made.
Again, they're very beautiful. Excellent craftsmanship.
Enjoy them.
Ron
Again, they're very beautiful. Excellent craftsmanship.
Enjoy them.
Ron
Update:
After many more hours of break-in, the sound has continued to improve. Micro-detail and the air surrounding each speaker is just wonderful; the soundstage is very wide and deep, and whatever edge was present in the highs has disappeared.
You really have to be patient if you build a pair of these, as the setting time has been significant.
Three ohm resistor in the tweeter network resulted in the most balanced sound in my room.
Cheers
- Status
- Not open for further replies.
- Home
- Loudspeakers
- Multi-Way
- Curved Small Thor Redux