Nobody in their right mind uses Microphones, xSim, X-Box and whatnot... Life is too short. 🙄
All you need to know is how to use the "Google" search engine. You can then plagiarise the ideas of people who understand all that stuff.
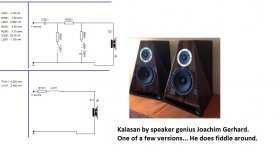
jimbones' problems quickly sorted. 😎
Legal Stuff: Any views in these pictures are solely those of system7 and not diyaudio.
All you need to know is how to use the "Google" search engine. You can then plagiarise the ideas of people who understand all that stuff.
jimbones' problems quickly sorted. 😎
Legal Stuff: Any views in these pictures are solely those of system7 and not diyaudio.
Attachments
Maybe so, but I want the satisfaction of doing the design myself. Life's too short not to pick up new hobbies. 🙂
Then prepare for dejection... 🙁
Thrush-CAT (Satori MW16P-4 with Morel CAT378) – AmpsLab
What the experts don't usually tell you. Just my opinion. 🙂
Mike Chua said:After my two epic failures, first with the Morel CAW634, then the Satori MW16P-4, I was utterly distraught. Never before have I felt so dejected.
Mike Chua said:I don’t know what the engineers were thinking when they worked on this Satori. The competitors have better bass. As for the extension, it’s not a game changer. It appears that they tried to please everyone but ended up with not having something that can blow the competition away. As for the price, I will leave it to readers to decide whether it’s worth paying $160.
Thrush-CAT (Satori MW16P-4 with Morel CAT378) – AmpsLab
What the experts don't usually tell you. Just my opinion. 🙂
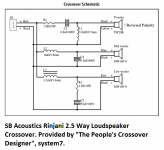
In the interest of accuracy (and lest people draw the wrong inferences), it should be made clear at this point that the Rinjani crossover design is not 'provided by the [self-announced] people's crossover designer System 7'. It in fact has absolutely nothing to do with him, being a kit design freely available on SB's own website. The 16 page pdf can be found here:
https://sbacoustics.com/wp-content/uploads/2021/07/Rinjani-User-Manual.pdf
As for Michael's view on the MW16P, it is his opinion, which he is perfectly entitled to hold, but it is certainly not one that is shared by everyone.
https://sbacoustics.com/wp-content/uploads/2021/07/Rinjani-User-Manual.pdf
As for Michael's view on the MW16P, it is his opinion, which he is perfectly entitled to hold, but it is certainly not one that is shared by everyone.
Last edited:
Madisound offers crossover design services. Danny at GR Research will even test and design a crossover to fit application if you send him the box and drivers.
Madisound no longer does design service I think their designer passed away, sad.🙁
It is his opinion, which he is perfectly entitled to hold, but it is certainly one shared by everyone.

Deserve a" how to process acurate measurements" sticky ? Step to step one ?
Here is a very good guide with lots of explanation that should suit anybody regardless of their level of knowledge
How to make quasi-anechoic speaker measurements/spinoramas with REW and VituixCAD | Audio Science Review (ASR) Forum
I have attached a guide from Audio Precision which is also very good and well explained
The harder seems often to me how to proceed to take right measurements of the drivers in box w/o filter :
For using Vituix kimmo has made guides for different platforms, with a basic rundown in the help file
https://kimmosaunisto.net/Software/VituixCAD/VituixCAD_Measurement_REW.pdf
A USB mic does present some challenges when it comes to measuring timing properly. REW's acoustic timing offset is one way to deal with it or Jeff B's interference method. An analogue mic and interface to allow true dual channel measurements is best and doesn't have to cost that much.
Attachments
Last edited:
That's rock Fluid ! 🙂
Thanks. Your post could be the beginning of a sticky with Xrq971 items list ! (mods if you read)
(I've a calibrated mic from Germany with a good EMUTracker-Pre external soundcard with the nobs, phantom power, switchable ground, constructed my ARTA BOX : not hard , that's fun to have a spl curve converted from an impulse response 😎)
Great info. So if I go off the grid for a few days you understand why. I have lots of reading and notes to take 🙂
Very true, if it is French you speak then krivium has offered to help with native translations before 🙂
It is easier for me to read english than for you to read mine ;
It is just way slower. Technical english is simplier than its litterature to read. Just AllenB writtings here give me hardtime to translate and understand...
Nah poor Krivium...he certainly has better to do.
It is just way slower. Technical english is simplier than its litterature to read. Just AllenB writtings here give me hardtime to translate and understand...
Nah poor Krivium...he certainly has better to do.
Kimmosto's technique does not agree with Xrq971 list.Thanks. Your post could be the beginning of a sticky with Xrq971 items list ! (mods if you read)
A definitive thread would have to set out the list as well as explaining the reasons people do it other ways, so that everyone knows where they stand and can work with what they have.. but newbies are not encouraged to start out the wrong way.
You can do Bagby’s method, which is how I started out. I just adapted it to make it easier on myself by not worrying about stitching the low bass response below 300Hz. It’s a lot of work. The XO is well above this anyhow. My trick of measuring at 0.5m and 2.0vrms and not 1m and 2.83vrms saves the hassle of not having to deal with the floorbounce dip circa 150Hz fo 300Hz, really. If you still have issues, using frequency dependent window with 6 cycles usually works.
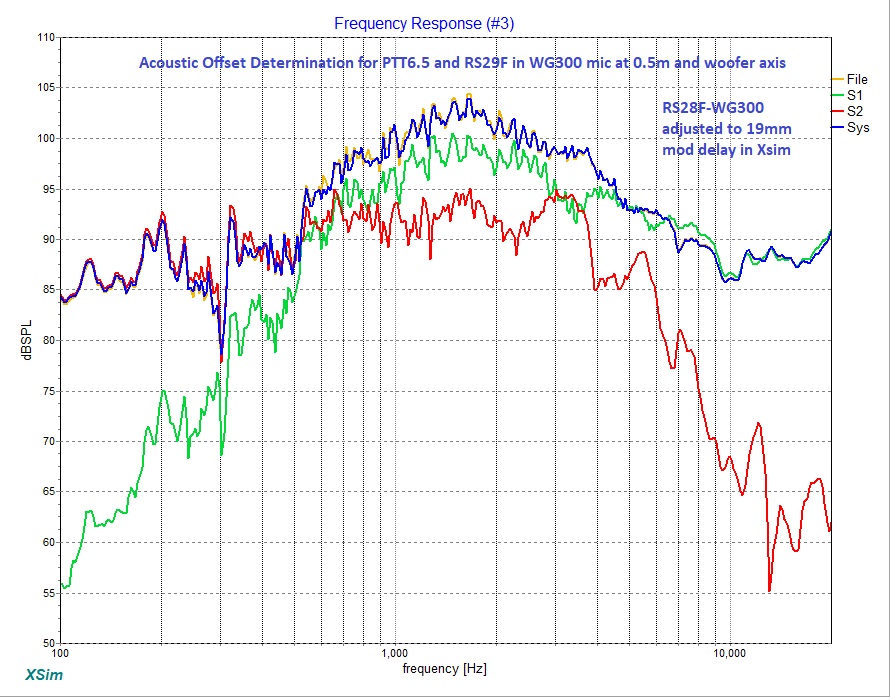
The trickiest part of all of this is using the acoustic interferometry to set the tweeter acoustic center offset precisely. That needs to be done right or the whole simulation is off. That’s why using factory FRD and ZMA files don’t really work. They don’t tell you the baffle specific acoustic center offset and they don’t account for baffle specific diffraction effects.
Here is an example of using the acoustic interferometry method with a USB mic (no timing reference from a second mic needed). The predicted combined woofer and tweeter is the blue trace and yellow is the measured. Note how every little wiggle and peak and dip is precisely matched. This allows the acoustic centers offset to determined to mm accuracy. Once this works, your crossover, as complicated as it may be, will be predicted correctly if you also give it an accurate ZMA file.
Red is raw woofer data, green is raw tweeter data, blue is predicted simulation of woofer and tweeter in parallel with the distance offset on the tweeter slowly adjusted until it matches the raw combined woofer and tweeter data (yellow). I ended up with 19mm (behind the woofer). This is because it was already set back in a waveguide.
Once all this works, it’s kind of fun to go into Xsim and play with different filters and see what happens.
Here is an example of a recent XO I designed for a 7in woofer and a planar tweeter in a 2 way. The predicted final result is the blue trace and the measured actual response using a physical crossover per the design is the yellow trace. Note how well they match. I am not sure what happened near 20kHz but that was the only anomaly. You can get some crazy good agreement between theory and practice with this method.
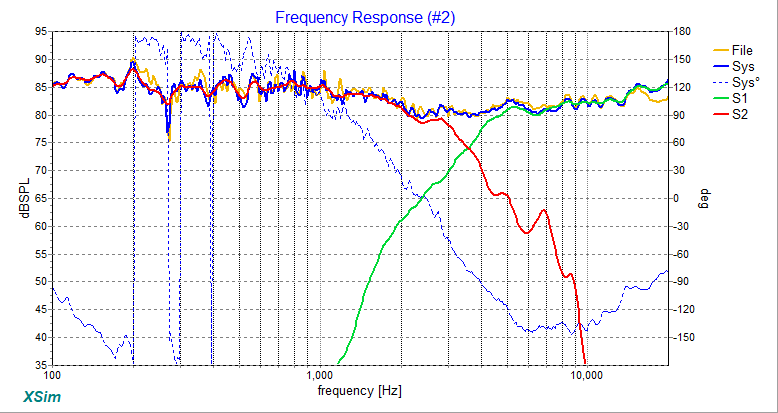
The crossover was moderately complicated but that didn’t throw Xsim off at all.
The trickiest part of all of this is using the acoustic interferometry to set the tweeter acoustic center offset precisely. That needs to be done right or the whole simulation is off. That’s why using factory FRD and ZMA files don’t really work. They don’t tell you the baffle specific acoustic center offset and they don’t account for baffle specific diffraction effects.
Here is an example of using the acoustic interferometry method with a USB mic (no timing reference from a second mic needed). The predicted combined woofer and tweeter is the blue trace and yellow is the measured. Note how every little wiggle and peak and dip is precisely matched. This allows the acoustic centers offset to determined to mm accuracy. Once this works, your crossover, as complicated as it may be, will be predicted correctly if you also give it an accurate ZMA file.
Red is raw woofer data, green is raw tweeter data, blue is predicted simulation of woofer and tweeter in parallel with the distance offset on the tweeter slowly adjusted until it matches the raw combined woofer and tweeter data (yellow). I ended up with 19mm (behind the woofer). This is because it was already set back in a waveguide.
Once all this works, it’s kind of fun to go into Xsim and play with different filters and see what happens.
Here is an example of a recent XO I designed for a 7in woofer and a planar tweeter in a 2 way. The predicted final result is the blue trace and the measured actual response using a physical crossover per the design is the yellow trace. Note how well they match. I am not sure what happened near 20kHz but that was the only anomaly. You can get some crazy good agreement between theory and practice with this method.
The crossover was moderately complicated but that didn’t throw Xsim off at all.
Last edited:
Holm Impulse also has a timelock feature where it will hold the audio stream open and allow comparison to a reference.
By measuring the tweeter first and setting that as reference a second measurement of another driver (keeping the mic in the same position and not moving it) will include the relative offset from the driver and give a result much like a loopback would.
A walkthrough here with other links
HOW TO: Measure using HOLM and ARTA | AVS Forum
jtalden has a guide somewhere for sub alignment where the same method is used.
HolmImpulse has been the best measurement software.
Is there some clarification of the way windows has changed its audio and what this affects, and a recent compatibility check, ie with W10/11?
Is there some clarification of the way windows has changed its audio and what this affects, and a recent compatibility check, ie with W10/11?
Hi Jim, DIY Audio is great, but sometimes I find the online forum format not the best way to learn, particularly for visual learners. And one can get side tracked because you ask 10 people and get 20 opinions.
Someone needs to be on the wavelength as you to get it to be able to advise you. And many people are good do-ers, and not everyone is a good teacher.
So I'm going to do a shout out to, IMHO, hands down, the best "How to design a loudspeaker" course that I've come across.
It's via video, and you can rewind/skip, and go at your own pace. It covers the theory and the practical basics, with references to textbooks if you want to go off and read some more. AND it's based on modern hardware (2020 era computers/soundcards, microphones etc, so you don't have to and buy some ancient soundcard on Ebay) and is up to date (he uses Xsim, but theory applies to other software too)
I wish someone had done this 10 years ago when I got started… he goes through the process, and has discussion of pros/cons of doing things. Big ups to Marius for creating and sharing such useful video content and step by step process to actually building your speaker.
It is paid content, but for the price of just a pair of cheap tweeters he covers everything- from what equipment you need to have (or buy), how to select and model the right cabinet for your woofer, how to take measurements correctly, how to model and design the passive crossover, for a 2 way, and then 3 way.
Look for it on Udemy:
Loudspeaker engineering : How to design speaker crossovers | Udemy
(disclaimer- I'm not affiliated with the Marius the content creator, I am merely a happy customer)
Last edited:
The only real difference is that kimmo won't use or recommend USB mics due to the difficulty in getting reliable timing information (of course he would not recommend to use XSim either).Kimmosto's technique does not agree with Xrq971 list.
This isn't related to the quote above but seems relevant.
If anyone is starting out and has not already learned how to use a certain program and they are serious about designing speakers then they would be well served by using Vituix and following Kimmo's instructions.
Designing speakers using traced data or single axis measurements is appealing due to the simplicity and effort required but there is so much research and blind testing that has been done to prove that a speaker cannot be described by one single curve alone.
Vituix is not the path of least resistance but it is the most comprehensive free way to see what is going on with a speaker in 3 dimensions.
Once you know what you have you stand some chance of being able to relate that to what you hear and make changes accordingly.
Last edited:
I have used it successfully under Windows 10 but I have no idea if 11 will break anything.Is there some clarification of the way windows has changed its audio and what this affects, and a recent compatibility check, ie with W10/11?
- Home
- Loudspeakers
- Multi-Way
- Crossover Design Service List?