Tulips !!!
BTW nice stand ,looks like Cabasse simplified .
to a keyboard player ;
what's better than roses on your piano?
I'm after a more angular look, so yes, it will be hand built. For those familiar with clay, I plan on having a mold of the interior space and wrapping large slabs of clay to cover 3/4. Once that's, take the mold out and seal it closed. Because its slab built, I want dont want the clay to be too soft, otherwise it sags and makes it impossible to get smooth surfaces and clean corners, which are two characteristics I'm after.
Sounds good! You certainly won't need much plasticity in your clay if your are draping slabs over a mold. Just enough to keep it from cracking during the intitial molding shaping. I don't know if you have the facilities to mix your own clay there at school, but I would certainly think looking into mixing a more open body would be well worth it in terms of SQ of the final product. Of course you could also add another layer after the firing to reduce the ringing, but since it's a ceramics class might as well keep it all ceramic if possible. The extra grog would have the added benefit of reducing the chance of warpage during firing.
Joe
I've already taken potential shrinking into account, so no worries there.
The uni does have the facility to mix clay, and ive done it before. Not terribly thrilled at the prospect of mixing more clay 🙁. I'll probably have to anyway though...
I'm going to start drawing up some measured drawings over the weekend and possibly start the mold.
@LineSource, those are some fancy looking speakers and stands! probably a bit more involved then what I have the time for at the moment though 🙁.
Any thoughts on the bargain bin drivers? I'm trying to make the most of my minuscule budget 😛
A while back I built some speakers for a friend using the TangBand 656 driver, which I then modified according to this guy. He doesn't seem to have instructions online any more for modifiying this driver. Basicly though it involved small rings of glue on the driver (quite easy to do on the wheel), and cutting off the dust cap and putting a phase plug in. I don't know if the anybody here might still have the info on moddifying them, but them were pretty nice when completed, and cost less than $30 a driver.
As far as clay goes, I don't imagine there is time for clay testing? Assuming not I would recommend lowering the feldspar content (though you still need a little to prevent cristobalite from forming) to lower the vitrification. Also raising the grog to at least 15% with a mix of small and large mesh grog. Hard to know exactly what's best without knowing the rest of the mix. I mentioned adding organic material before, and this is helpful. However after it's mixed you have to use the clay very quickly, as it will start to mold fast.
I hope this is helpful...
Joe
Have you considered using sculpture cement? Some simple shapes like a sphere with tapered tube can be cast with a basketball interior covered in household plastic wrap, and a plywood side profile template to rotate around the rough exterior cement. You can use chicken wire, or old copper wire to build a skeleton frame for the concrete. I no longer try to drill+tap+screw the speaker into the concrete, but just silicone adhesive midrange and tweeter drivers.
The cement that I use in this process is white portland cement. The cement is mixed with white silica sand in a ratio of about 1 part sand to 2 parts cement, and a small amount of micro fibers Fibermesh® 150, ¾ " long polypropylene multifilament fibers. Ratio of latex 1 : water 4 is added to this mixture to achieve the consistency of clay. The use of a latex additive and fibers allows for better adhesion to dried cement, helps to prevent cracking, and offsets the lack of aggregate or sand. I use a metal armature when starting my sculptures, similar to what would be used in clay or plaster. I wrap chicken wire or scrap copper wire together forming a skeleton to support the cement. Using a variety of tools which include various rasps, dremel tool bits, sand paper and sometimes even a grinder I then can begin the process of working at the cement to smooth out, correct errors and make marks that would be indicative to an original sculpture. The moisture content should remain high in the sculptures to keep the material from becoming so hard it becomes difficult to work with. This means that when a sculpture is started, it needs to be completed in a timely fashion, and wrapped in plastic when not being worked on. When the cement has time to slowly cure, and the sculpture is finished, it is then sealed with a stone sealer, or concrete paint. Clear wax can be used to help buff the finish to a low luster sheen.
LineSource, that sounds very interesting! What density is the finished product? I imagine it dries like mortar?
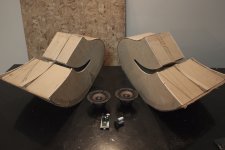
Just a quick progress report, I have all the electrical bits and the drivers.
Ended up getting the TB w3 and that little DTA t-amp.
Made the interior mold over the weekend between spurts of fever induced delirium 😀
going to start building the clay enclosure tomorrow and it will be finished but not glazed by the end of the week.
Gotta love the end of the year crunch at uni🙄
Ended up getting the TB w3 and that little DTA t-amp.
Made the interior mold over the weekend between spurts of fever induced delirium 😀
going to start building the clay enclosure tomorrow and it will be finished but not glazed by the end of the week.
Gotta love the end of the year crunch at uni🙄
Attachments
That's great ! I can't even imagine HOW are you going to do it !
Now I see...You are going to destruct the molds ! My way of thinking tells to use ONE model and put clay on it ,so you can build exact or very similar clones . this could be useful when putting many horns together to increase output level . Also ,the cabinets could be made mirrored , or designed to be mounted together .
Another issue 🙂 is the kind of horn expansion : the chamber has to be re-thought as some BR with big exponential duct ? Do all the internal surfaces have to be covered with felt or other material ?
I have no idea if I should cover the interior with felt. Im sort of winging it at the moment. Since this is for school, they just have to sound adequate and im likely to sell them afterwards since I really dont have room for more of these things. (odds are they will sound way better than what most of the people I know are used to)
I actually plan on keeping the molds, Im going to cover the front/back and one side with clay, let it stiffen, remove the mold, and close the whole thing up... at least in theory.
Depending how these turn out, I may be inclined to explore the design and science of it more. but for now, these are strictly one-offs.
Yes , that's why I said to make it into 2 or 3 parts ,because to obtain a correct horn expansion , it can be divided into woofer-chamber/throat and first segment then , another two segments ,folded ,then , last segment or mouth of the horn ,which would have an area same as yours .
Depending how these turn out, I may be inclined to explore the design and science of it more. but for now, these are strictly one-offs.
18" clay spheres anyone?
dave
Also ,something very basic ...thx for the idea Dave 🙂
a spiral cut on a circle : four pieces of them and you can build two snail-style horns ..something like B&W Nautilus ,but with the woofer mounted at the origin of the expansion
a spiral cut on a circle : four pieces of them and you can build two snail-style horns ..something like B&W Nautilus ,but with the woofer mounted at the origin of the expansion
I suggest also to bring over some solid foam ,the yellow or the blue one .Dont give him any ideas, hes got enough as it is...
With a saw and a cutter you can easily shape it ...as a drop ! Then you can place it in the chamber behind the speaker and obstruct much of the throat.
Or you can put

an extra compression chamber and use the first volume for a first fold after the throat . Everything can then be assembled using common gum/windows-cold-stopper stripes and screws ( to be perfectioned....😀)
was actually in reference to my dad's project that you can find here: http://www.diyaudio.com/forums/full-range/184407-alpair-12-studio-reference-monitors-fired-up.htmlDont give him any ideas, hes got enough as it is...
I would otherwise never suggest someone has too many ideas.
was actually in reference to my dad's project that you can find here: http://www.diyaudio.com/forums/full-range/184407-alpair-12-studio-reference-monitors-fired-up.html
Yes, he has plenty of ideas to keep him busy for a good long while...!
I'm not writing much on Ivan's thread...letting him have this one to himself. We get to talk about this stuff plenty in the analog world. I will say that I am really glad to have some shared interests that we can talk about and its been great to be able to work together on some projects.
Everybody, ask Ivan to post photos about his other speaker projects! They came out really well.
AHHHH 
They replicate !!! 😱
Good to know father & son share the same interests ...my father was an
electrician ,indeed ...
Now I'm finishing my collection of cardboard cabinets 😕
One is OB , another TL ..😉
Photos on request.
They replicate !!! 😱
Good to know father & son share the same interests ...my father was an
electrician ,indeed ...
Now I'm finishing my collection of cardboard cabinets 😕
One is OB , another TL ..😉
Photos on request.
A
Photos on request.
Post em... (maybe in gallery thread?)
dave
Ivan,
looks like a good start I'll be curious to see it as it progresses. I had considered making clay horns in the past, but never really gave it a go. There seem to be many hurdles along the way (warpage during firing, ringing of the mouth...ect). I'm excited to see you pursuing it though, and am watching with interest.
keep us posted
Joe
- Status
- Not open for further replies.
- Home
- Loudspeakers
- Full Range
- Clay as speaker enclosure?