Is that chassis from wonderco_buy?
Yes, that is one of his. Good chassis seller on eBay. I think this is one of his larger ones. HB-630
Merry Christmas and happy New Year to everyone of DiyAudio,
Need some advises, i want to build a class D audio for my HT set-up, 5 channel x 125w - 8 Ohm. what is the ideal rating for the transformer to support the massive playback on HT( home theater ) ?
My spks main - 6ohm (50 - 350w), centre - 8ohm (15-150w), rear - 6ohm (100w).All r very easy to drive spk.
I am considering, 1 x SDS-254(main spks) , 2 x CDA-254( sur and centre )
I need recommendation for the power supply e.g How many Cap need, what is the ideal transformer rating etc.( Any things that r need can also advise )
I will like to house all the 3 sets of amp in to one box, possible ?
All advise r most welcome.
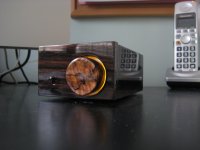
Just finished my iPhone speaker box with the Hifimediy T2 (TK2050)
Some pics:
More pics and vids www.wolfeil.de
Some pics:
An externally hosted image should be here but it was not working when we last tested it.
An externally hosted image should be here but it was not working when we last tested it.
An externally hosted image should be here but it was not working when we last tested it.
An externally hosted image should be here but it was not working when we last tested it.
An externally hosted image should be here but it was not working when we last tested it.
An externally hosted image should be here but it was not working when we last tested it.
More pics and vids www.wolfeil.de
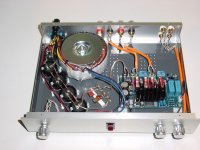
After having followed with much interest the Hypex discussions and seen extremely positive reviews of amplifiers using the "hype" Hypex class-D modules, I decided to take the plunge and build my own version. After some exchange of emails with Hypex, consultation of their mounting instructions and comparison with the drawings from IanMac, I ordered the components (2 UCD400HG-HxR , 2 SMPS400A400, 2 cableset SMPS180/400,2 UcD signal cable, 2 Neutrik XLR female 3 pole chassis, 2 loudspeaker binding post 2 poles clear, 2 power connector Euro fused, 2 switch on-off, 1 mounting set blue faston, 1 mounting set red faston 1 Faston crimptool) for 899,87 € VAT and shipping included.
When searching for cases, I came around Enclosures | Farnell België and ordered two black aluminium boxes Hammond - 1455N2201BK -for 64 € VAT and shipping included. These Hammond boxes have the advantage, that when putting them aside each other with their small border, the todal width is 21,2cm, whereas my Cyrus box take 21,5cm ! Then I made a first drawing of the arrangement within the rather small box and checked with Hypex if an external heatsink would be necessary. Their answer was "maybe, but you can try without and check if it is heating". So to be ready, I ordered two Fischer heatsinks in black aluminium SK 58/50 SA from FISCHER ELEKTRONIK|SK 58/50 SA|HEAT SINK, 50MM, 1.15 - 1.8°C | Farnell België for 17€. Finally I found some soldering tools for 30 € bought some screws, aluminium bars, thermal retracting isolation for 40 € and got cables for XLR input to the amps (2 x 5 m XLR female-male cable PRO, 2 adapter XRL male, RCA female 48€ VAT and shipping included).
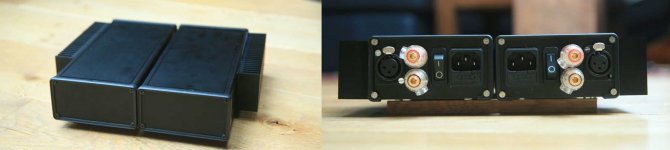
So at that moment I had invested 1100€ and was eager to assemble. While waiting for delivery, I exercised myself with soldering and prepared the LEDs for power-on lights, using a 21 V signal as the one expected from the power supply and some resistances. Happily, cases arrived rapidly and I started the drilling work. To take advantage of the fact that two Hammond boxes=one Cyrus box, and the possible need to add external heatsinks, I decided to make the boxes asymmetric (see picture below) and to include a possibility to fix the two monos together on a oak bar on the bottom (oak because my listening room is in the attic with a lot of oak). So basically I can use them as one cyrus-like stereo box (dual mono in fact), or as two smaller mono boxes which can be placed nearer to the speakers.
IMG1
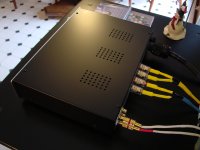
I made a series of holes in the bottom for air inflow and two slots and a few holes in top plate. For the blue power-on LED, the idea was to keep the LED inside the box at the front panel, just above a small airflow slot of the bottom plate beyond the front plate. In this way, the amplifier would glow blue downward when powered on. This turned out to work nicely (see pictures below).
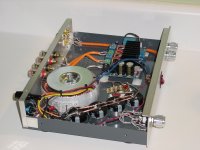
Connecting the Hypex modules was easy, the only difficulty was to cut the cables to the right length in my small box. For loudspeakers, I used some thick cables for connecting LS+ and LS- to the amplifier board. No connections for bi-wiring were foreseen, due to my self-imposed space restrictions. In any case, I consider bi-wiring can be arranged outside of the box, if inside the box sufficiently good cables are used.
IMG2
The first case was finished after a few evenings of drilling, polishing, soldering, checking and rechecking before finally testing my first self-made mono amp on my venerable second system with Tom Waits Mule variations track 8 on the CD player. Suspense : My blue LED comes on, then the red LEDs on the Hypex UcD too and then ….…. Nothing. No sound, no hum, no smoke, no fuse blown up, just …. deep silence. Bummer; did I just blow up my first diy amp? Nervously took out all cables, checked again all connections, made some voltage testing, everything seemed ok. So asked advice from Hypex and IanMac, both suggested the same source of error, the enable line not being connected. Checked again, enable line was definitively there. After hours of verifications and thinking, I finally decided to use the second UcD amp in place of the first one, and ..... YES music started to play.
So the first, faulty, UcD went back to Hypex and in the meanwhile I tested the single mono as the amp for my center speaker in my AV system. It obviously sounded better than the monobloc I use normally (smarty+psxr), but I did not do a real comparison, being more concerned with the temperature of my mono. Even without input from the pre, the small box remained rather warm (one can touch it, but when in use, it went rather hot on the side where the amp's heatsink is bolded to the case). So I added the external heatsink and the temperature dropped somewhat.
IMG3
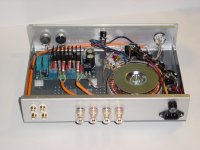
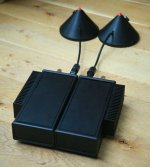
During my waiting for the return of the Hypex UcD, I prepared the second box, already much faster than the first one and I now directly including the drillings for the heatsink. I also assembled two boxes with Schaffner filters and a possibility for unplugging earth connections (the cones on the pictures); maybe I could call them PSO-R (power supply optimisation, rare). Hypex repaired the UcD free of charge (it seems a diode was broken off) and plugging in the UcD when arrived was then a matter of minutes. Finally I could test the system in stereo on my main system.
With Norah Jones It's gonna be playing via my DacMagic, I sat down, flabbergasted. Did I forged to put my system in stereo mode and my 5.1 system was still on? So well centrally placed was the voice and so deep the bass. But no, it was really playing in stereo. Then I went quickly through some of my favourite songs and first impressions were confirmed. Much more details, harder attacks on drums, crystal clear voices, precise placement of singers and instruments, simply impressive!
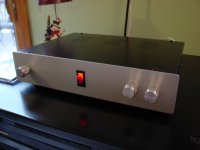
Conclusion : building diy amps is very interesting but somewhat stressing, particularly when it is the first experience, when the budget is not so low and when things are not exactly going as planned. On the other hand, after the fact, the exercise is absolutely feasible (with the help of IanMac and Hypex
An externally hosted image should be here but it was not working when we last tested it.
) and rewarding, but I would suggest to use larger boxes for novices. In any case, I do not think that for 1100€ I would get two mono amps of similar quality. As for the lower reselling value, well for the moment I do not want to sell An externally hosted image should be here but it was not working when we last tested it.
I will now turn my interest again to listening to music and eventually make a review of my first weeks with the Hypex.
IMG4
Attachments


Last edited by a moderator:
50 Caliber
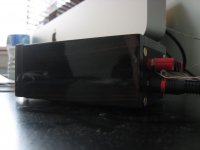
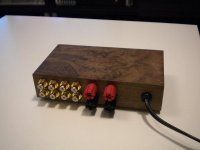
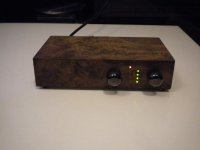
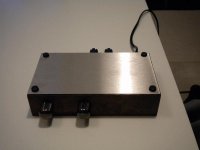
Below is my first attempt at a Class-D amp. I wanted to make something small, portable, and somewhat tolerant of water for when we show movies in the backyard. It turned out that an old 50 cal ammo box fulfilled that need quite well, and at a very reasonable price.
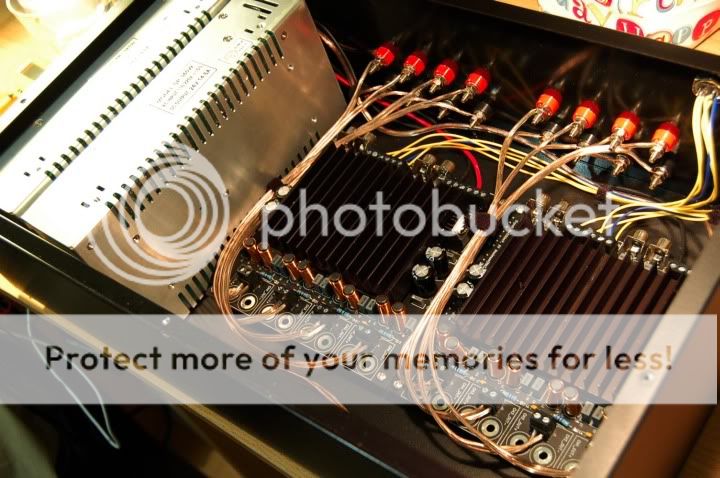
On the front there is the 50k stepped attenuator with massive aluminum knob, on/off switch with safety cover (for fun), front/back input selector, and led indicator. On the right side are some vent holes and a hastily added on/off switch for the case fan. On the left is the case fan, which was salvaged from something long ago and is powered at 5v to keep the noise down. However rough around the edges it is on the outside, it pales in comparison to the hot mess on the inside. Suffice it to say there is a 2x100w Sure board (only modification is the passive heatsink), a 36v Meanwell SMPS, and a pot to adjust the brightness of the led on the front.
Overall, I had a lot of fun getting this thing together and making it work. There a lot of things I could have done better, but I'm happy enough that it works at all. One thing that I think really could have improved the design are punched louvers rather than the inlet holes and case fan, but I couldn't figure out how to do that.
Below is my first attempt at a Class-D amp. I wanted to make something small, portable, and somewhat tolerant of water for when we show movies in the backyard. It turned out that an old 50 cal ammo box fulfilled that need quite well, and at a very reasonable price.
On the front there is the 50k stepped attenuator with massive aluminum knob, on/off switch with safety cover (for fun), front/back input selector, and led indicator. On the right side are some vent holes and a hastily added on/off switch for the case fan. On the left is the case fan, which was salvaged from something long ago and is powered at 5v to keep the noise down. However rough around the edges it is on the outside, it pales in comparison to the hot mess on the inside. Suffice it to say there is a 2x100w Sure board (only modification is the passive heatsink), a 36v Meanwell SMPS, and a pot to adjust the brightness of the led on the front.
Overall, I had a lot of fun getting this thing together and making it work. There a lot of things I could have done better, but I'm happy enough that it works at all. One thing that I think really could have improved the design are punched louvers rather than the inlet holes and case fan, but I couldn't figure out how to do that.
An externally hosted image should be here but it was not working when we last tested it.
An externally hosted image should be here but it was not working when we last tested it.
An externally hosted image should be here but it was not working when we last tested it.
Last edited:
Sorry - still figuring out how to post photos. Hopefully this will work better.
An externally hosted image should be here but it was not working when we last tested it.
An externally hosted image should be here but it was not working when we last tested it.
Hello,
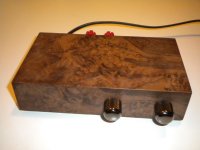
here is my newest projekt...
Helder TK2050 (two mono-amps) and a PGA2311 pre-amp.
Sounds really great without noise or humming!
Very fine details, wide stage and a spectacular dynamic and bass.
I did some changes on the TK2050 boards...
Don't like the quality of soldering and board layout from Helder.
The mass bridges were to week and desoldering nearly unpossible without destroying the board.
I did some increases at the mass bridges and changed the caps to Nichicon FG 4.700uF 35V.
The PGA2311 is also different to the pre-amps in ebay... it uses the DIP-version
of the chip with many different caps and capacities than the commercial ones (Nichicon Muse, ELNA Cerafine).
The powerboards uses 4x 15.000uF 50V ELNA caps with bypasses... toroid transformers are 24V 200VA and 6V 30VA.
But take a look for yourself... 😉


Regards
Oliver
here is my newest projekt...
Helder TK2050 (two mono-amps) and a PGA2311 pre-amp.
Sounds really great without noise or humming!
Very fine details, wide stage and a spectacular dynamic and bass.
I did some changes on the TK2050 boards...
Don't like the quality of soldering and board layout from Helder.
The mass bridges were to week and desoldering nearly unpossible without destroying the board.
I did some increases at the mass bridges and changed the caps to Nichicon FG 4.700uF 35V.
The PGA2311 is also different to the pre-amps in ebay... it uses the DIP-version
of the chip with many different caps and capacities than the commercial ones (Nichicon Muse, ELNA Cerafine).
The powerboards uses 4x 15.000uF 50V ELNA caps with bypasses... toroid transformers are 24V 200VA and 6V 30VA.
But take a look for yourself... 😉
Regards
Oliver
Last edited:
Awesome! 🙂Fumac, does your MHz-power design drop in freq like UcD does ?
If so, about how much ?
anyways heres my prototype: http://diymania.hv4all.com/selfosc classd/new/prototype/d-amp.JPG
Class d valve hybrid
SRPP valve front end with class d mosfet stage.
Uses irs2092 class d chip.
SRPP valve front end with class d mosfet stage.
Uses irs2092 class d chip.
An externally hosted image should be here but it was not working when we last tested it.


Sure Electronics TK2050 TP2050 AMP
145W 24V DC 6A power supply
Mini PCM2704 USB DAC
IKEA GRUNDTAL Tissue box ($8)
Not much space left in the box 🙂


.JPG)
.JPG)
.JPG)
.JPG)
.JPG)
Regards Håkan
145W 24V DC 6A power supply
Mini PCM2704 USB DAC
IKEA GRUNDTAL Tissue box ($8)
Not much space left in the box 🙂
Regards Håkan
Cost $250 to build, including the case. Sounds awesome.
looks great! what case did you use?
- Home
- Amplifiers
- Class D
- Class D Amp Photo Gallery