Being working on this project for the last two years. Here the final result, working perfectly.
This project started when one of my friend brought me a defective SL1 (original), he said: <nothing serious, just a little noise at the output, probably a noisy tube...>, one month later it was fixed, nothing serious, yeah right... When I started to work on the unit at first I was completly lost, it was a very complex preamp, with a lot of SS parts near the tubes, very complex HV regulator section, and external power supply. I rapidly realized that the supply was defective, and that probably some other parts, these small TO92 SS parts were gone as well. I had no schematics, they were impossible to get, I was left in the dark.
I said to my friend I can try to fix it, but it will be expensive, and will take me a long time (doing repair part time, was still working at the time). First I needed to repair the HV section, all the heaters supplies seems ok. I started to trace the HF regs section schematic, it was a mess, even worst, some part of it was inside the external supply. I worked, and worked, and finally got something that make sense. I isolated this section, and found all the defective parts, replaced them, and got a working HV regs. Then using an external lab power supply (current limited), and by isolating each tubes section, found the shorted/open SS parts driving the tubes (then are small MOSFET), and replaced all the defective ones, tracing the schematic while I go.
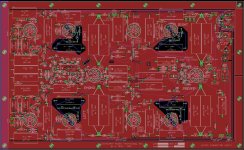
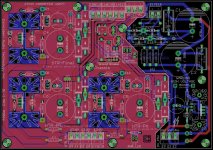
While doing the schematics, it was difficult to trace the PCB, and to see where all the traces were going, so to help me I started making a PCB, to help tracing, and figuring the schematics. When I was done I had a pretty close PCB, probably with some errors, but enough to complete my schematics and the repair.
We listend to the repaired unit and we found it was one of the best preamp we ever listened to, period. And the phono section is just gourgeous. A real reference preamp...
A few years later an other friend ask me for a recommadation for his system (he has a Pass XA30.8 as amp). He was looking for a good preamp, and a phono preamp. I told him that the CAT SL1 was doing all that, in one package. I bought a used unit from Alberta, but guess what it was intermittent. I had to repaired this one two. It has a few problem, intermittent tube sockets, and a few cold junction soldering. Repalced all the sockets, and redo the solder joint and it was ok. This unit was slightly newer than the the first one I repaired, version MKII. I used my previous info for the repair, fine tuned my schematics and PCB layout, and did the few new changes.
Then finally I had to repair a third one, this one had a severe problem. The power supply main transformer has the HV secondary burned, litterally detroyed, and the rest of the HV section gone naturally. One very bad short coming of this preamp supply is this, the main fuse will let go if one of the high current heater supply short, but won't blow if it is only the much smaller current HV section. The HV really needs its separate low rating fuse.
I was pretty close the first time, and I was confident I had the real thing. During COVID I had spare time and decided to make myself a CAT SL1, my own version. To improve on the thing I don't like about the originals I worked on I decided to make these changes:
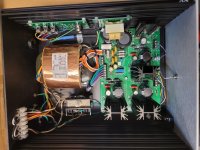
-Better made external power supply, with larger enclosure, proper layout, bigger regulator heatsinks, CRC filtering and better caps on the HV section, Separate fuses on all the outputs (Heaters and HV), and since I want SE/BAL converters in the preamp, extra +/-24V supply for these converters.
-I hate the original cable between the supply and preamp. It can't be disconnected, it is large gauge, not very good quality ( at least on the ones I saw), make working on the preamp difficult, etc... So I want a flexible cable, with detachable connector at the preamp. I know, it may not sound as good as the fixed one, but no way I'll have a captive cable on my preamp...
-Added a ground breaker to the supply, my own version of the Ayre noise filter and Furutech IEC AC inlet connector.
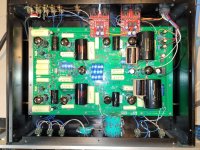
-The original used the excellent, and now gone REL-Caps everywhere (the new one have custom made caps). I cannot get REL-Caps, so used more mondain IC film caps for the supply, and Mundorf caps for coupling. For the output I went over the board with Mundorf Supreme Silver/Gold/Oil caps, bypassed with Duelund copper foil.
-The original has the excellent ROE resista resistors. One of my friend was able to give my most of the values I needed. Used a mix of Tantalum and Shinkoh and Kiwame resistors for the rest.
-The original used for volume an Electroswitch 24 steps attenuator with ROE descrete resistors. Again impossible to get, found a 4 decks one on ebay. Mounted all the ROE resistors, ans it tested fine.
-The Balance used a smart way of doing the balance without impacting on the channel crosstalk. It adds resistors on the lowering channel, in fact increasing these channel volume total value, decreasing the actual volume, while the other channel don't move, clever. Again it is using an Electroswitch rotary switch, got this one at Mouser...
-I made a few years back small SE/BAL and BAL/SE converter PCB, using the mostly transparent DRV134 and INA2134 chips. I installed them inside the preamp. The SE/BAL input converter is only on the CH1 input, with a switch to select between RCA and XLR. The SE/BAL output converter is at the output. Since this preamp can produce HUGE output level, I installed +/-12V protection zener at the input, in fact limiting the preamp to +/-12Vpk-pk output. If the preamp is so good I may install Lundhall balanced output down the road...
-The MK2 version I saw use Cardas hook-up wiring, I used the same.
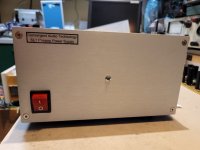
So, here my preamp, after all this work I'm very happy with the result, no noise, phono section has a perfect RIAA curve after some tuning, same gain on both channels with the tubes I used, very stable HV supply with no noise. Yes I used a clone enclosure from China but I remade completly the rear panel, and trashed the included cheap toggle switches, bought good quality C&K ones.
Here a few measurements:
Preamp Section gain: 25.5dB, BW 836Khz, Vout max 50Vac (limited now by the SE/BAL converter inout zener at +-12Vpk-pk), THD: 0.01%, noise <1.2mvac, Zout around 500 ohms.
Phono section gain: 45dB with external load connector. Huge overload threshold. My friend use it with a Denon DL103 without problem...
This project started when one of my friend brought me a defective SL1 (original), he said: <nothing serious, just a little noise at the output, probably a noisy tube...>, one month later it was fixed, nothing serious, yeah right... When I started to work on the unit at first I was completly lost, it was a very complex preamp, with a lot of SS parts near the tubes, very complex HV regulator section, and external power supply. I rapidly realized that the supply was defective, and that probably some other parts, these small TO92 SS parts were gone as well. I had no schematics, they were impossible to get, I was left in the dark.
I said to my friend I can try to fix it, but it will be expensive, and will take me a long time (doing repair part time, was still working at the time). First I needed to repair the HV section, all the heaters supplies seems ok. I started to trace the HF regs section schematic, it was a mess, even worst, some part of it was inside the external supply. I worked, and worked, and finally got something that make sense. I isolated this section, and found all the defective parts, replaced them, and got a working HV regs. Then using an external lab power supply (current limited), and by isolating each tubes section, found the shorted/open SS parts driving the tubes (then are small MOSFET), and replaced all the defective ones, tracing the schematic while I go.
While doing the schematics, it was difficult to trace the PCB, and to see where all the traces were going, so to help me I started making a PCB, to help tracing, and figuring the schematics. When I was done I had a pretty close PCB, probably with some errors, but enough to complete my schematics and the repair.
We listend to the repaired unit and we found it was one of the best preamp we ever listened to, period. And the phono section is just gourgeous. A real reference preamp...
A few years later an other friend ask me for a recommadation for his system (he has a Pass XA30.8 as amp). He was looking for a good preamp, and a phono preamp. I told him that the CAT SL1 was doing all that, in one package. I bought a used unit from Alberta, but guess what it was intermittent. I had to repaired this one two. It has a few problem, intermittent tube sockets, and a few cold junction soldering. Repalced all the sockets, and redo the solder joint and it was ok. This unit was slightly newer than the the first one I repaired, version MKII. I used my previous info for the repair, fine tuned my schematics and PCB layout, and did the few new changes.
Then finally I had to repair a third one, this one had a severe problem. The power supply main transformer has the HV secondary burned, litterally detroyed, and the rest of the HV section gone naturally. One very bad short coming of this preamp supply is this, the main fuse will let go if one of the high current heater supply short, but won't blow if it is only the much smaller current HV section. The HV really needs its separate low rating fuse.
I was pretty close the first time, and I was confident I had the real thing. During COVID I had spare time and decided to make myself a CAT SL1, my own version. To improve on the thing I don't like about the originals I worked on I decided to make these changes:
-Better made external power supply, with larger enclosure, proper layout, bigger regulator heatsinks, CRC filtering and better caps on the HV section, Separate fuses on all the outputs (Heaters and HV), and since I want SE/BAL converters in the preamp, extra +/-24V supply for these converters.
-I hate the original cable between the supply and preamp. It can't be disconnected, it is large gauge, not very good quality ( at least on the ones I saw), make working on the preamp difficult, etc... So I want a flexible cable, with detachable connector at the preamp. I know, it may not sound as good as the fixed one, but no way I'll have a captive cable on my preamp...
-Added a ground breaker to the supply, my own version of the Ayre noise filter and Furutech IEC AC inlet connector.
-The original used the excellent, and now gone REL-Caps everywhere (the new one have custom made caps). I cannot get REL-Caps, so used more mondain IC film caps for the supply, and Mundorf caps for coupling. For the output I went over the board with Mundorf Supreme Silver/Gold/Oil caps, bypassed with Duelund copper foil.
-The original has the excellent ROE resista resistors. One of my friend was able to give my most of the values I needed. Used a mix of Tantalum and Shinkoh and Kiwame resistors for the rest.
-The original used for volume an Electroswitch 24 steps attenuator with ROE descrete resistors. Again impossible to get, found a 4 decks one on ebay. Mounted all the ROE resistors, ans it tested fine.
-The Balance used a smart way of doing the balance without impacting on the channel crosstalk. It adds resistors on the lowering channel, in fact increasing these channel volume total value, decreasing the actual volume, while the other channel don't move, clever. Again it is using an Electroswitch rotary switch, got this one at Mouser...
-I made a few years back small SE/BAL and BAL/SE converter PCB, using the mostly transparent DRV134 and INA2134 chips. I installed them inside the preamp. The SE/BAL input converter is only on the CH1 input, with a switch to select between RCA and XLR. The SE/BAL output converter is at the output. Since this preamp can produce HUGE output level, I installed +/-12V protection zener at the input, in fact limiting the preamp to +/-12Vpk-pk output. If the preamp is so good I may install Lundhall balanced output down the road...
-The MK2 version I saw use Cardas hook-up wiring, I used the same.
So, here my preamp, after all this work I'm very happy with the result, no noise, phono section has a perfect RIAA curve after some tuning, same gain on both channels with the tubes I used, very stable HV supply with no noise. Yes I used a clone enclosure from China but I remade completly the rear panel, and trashed the included cheap toggle switches, bought good quality C&K ones.
Here a few measurements:
Preamp Section gain: 25.5dB, BW 836Khz, Vout max 50Vac (limited now by the SE/BAL converter inout zener at +-12Vpk-pk), THD: 0.01%, noise <1.2mvac, Zout around 500 ohms.
Phono section gain: 45dB with external load connector. Huge overload threshold. My friend use it with a Denon DL103 without problem...
Attachments


Last edited:

Sorry no schematics, this preamp is still a commercial product. I did my own version. No insurance I made it right everywhere. It is good for me, but it is not the real thing. Just the caps are impossible to get, and contribute certainly to the original great sound. Without a real one by your side, with all the little details evrywhere it would be very difficult to reproduce.
Anyway my schematics are hand drawn, very badly drawn I may say, and difficult to make sense, even for me...
SB
Anyway my schematics are hand drawn, very badly drawn I may say, and difficult to make sense, even for me...
SB
That’s pretty close to the real thing. The phono section RIAA values are incorrect thought. There are a few errors here and there but you get the idea of the circuit. I also found this schematic back then and used it against my own traced ones. It makes sense, in particular the HV regs section is ok…
But there are errors, for example if you follow this schematic the mute relay will never unmute…
Also this schematic needs the pcb layout to really makes it sing. The ground layout in particular is pretty fancy, with high current insulation sections, star ground, ex… some sections also have no ground plane to reduce capacitive effect, really needed for high impedance sections.
As always, a good design is maybe 70% circuit topology, 30% pcb layout. Looking at the schematic you can guess why it took me months to design the pcb for it.
Btw we had made custom power transformer to built the supply, it works beautifully. A must need for this built.
But it is a good start, food for thought as you say…
SB
Last edited:
This thread make no sense without schematic....
There are many factory versions of the basic circuit, since it's been in production for a long time.
Bu this thread has several versions.
https://www.diyaudio.com/community/threads/diy-cat-sl1-preamp.218367/
I won't argue about the circuit topology, its complexity (needed or not needed), but we are listening to this preamp on a very high end system (Wilson Audio speakers, Vaccuum State 300B tube monoblock amps, Yamamoto Tube output dac, Aurender streamer, Tidal music files, etc) and I can tell you that this preamp plays wonderfully. We listened to our lot of top preamps over the years and the CAT is amond the top of the best ones we ever had the pleasure to listen to. This evening we will try the phono section.
Will you compare entire preamps with each other, or just the phono sections,
using one particular line stage for all of them?
using one particular line stage for all of them?
State RTP3D, I made one, or Air Tight ATC-2, used to have one. Pass Labs preamp, Curcio Daniel 2 heavily mods, etc…
Just the preamp section for now, but some years ago we listen to an original one, the phono section was a killer. Really a great phono preamp.
SB
Just the preamp section for now, but some years ago we listen to an original one, the phono section was a killer. Really a great phono preamp.
SB
Could you be more specific and select one that's the exact copy?There are many factory versions of the basic circuit, since it's been in production for a long time.
Bu this thread has several versions.
https://www.diyaudio.com/community/threads/diy-cat-sl1-preamp.218367/
"Could you be more specific and select one that's the exact copy?"
There's no way to know for sure. There was no official mfr schematic released.
And there have been quite a few versions over the 38 years of production.
There's no way to know for sure. There was no official mfr schematic released.
And there have been quite a few versions over the 38 years of production.
Last edited:
I used an original one that I had for repair, without any info for it, and I made a exact copy of the main pcb, and improved the external psu design that was very basic. See the story at the beginning of the thread. It was the MK2 version, an old version still using REL-CAP and resista resistors, long discontinued… Than later I found this exact schematic, and was able to compare to my own hand draw one. I could confirm that it was good, except for a few errors…
Don’t know yet, the wifes came down to the listening room and we had to go upstair for the supper. Then my friend left for a week at Vancouver. Me i had other things to do, so we postponed the vinyl test. But the preamp section itself was gourgeous…
Stay tuned…
SB
Stay tuned…
SB
- Home
- Amplifiers
- Tubes / Valves
- CAT SL1 - My own version