How fast? Use surface feet
Tool speed is generally given in "surface feet per minute". Mentally straigten out the cutting edge of a round cutter, and think of it as how many feet worth of cutter would pass over a point in a minute. As you can see, that is a way of talking about cutting speed that is not connected to the actual diameter of the cutter, yet defines the rpm you need once you fix the diamter of the tool.
Google gives me:
http://tooltech1.com/sfm.htm
http://www.i-logic.com/utilities/SFM.asp
Progress update...
From having never worked with metal, to two cases in a fortnight. Satisfaction guaranteed. 😀
From having never worked with metal, to two cases in a fortnight. Satisfaction guaranteed. 😀
An externally hosted image should be here but it was not working when we last tested it.
I think the hard part is done - getting the panels to fit together. There's a few bits that need trimming which I'll attempt with a router and flush trim bit. Those Dewalt drill bits worked a treat for flush installing the front bolts accurately.
This is how I'll lay it out internally. The pot will be on the right side and the inputs and outputs will be behind the amps. I've tried to keep the PSU components away from everything else and the amp in/outs direct as possible. Any criticisms/suggestions?
This is how I'll lay it out internally. The pot will be on the right side and the inputs and outputs will be behind the amps. I've tried to keep the PSU components away from everything else and the amp in/outs direct as possible. Any criticisms/suggestions?
An externally hosted image should be here but it was not working when we last tested it.
You will be using shaft extender to keep the pot in a back?
If any critisism, the top panel should be over the rear panel, as from the pics, it seem like it's the other way around😉
If any critisism, the top panel should be over the rear panel, as from the pics, it seem like it's the other way around😉
I was actually thinking about putting the pot just behind the front panel. Why put it in the back?
Now that you mention it, I don't know why I let the top panel sit inside the front and back panels. I actually planned out this enclosure on my own (honest ), and did take a closer look at the group buy chasis after realising the similarity, but the rear panel seems to have escaped me.
Now that you mention it, I don't know why I let the top panel sit inside the front and back panels. I actually planned out this enclosure on my own (honest
), and did take a closer look at the group buy chasis after realising the similarity, but the rear panel seems to have escaped me. Vikash said:I was actually thinking about putting the pot just behind the front panel. Why put it in the back?
Now that you mention it, I don't know why I let the top panel sit inside the front and back panels. I actually planned out this enclosure on my own (honest
One advantage of the rear panel under the top panel is additional support the top gets, not to mention it's more visually pleasing 😉
Regarding the pot, if you position it closer to the amp, you have less wires to run, less influence of wires on the sound and less chances of picking up interferences. Mounting the pot in a back shouldn't be a problem, just one additional angle supported off the bottom or side panel. And shaft extenders are easy to make, I can even send you one if you want 😉
Table saw, appropriate aluminium blade, and Rocol compound for lubricant. See also post #7 and post #38. 😉
I've re-thought the internal layout and moved the pot to the back centre. The rectifier board now comes to the front right. Now all the wires will be minimal lengths, and no amp wires crossing psu wires. Volume control in centre of amp. I've yet to choose a pot so don't know how I will attach a shaft to it yet. I'm reading good things about the Vishay Sfernice P11 which looks to be the favourite at the moment.
I tried using the router on the alu again but still found it difficult to control as the bit keeps wanting to throw the piece. The router is mounted to a DIY table and I'm using a Freud flush trim bit on the cheapest router ever made.
I've also just tried a freeze dried strawberry. Don't do it.
I tried using the router on the alu again but still found it difficult to control as the bit keeps wanting to throw the piece. The router is mounted to a DIY table and I'm using a Freud flush trim bit on the cheapest router ever made.
I've also just tried a freeze dried strawberry. Don't do it.
It might not be the best, as you need slower speeds for aluminum. But it's still workable. Get yourself metal blade though, and depending on a size, it sometimes may be a problem.
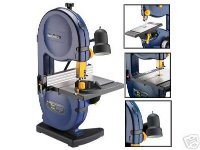
i have this bandsaw:
http://www.sears.com/sr/javasr/prod...ertical=TOOL&pid=00921413000&subcat=Band+Saws
http://www.cowanrg.mesanetworks.net/projects/images/shop/shop4.JPG
and it works fine for aluminum work. i can even cut thinner steel with it. ive cut up to 1/2" with it, none bigger though (not tried yet). it cuts pretty clean, pretty straight, and pretty easily. its a nice tool to have for all sorts of things.
my advice with bandsaws is find a place that offers different blade types and try them out. i have a hardware store that makes blades in many different types. you select the length, the width of the blade, and the TPI count, and they make it for you. i got like 3 different combinations and tried them out. it turns out for aluminum, the one that i didnt think would be the best, was the best. i thought a higher tooth count would be better, but its a slower cut and it clogs easier, and thus gets dull really quick.
http://www.canadiantire.ca/assortme...<>ast_id=1408474395348027&bmUID=1092030486155
found some😉 good thing u warned me about a fine tooth blade
i was thinking it would work better
found some😉 good thing u warned me about a fine tooth blade
i was thinking it would work better
- Status
- Not open for further replies.
- Home
- Amplifiers
- Chip Amps
- Case and metal working