I tried sanding the edges of a 6mm aluminium panel today but I can't get seem to get a straight edge finish. This is the belt sander I'm using. I've only tried the standard 60 grit paper that came with it so far. Any ideas what I'm doing wrong?
No, you are not doing anything wrong. As the belt whips around, it doesn't stay flat on the platen. It might help to reduce the belt speed if possible.
The belt sander speed by itself is fine.
The 60 grit paper is a bit coarse. Try to use at least 80, and 100 could be your finishing grit.
If you brush on the longer side (of the edge) than having two wooden blocks on the sides of metal piece would help in keeping it perpendicular to the belt surface.
If you do your brushing across the edge, than some sort of table surface is helpful in positioning the piece properly against the belt, which should be vertical then.
Yes. I did some experimenting and by using the part of the belt where it just comes over the drum (the belt is therefore still tight on the bed) it solves the issue mostly. Peter, I was using a table/fence and tried sanding both vertically and horizontally, but I found the problem was actually the heat in the end. The piece was burning to the touch (I was wearing gloves and didn't notice at first), but a constant supply of lubricant (WD40 sprayed every 3-5 seconds) kept the material cool to the touch and sanded evenly.chipco3434 said:As the belt whips around, it doesn't stay flat on the platen

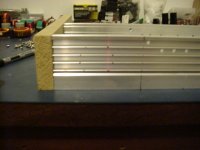
While I wait for some finer grit belts, I started manually sanding the heatsinks as perfect edges aren't neccessary - the results are really good, although it's a time consuming process.
(Four pieces 4mm thick - sanded with 150 grit, then 320, and 500)

If there is a better jig/idea for manual sanding then please share...
I forgot to mention a lubricant, and it's really neccessary for smooth finish. I was using WD40 initially, but later, on advice from a metal finishing house, I started using Varsol, which is much more friendly than WD40. It's not sticky, dries nice and doesn't leave any residue on the belt.
line graining
i think this is what you want?
just get it close with 80 on the belt sander then stick a large peice (3m makes a great spray adheisive)of 80 or 120 to a flat table and work your peice on that by hand with a little water.i find it alot easier to get the lines strait this way.if you are looking for a better finish use some wet scotch brite in the same manner following the 120.
yosh
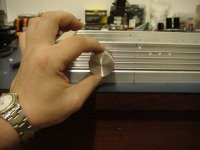
This is a piece I made completely by hand using a flat block and a straight-edge as a guide. I don't know how it compares to other people's work (or even PD's), but I am pretty satisfied. It's hard getting it completely even, not to mention that it takes hours  I think that I am only going to brush the front/sides and maybe try sandblasting the top/bottom/rear. What do you guys think?
I think that I am only going to brush the front/sides and maybe try sandblasting the top/bottom/rear. What do you guys think?An externally hosted image should be here but it was not working when we last tested it.
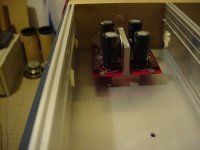
I did the front and back of the copper heatsinks on the disc sander today going through 150 grit, 320, 600 and finishing on 1200. I used WD40 up to 600 and then white spirit on the 1200 grit.

There are still some marks in the direction of the disc which I'd like to remove. Can these be buffed out with a cloth and some kind of rubbing compound?
There are still some marks in the direction of the disc which I'd like to remove. Can these be buffed out with a cloth and some kind of rubbing compound?
Hi!
I apologize for placing my question here - but since this is a debate about case and metal working:
- I got an idea yesterday - I have a plan to build a small A class amp with 20W dissipation/channel - but this time I wouldn't like to use "standard" heatsinks - I've been thinking - probably I could use side Al plates as a heatsink - one plate per each side: (250mm x 80mm x 20mm) aluminium plate with 11-12 vertical holes with fi=10mm ... ( a little bit similar to BOW's ZZ)
Hmm - I just wonder - I know that in the case of GC that kind of alternative heatsink would be overkill ... But I'm a little bit sceptical considering they will have permanent 20W dissipation ...
Any ideas will that be sufficient?
Thanks
Re: hmm
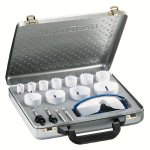
ive used them on metal before... i would only do it with a drill press though. clamp the piece tightly, go slow, and make sure its a bi-metal hole saw.
ive used them on metal before... i would only do it with a drill press though. clamp the piece tightly, go slow, and make sure its a bi-metal hole saw.
karma said:what about something like this hole saw. would this work?
Re: hmm
--Ferdi
No, I don't think those would work unless you wanted to cut all the way through. But, as I understood it, you want to have the flat alu left. You could use that to cut a nice circle in the fins and then maybe use a dremel to cut away the fins inside the circle? I think you really need some kind of mill to do it right.karma said:what about something like this hole saw. would this work?
--Ferdi
oh, he doesnt want to cut all the way through?
if you wanted to get real time-consuming you could just use a sanding disc on a drill press and sand it down...
if you wanted to get real time-consuming you could just use a sanding disc on a drill press and sand it down...
its a bi-metal hole saw. but ill try the sanding thing first see how it turns out. i have a dremel tool and a drill press one of em should do it
thanks..
thanks..
I would probably go with a hole saw. You have to put some wooden inserts between fins, as otherwise they might get bended. Also, before saw hits the fins, a drill bit has to be inserted in a base for proper guiding (so the drill bit has to be long enough).
Then break off the fins with pliers and finish off the remaining pieces with a disk sander.
Then break off the fins with pliers and finish off the remaining pieces with a disk sander.
- Status
- Not open for further replies.
- Home
- Amplifiers
- Chip Amps
- Case and metal working