I am currently working on a 2nd edition to the Manual. A couple of errors in the first are being corrected and I am adding to the information base. I will likely separate out the information base from the instructions for those who are already knowledgeable or who don't want to read more than they have to . Any findings, additions, suggestions, criticisms, or corrections would be greatly appreciated. I will also be adding a few new spreadsheets. If anyone has access to spreadsheets or has built any that they feel would be of assistance to others working with Speaker Workshop, feel free to Email them to me. I will certainly credit the author.
Thanks,
Jay
p.s. target date is the end of the year for completion due to multiple other concurrent obligations.
Thanks,
Jay
p.s. target date is the end of the year for completion due to multiple other concurrent obligations.
good work 🙂
Hi Jay,
Good to hear that you are doing an update, the first manual is invaluable (made my speaker workshop experience so much better!!!), though I did notice ocasionally that some things weren't quite clear...
I'm just getting back to my project after 3 months of inactivity and I'm starting to look at the SW manual again, I'll try and make notes of any thing I find difficult to understand.
I'm just on page 102 at the moment, and I find it quite confusing... I'm using a walin jig II, but I suspect that the instructions 2 through 5 are really for Claudio's cables, and not particularly relevant to the walin jig II?? Even if I take this as the case I still find it confusing....
I don't understand step 3, where in speaker workshop do you adjust the volume?
Also is the idea here to get the levels from the mic, and the amp to be close to the same? I remember I had difficulty with this before.... maybe I should use a Claudio type cable for acoustic measurements, would probably give a finer level of control than my 0, 10 or 20 db attenuation with the walin Jig. The problem I found with the Jig + walin preamp II was that if I set the amp to a high enough level to get decent levels from the mic, I had to use the 10db attenuation on the jig, but then the ref signal was too low.....
Tony.
OK an extra bit 🙂 relevant to Audigy 2 ZS owners:
on page 45 step 5, substitute analog mix for line in.
in addition to step 8, tick the box record without monitoring.
Also before proceding to the check sound car wizard go to options/ preferences/ general and make sure the check 96Khz tick box is ticked. If it was not, then tick it, close speaker workshop and reopen. If this is not done you will not get 96Khz sampling even if your card supports it.
Tony.
on page 42/43 (for owners of an audigy II ZS) do not mute "line in" when carrying out step 3/4. if you do you will not be able to record.
Can you tell I'm resetting up speaker-workshop 😉 did a pc rebuild and although I had all my project stuff saved, the other settings are gone...
also on page 50, swap the order of the max and min settings in step 34 as they appear in the dialog box in the reverse order to the instructions..... probably being picky now, but still....
Tony.
Please keep up the good work. I don't currently have the time to re-edit the whole first edition (though I hope to review prior to releasing the 2nd edition) and the more eyes to look it over, the better. I welcome the input.
Thanks
Jay
Thanks
Jay
I haven't read the whole manual, apologies if it is already implemented, but it would be really useful if there was a clear, emphasized procedure of
making phase reliable measurements for all the drivers when aiming in crossover design, something that many users dont pay attention to. For example checking the Measurement.in.l file each time, like
Dick is mentioning at his website :
http://home.hccnet.nl/ine.dick/Jan's speaker/pages Jan/p11a.html
Thank you for all the helpful work you 've done for us !!
Thanks for the reply. Phase is mentioned and stressed. Regarding the xover issue, one generally designs a crossover based upon either a listening position or the standard 1 meter (I prefer the former method). By taking measurements with no changes in mic placement or gating, phase differences are taken into account in crossover design in SW. This is covered in the Manual.
Jay
Jay
Hi JMB,
Just another thing I think you should add to the speaker workshop manual 🙂
I couldn't work out why the phase in my gated measurements looked completely wrong. jbateman just sorted me out with the transform delay function. This is mentioned in the manual but on the page titled Excess Delay (page 122) quite a few pages on from the measurements and the graph showing the phase.... the other problem is that I stopped reading this when it said "It is not recommended to use this as if you take all measurements from a reference point, it will already be adjusted for in SW."
I think maybe you should include a picture of what the phase measurement looks like without doing this cleanup and then say if you want to clean this up use the function and show what the phase looks like afterwoulds. You can then put in the warning about the excess delay, and doing it for all of the drivers....
here is a link to what jbateman posted for me http://www.diyaudio.com/forums/showthread.php?postid=703912#post703912
I really was wondering why my phase data didn't look like the graph in the unofficial speaker workshop manual 🙂
Tony.
Any way to make the changes so that the entire manual doesn't have to be reprinted? Would save a few trees if old pages could be removed and new ones inserted.
Sheldon
Sheldon
Thanks for your suggestions. I will attempt to clarify the phase issue a little more in the next Edition.
Regarding just inserting modified pages, the Manual is undergoing an edit. I plan on restructuring it so that it is divided into 2 portions, an educational portion and a portion more devoted to Speaker Workshop. It is kind of a work in progress and will hopefully be a nice Xmas present to everyone.
Jay
Hi Wintermute,
I may not have time to go back and set up the whole project. Would you have any objection to my using some of the snapshots from your post?
Thanks,
Jay
I may not have time to go back and set up the whole project. Would you have any objection to my using some of the snapshots from your post?
Thanks,
Jay

That's fine 🙂 some of them are jbatemans though ( the ones showing all three pulse, before and after delay being removed in one shot)... though I guess I did have the three spread over a couple of posts 🙂
If you like I could send you higher resolution shots which should be better for printing 🙂 just let me know what you want 🙂 you can email me via the email link below.
Tony.
If you like I could send you higher resolution shots which should be better for printing 🙂 just let me know what you want 🙂 you can email me via the email link below.
Tony.
OK I've got another one 🙂
on page 49 when going through the calibration stuff, step 21 says cut and past into the calibration folder.... by default there is no calibration folder, so I created one myself using resource new folder... however I remember the first time I read it I was wondering why I didn't have a calibration folder and thought something must be wrong 🙂 probably should add in a step to create the calibration folder just for us dummys 😉
Tony.
another one 🙂
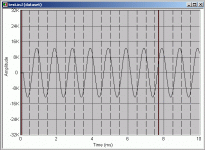
on page 51 (step 34 point vi) if the instructions have been followed then there will in fact be 10 sine wave cycles, as the X maximum was set to 10ms not 4ms as in the fig on page 50.
Oh I just thought of another thing that would be usefull. Putting figure numbers on all screen shots would make referencing them much easier 🙂
also if the instructions have been followed properly the waveform should be no where near 32K.... as the levels have been set to a low level to avoid frying the sound card
screen shot below:
Tony.
edit: submitted better screen shot.
Attachments
OK one more. On page 62 is the bit about testing with RMAA. This will not work with the Jig set to direct mode...... RMAA requires a loop of both left and right channels, so a double ended mini jack cable is the best option. Connecting with the jig results in only one output channel being fed back in to the two input channels, and RMAA won't like it 🙂
Tony.
Tony.
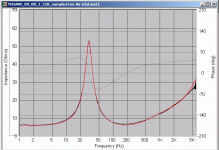
I'm just measuring my Vifa M26WR_09_08's at the moment for free air resonance... have been playing around with sample rates etc and remembered a post from before that mentioned about comparing the impeadance curve that was estimated to the impedance curve that was measured... it was another by jbateman here ---> http://www.diyaudio.com/forums/showthread.php?postid=696616#post696616
I think this is a really good technique and takes the guesswork out of whether or not you have an accurate measurement.
What I did was add the estimate dataset to the actual measured graph, and then tried varying the top and bottom freq cutoffs in the estimate parameters dialog until they matched up nicely 🙂 I think this is what point 33 is saying on page 77, but I'm not 100% sure as it says compare to the manufacturer specs..... so I thought when I read it the first time it was refering to the T/S params just calculated...
screen print attached. red trace is the estimated impedance, this result was gained after setting the freq range to 2Hz - 3Khz.
setting to 5Khz upper, results in more accuracy in the upper range of the estimated impeadance plot (above 4Khz) but less accuracy between 150Hz and 1KHz which I think is more important for a woofer 🙂
impeadance plot itself was measured at 12Khz sample rate 131072 sample size with a repeat count of 4.
Tony.
Attachments
Hi Jay,
another one if it isn't too late 😉
on page 151 Waterfall measurements. Point 6 it says "usually between 1 and 5 seconds", I think it should be 1 and 5 milli seconds! 🙂
Tony.
another one if it isn't too late 😉
on page 151 Waterfall measurements. Point 6 it says "usually between 1 and 5 seconds", I think it should be 1 and 5 milli seconds! 🙂
Tony.
- Status
- Not open for further replies.
- Home
- Loudspeakers
- Multi-Way
- Calling for help- starting Speaker Workshop Manual 2nd Edition