
Cool! 🙂
I wondered where that little res go to! Must have put it in by mistake, dont worry about it.
Get them in soon and post some pics and a report on the sound after the mod. The Diodes are a little tricky to fit, I can send you some pictures of mine tonight if you need.
PS: brown stuff on caps is just glue, nothing to worry about.
Mike.
Hey Stream,
You might want to peel off the white CA branding on those caps as it looks a bit messy, and we can see whats underneath! 🙂
Mike.
You might want to peel off the white CA branding on those caps as it looks a bit messy, and we can see whats underneath! 🙂
Mike.
btw Stream, I like your avatar. Are those speakers real? If so I'd love to know how you made them...
Valleyman, I found this pic (and then modified a little) in internet 🙂
Mike:

Inner body hasn't any info...
Mike:
An externally hosted image should be here but it was not working when we last tested it.

Inner body hasn't any info...
^^^^^^^^^^^^^^^^^^^
WHAT HE SAID!!!! Did you strip both caps?
It looks like you have cut along the stripe that marks the negative side with a blade. If so you should have a line on the side of the casing where the blade has scratched the metal, on the negative side.
I'm surprised that they are blank inside. I expected to see another manufacturers markings. Never mind, as long as you know what pin is the negative, you now have some cool looking shiny caps!
Let us know soon.😉
The embossed terminal rivet is the negative.
That slightly unusual riveting should be a clue to the manufacturer.
That slightly unusual riveting should be a clue to the manufacturer.
Of course I have thought about polarity between cutting 🙂
Bingo! My knife made a straight line on cap's body 🙂It looks like you have cut along the stripe that marks the negative side with a blade.
- PS recap
- diodes
- Cut all the caps in signal-circuit , besides opamp-input cap and LM-input cap.
- maybe change opamp to AD8066, if i'll make pcb for DIP=>soic
- Also thinking about adding little Epcos like it's made in SE version
- diodes
- Cut all the caps in signal-circuit , besides opamp-input cap and LM-input cap.
- maybe change opamp to AD8066, if i'll make pcb for DIP=>soic
- Also thinking about adding little Epcos like it's made in SE version
Sounds good.
If you have enough you could use them for bypassing the PS caps next to the 3886 chip and around the +/- 15v regs on the opamp supply. They also might be good for bypassing the signal path DC blocking caps. You could also try the 'snubber' using those caps if they are 50v or above?
Where?
If you have enough you could use them for bypassing the PS caps next to the 3886 chip and around the +/- 15v regs on the opamp supply. They also might be good for bypassing the signal path DC blocking caps. You could also try the 'snubber' using those caps if they are 50v or above?
Also thinking about adding little Epcos like it's made in SE version
Where?
100Vdc 68nF (B32529-C1683-K)
63Vdc 0,1 uF (B32529-C 104-K)
63Vdc 0,1 uF (B32529-C 104-K)
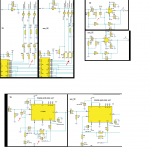
I posted one pic some time ago, but noone comment that...Please explain?
Attachments
- Status
- Not open for further replies.
- Home
- Amplifiers
- Chip Amps
- CA 340A SE LM3886 based amp - Upgrade advice please.