Hi Forum,
This thread is a description of my latest DIY speaker project I worked on during 14 months.
“Building the best 3-way full range speaker in the world”
This statement needs of course some clarification. The best speaker in the world does not exist. If there is something I have learned during this project is that a speaker project is all about compromises. Even if money is no object (and I had a serious budget), it is still all about compromises.
Size, width, depth, selection of units, selection of enclosure material, filter components, spikes, rubber feet, volume, closed or ported……. And so on.
A few years back I rebuild an Electro Voice Interface D speaker into a more modern version with the original drivers and a new filter and new enclosure. The end result was definitely a better version of the original. The enclosure was way more ridged and the filter components from a much higher quality than the original. This speaker was very impressive, live sounded live ….. at loud volumes. The set turned into a 5.1.4 Dolby Atmos system and for movies there was nothing better in my opinion. Dynamics were fantastic, and the AVR did some decent Audyssey room correction by equalizing the speakers.
So early last year (2017) I started to get less satisfied with this system. As good as it was for movies it didn’t tick the box for stereo anymore. At loud volumes it did okay, but it lacked resolution and I just never listened to stereo music anymore. I considered to buy a good equalizer but never found one that ticked all boxes.
Jumping 16 months forward I have listened to (stereo) music in the last months more than in the last 12 years (since I moved in my current home). I consider the below project my best speaker achievement. However, it was also the most difficult one.
Back to the project:
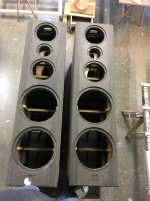
A friend asked me early last year if I could help him with a medium sized speaker and after a few discussions and checking out components I decided to replace my Interface D remake with something new. The criteria for me was building a decent sized front speaker. Full range (<30Hz – 25kHz). Powerful, high resolution by using the best components DIY builders can find and an enclosure that is very rigid, heavy and good looking.
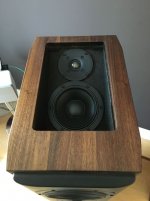
We first built a prototype of the two way mid sized enclosure to test the selected components. This speaker would be my friends front speaker and for me it would serve as the surround speaker with built-in upfiring Atmos unit as the separate top unit I built for my previous system was visually less attractive.
The selected components:
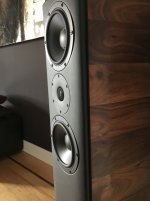
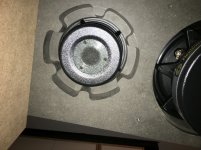
Tweeter for all units is the great Scan Speak beryllium D2908/714000 unit. Influenced by Troels Gravesen as some other decisions I made.
The Mid/LF units are Audio Technology 18H521706 SDKA in a d’Appolito arrangement. We wanted some LF authority in the 2-way system so double the cone size helped here. And you would be amazed how well this worked. The 2-Way sounds awesome. To get a slightly easier load we ordered these units with an Re of 7,5 Ohms. This speaker has a friendly 4 Ohm load.
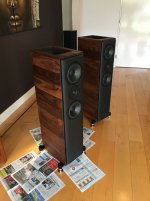
The woofers for the 3-way front speakers are the fantastic Audio Technology 10 C 77 25 10 KAP with a sandwich cone. These speakers were also ordered with an Re of 7,5 Ohm as I used 2 in parallel.
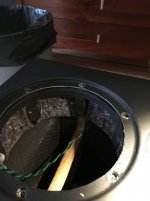
The 3-way has a vented LF enclosure tuned at 28Hz, but also the mid is vented. And the mids are so gorgeous, lush with warmth and resolution that I consider that as the best part of the speaker.
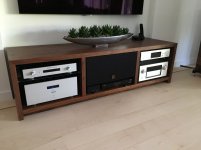
I also built a 3 way center speaker with the same components but added an Audio Technology 15H52 1206 SDKAM to get a better horizontal dispersion of two vertically placed units.
Some generic enclosure specifications:
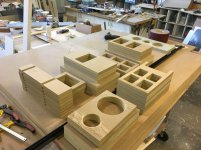
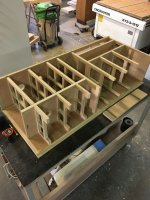
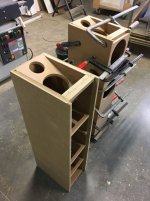
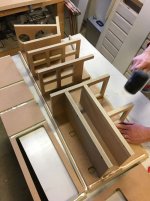
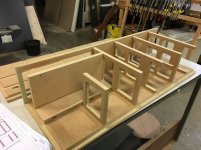
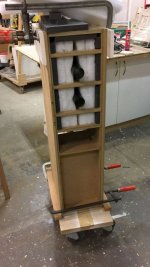
MDF 25mm for most parts side panels, 31 (25 and 6) for the large speakers. 18mm for all bracing and dual layers for top and bottom.
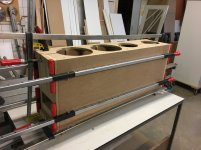
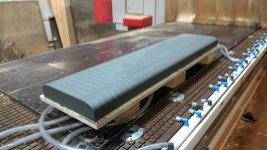
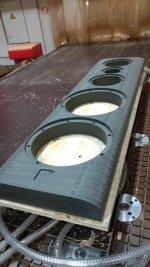
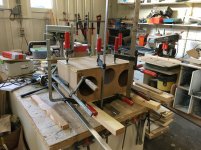
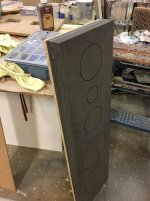
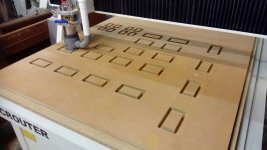
The front panels are 3 layers of 13mm HDF (1100kg/m3) and 5 layers for the big speakers. Glued together under a 30-ton hydraulic press and 5 axis CNC machined to a golden ratio curve. These baffles are covered with a 1,4mm leatherette that visually works very well with the speaker units to an aesthetic unity.
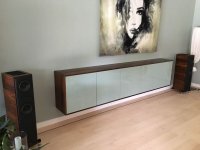
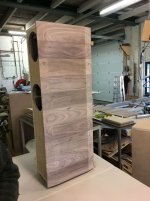
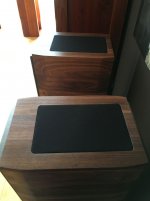
As an extra layer and to make them even more appealing in our living room I covered the enclosure with massive 20mm solid walnut panels that have a slight angle at the front and back to make these panels a bit less solid from the front. They are finished in a natural Tung-Oil.
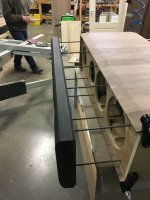
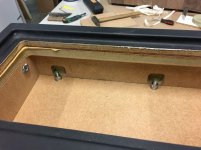
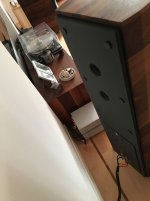
The front panel is connected to the rear panel with 10 pieces M8 stainless steel threaded rods to remove the last internal resonances by putting some tension on these rods.
One thing is sure for me: I am listening to more music than ever before. More music sounds better and it sounds great at really low volume levels as well. The speakers can go loud. And they go deep, very deep with authority, control, resolution and most important musicality. Old stuff recorded decades ago sound great, and also high resolution contemporary music as well.
I hope the below pictures say enough.
This thread is a description of my latest DIY speaker project I worked on during 14 months.
“Building the best 3-way full range speaker in the world”
This statement needs of course some clarification. The best speaker in the world does not exist. If there is something I have learned during this project is that a speaker project is all about compromises. Even if money is no object (and I had a serious budget), it is still all about compromises.
Size, width, depth, selection of units, selection of enclosure material, filter components, spikes, rubber feet, volume, closed or ported……. And so on.
A few years back I rebuild an Electro Voice Interface D speaker into a more modern version with the original drivers and a new filter and new enclosure. The end result was definitely a better version of the original. The enclosure was way more ridged and the filter components from a much higher quality than the original. This speaker was very impressive, live sounded live ….. at loud volumes. The set turned into a 5.1.4 Dolby Atmos system and for movies there was nothing better in my opinion. Dynamics were fantastic, and the AVR did some decent Audyssey room correction by equalizing the speakers.
So early last year (2017) I started to get less satisfied with this system. As good as it was for movies it didn’t tick the box for stereo anymore. At loud volumes it did okay, but it lacked resolution and I just never listened to stereo music anymore. I considered to buy a good equalizer but never found one that ticked all boxes.
Jumping 16 months forward I have listened to (stereo) music in the last months more than in the last 12 years (since I moved in my current home). I consider the below project my best speaker achievement. However, it was also the most difficult one.
Back to the project:
A friend asked me early last year if I could help him with a medium sized speaker and after a few discussions and checking out components I decided to replace my Interface D remake with something new. The criteria for me was building a decent sized front speaker. Full range (<30Hz – 25kHz). Powerful, high resolution by using the best components DIY builders can find and an enclosure that is very rigid, heavy and good looking.
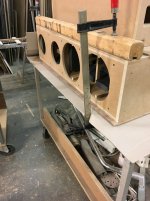
We first built a prototype of the two way mid sized enclosure to test the selected components. This speaker would be my friends front speaker and for me it would serve as the surround speaker with built-in upfiring Atmos unit as the separate top unit I built for my previous system was visually less attractive.
The selected components:
Tweeter for all units is the great Scan Speak beryllium D2908/714000 unit. Influenced by Troels Gravesen as some other decisions I made.
The Mid/LF units are Audio Technology 18H521706 SDKA in a d’Appolito arrangement. We wanted some LF authority in the 2-way system so double the cone size helped here. And you would be amazed how well this worked. The 2-Way sounds awesome. To get a slightly easier load we ordered these units with an Re of 7,5 Ohms. This speaker has a friendly 4 Ohm load.
The woofers for the 3-way front speakers are the fantastic Audio Technology 10 C 77 25 10 KAP with a sandwich cone. These speakers were also ordered with an Re of 7,5 Ohm as I used 2 in parallel.
The 3-way has a vented LF enclosure tuned at 28Hz, but also the mid is vented. And the mids are so gorgeous, lush with warmth and resolution that I consider that as the best part of the speaker.
I also built a 3 way center speaker with the same components but added an Audio Technology 15H52 1206 SDKAM to get a better horizontal dispersion of two vertically placed units.
Some generic enclosure specifications:
MDF 25mm for most parts side panels, 31 (25 and 6) for the large speakers. 18mm for all bracing and dual layers for top and bottom.
The front panels are 3 layers of 13mm HDF (1100kg/m3) and 5 layers for the big speakers. Glued together under a 30-ton hydraulic press and 5 axis CNC machined to a golden ratio curve. These baffles are covered with a 1,4mm leatherette that visually works very well with the speaker units to an aesthetic unity.
As an extra layer and to make them even more appealing in our living room I covered the enclosure with massive 20mm solid walnut panels that have a slight angle at the front and back to make these panels a bit less solid from the front. They are finished in a natural Tung-Oil.
The front panel is connected to the rear panel with 10 pieces M8 stainless steel threaded rods to remove the last internal resonances by putting some tension on these rods.
One thing is sure for me: I am listening to more music than ever before. More music sounds better and it sounds great at really low volume levels as well. The speakers can go loud. And they go deep, very deep with authority, control, resolution and most important musicality. Old stuff recorded decades ago sound great, and also high resolution contemporary music as well.
I hope the below pictures say enough.
Attachments
-
 Front speaker 01.jpg74.6 KB · Views: 7,178
 -
 IMG_9354 small.jpg159.6 KB · Views: 2,697
 -
 IMG_9356 small.jpg168.6 KB · Views: 2,519
 -
 Surround detail.jpg89.1 KB · Views: 2,455
 -
 Surround set with Atmos up.jpg57 KB · Views: 2,303
 -
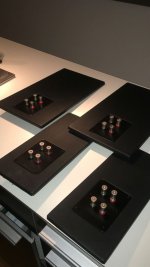
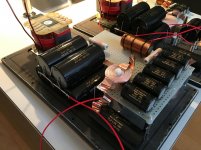
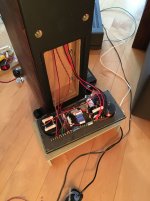
 Filter 1.jpg269.4 KB · Views: 2,472
 -
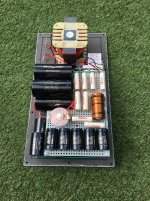 Filter 2.jpg327.6 KB · Views: 4,341
 -
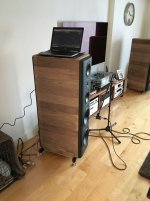
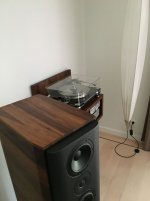 Front speaker with turntable.jpg68.7 KB · Views: 4,430
 -
 Front speakers Center.jpg91.3 KB · Views: 4,667
 -
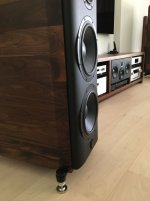 Front speaker details.jpg84.5 KB · Views: 4,726

Some more pictures
Attachments
-
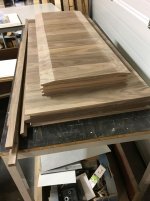 Building Pics the solid walnut sides.jpg119.2 KB · Views: 1,262
 -
 Building Pics CNC parts.jpg159.2 KB · Views: 1,284
 -
 Building Pics leather detail.jpg113.7 KB · Views: 1,253
 -
 Building Pics gluieng sides 2.jpg148.5 KB · Views: 1,359
 -
 Building Pics glueing the front unit.jpg145 KB · Views: 1,524
 -
 Building Pics glueing sides.jpg124.2 KB · Views: 1,282
 -
 Building Pics glueing parts 4.jpg128.2 KB · Views: 1,353
 -
 Building Pics glueing parts 3.jpg138.7 KB · Views: 3,555
 -
 Building Pics glueing parts 2.jpg127.4 KB · Views: 1,298
 -
 Building Pics glueing parts 1.jpg141.4 KB · Views: 1,634
And some more
Attachments
-
 Building Pics checking the fronts 2.jpg142.7 KB · Views: 1,127
 -
 Building Pics checking the fronts.jpg132.7 KB · Views: 1,200
 -
 Building Pics CNC Front 1.jpg161.5 KB · Views: 1,102
 -
 Building Pics CNC Front 2.jpg179.1 KB · Views: 1,050
 -
 Building Pics Chamfer 3.jpg149.4 KB · Views: 1,097
 -
 Building Pics Chamfer 2.jpg101.9 KB · Views: 883
 -
 Building Pics center 1.jpg172.5 KB · Views: 1,110
 -
 Building Pics adding oil.jpg109.6 KB · Views: 1,109
 -
 Building Pics adding dampening.jpg93.2 KB · Views: 1,087
 -
 Building Pics adding dampening and support.jpg178.5 KB · Views: 1,271
and the last ones
Attachments
-
 Building Pics tuning 2.jpg114.3 KB · Views: 1,047
 -
 Building Pics tuning.jpg110.5 KB · Views: 1,032
 -
 Building Pics the M8 rods.jpg141.2 KB · Views: 923
 -
 Building Pics the feet.jpg77.9 KB · Views: 827
 -
 Building Pics prepairing for CNC.jpg134.2 KB · Views: 894
 -
 Building Pics mounting speakers.jpg110.3 KB · Views: 909
 -
 Building Pics glueing leather.jpg106 KB · Views: 970
 -
 Building Pics damping.jpg161.4 KB · Views: 1,014
 -
 Building Pics connection filter panels.jpg97.8 KB · Views: 993
 -
 Building Pics cloth for upfiring.jpg78.2 KB · Views: 958
Last edited:
Okay, these are really the last ones 🙂
Attachments
-
 Building Pics filter construction 2.jpg156.6 KB · Views: 972
 -
 Building Pics Chamfer 1.jpg154.6 KB · Views: 899
 -
 Building Pics rear.jpg79.8 KB · Views: 995
 -
 Building Pics upfiring.jpg100.3 KB · Views: 1,264
 -
 Building Pics filter construction 1.jpg140.5 KB · Views: 1,144
 -
 Building Pics new ceiling unit.jpg63 KB · Views: 1,010
 -
 Building Pics surround filter.jpg114.3 KB · Views: 954
 -
 Building Pics CNC parts 2.jpg126.1 KB · Views: 970
 -
 Building Pics Center with cloth.jpg83.7 KB · Views: 1,012
 -
 Building Pics center in new hifi furniture.jpg92.9 KB · Views: 1,128
I would like to keep the details to myself for now with months of tweaking and listening.
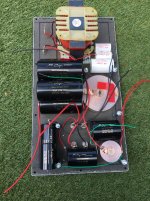
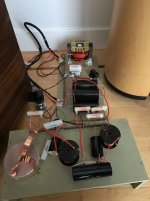
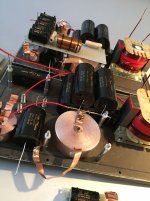
The filter is a normal 3 way second order LR design.
Crossover frequencies of 230 Hz and 2800 Hz
A small eq lifts the tweeter response. (expensive with Mundorf Supreme Silver Gold Oil capacitors in that part of the filter.
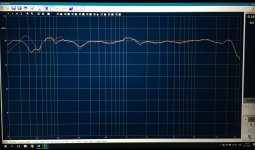
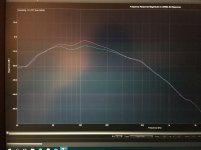
The frequency response below is left and right in the room measured at 1 meter distance on tweeter height. The little bump at 1,1 kHz has always been present in both the large and 2 way speaker. It sonically never bothered as measured in the listening position it is gone. Something to do with the d'Appolito arrangement. The frequency has a wavelength of exactly the the distance of the two midrange units.
The dip at 230 Hz is the error of the mic being at tweeter position and is gone when the mic is placed between LF and MF.
Below 300 Hz the frequency response alters with every different setup, distance of walls and so on, and is therefor not Representative but it says something about how low this speaker goes.
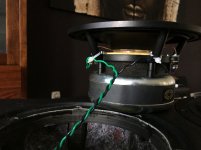
Here the second graph tells something. This is a near field measurement as shown in a picture above. The mic a few cm from the cone. The top red curve is with just the 2nd order HP filter. The green lower graph is with a notch filter added to dampen the second resonance peak and this little tweak made the LF sound so much better. more control and it was as if it reached deeper.
Of course do you like your self made speaker, I made many and I always loved them ...... at first. Then the first issues arrive. You hear imperfections, things that are not ideal and so on.
With this speaker this did not happen, and now 3 months since the last tweak, and 5 months since they first made sound they sound better and better.
I went to some shows, friends and shops to verify if I was critical enough and ...... nothing yet comes close. Speakers ranging from €10k to €125k outperform them in more than 1 aspect.
And my front-end can be improved .....
The filter is a normal 3 way second order LR design.
Crossover frequencies of 230 Hz and 2800 Hz
A small eq lifts the tweeter response. (expensive with Mundorf Supreme Silver Gold Oil capacitors in that part of the filter.
The frequency response below is left and right in the room measured at 1 meter distance on tweeter height. The little bump at 1,1 kHz has always been present in both the large and 2 way speaker. It sonically never bothered as measured in the listening position it is gone. Something to do with the d'Appolito arrangement. The frequency has a wavelength of exactly the the distance of the two midrange units.
The dip at 230 Hz is the error of the mic being at tweeter position and is gone when the mic is placed between LF and MF.
Below 300 Hz the frequency response alters with every different setup, distance of walls and so on, and is therefor not Representative but it says something about how low this speaker goes.
Here the second graph tells something. This is a near field measurement as shown in a picture above. The mic a few cm from the cone. The top red curve is with just the 2nd order HP filter. The green lower graph is with a notch filter added to dampen the second resonance peak and this little tweak made the LF sound so much better. more control and it was as if it reached deeper.
Of course do you like your self made speaker, I made many and I always loved them ...... at first. Then the first issues arrive. You hear imperfections, things that are not ideal and so on.
With this speaker this did not happen, and now 3 months since the last tweak, and 5 months since they first made sound they sound better and better.
I went to some shows, friends and shops to verify if I was critical enough and ...... nothing yet comes close. Speakers ranging from €10k to €125k outperform them in more than 1 aspect.
And my front-end can be improved .....
Attachments
Last edited:
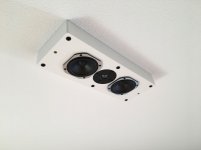
Those look great. I am also curious about those ceiling speakers for atmos you made, any more info?
Those look great. I am also curious about those ceiling speakers for atmos you made, any more info?
Yes indeed, two Beyma 5MP60N 16 Ohm and the same Scan Speak tweeter as in the upfiring unit. The Scan-Speak D2608-91300.
The crossover is also a 2nd order LR at 3500 Hz.
The upfiring needs a special notch filter according to Atmos specification.
Last edited:
I would like to keep the details to myself for now with months of tweaking and listening.
The filter is a normal 3 way second order LR design.
Crossover frequencies of 230 Hz and 2800 Hz
A small eq lifts the tweeter response. (expensive with Mundorf Supreme Silver Gold Oil capacitors in that part of the filter.
The frequency response below is left and right in the room measured at 1 meter distance on tweeter height. The little bump at 1,1 kHz has always been present in both the large and 2 way speaker. It sonically never bothered as measured in the listening position it is gone. Something to do with the d'Appolito arrangement. The frequency has a wavelength of exactly the the distance of the two midrange units.
The dip at 230 Hz is the error of the mic being at tweeter position and is gone when the mic is placed between LF and MF.
Below 300 Hz the frequency response alters with every different setup, distance of walls and so on, and is therefor not Representative but it says something about how low this speaker goes.
Here the second graph tells something. This is a near field measurement as shown in a picture above. The mic a few cm from the cone. The top red curve is with just the 2nd order HP filter. The green lower graph is with a notch filter added to dampen the second resonance peak and this little tweak made the LF sound so much better. more control and it was as if it reached deeper.
Of course do you like your self made speaker, I made many and I always loved them ...... at first. Then the first issues arrive. You hear imperfections, things that are not ideal and so on.
With this speaker this did not happen, and now 3 months since the last tweak, and 5 months since they first made sound they sound better and better.
I went to some shows, friends and shops to verify if I was critical enough and ...... nothing yet comes close. Speakers ranging from €10k to €125k outperform them in more than 1 aspect.
And my front-end can be improved .....
Measurements looks great, in what way the upward firing drivers influences the sound? What are the improvements in your opinion?
Measurements looks great, in what way the upward firing drivers influences the sound? What are the improvements in your opinion?
The upfiring speaker removes a few liter from the total volume. So in theory a slightly different tuning and the top speaker has less room to breathe.
We didn't compare my friends two way with my surround. He used the top filter components and I used less expensive ones as it is "just" surround.
But for the best stereo only experience I would not include the upfiring.
For me it was different as I wanted to get visually the same speakers as the big fronts and get a similar tuning by using the same drivers.
Hope this answers your question
Congratulations on a project you are satisfied with! Would it be too much to ask what the total parts cost of a stereo pair was, not counting work hours?
Congratulations on a project you are satisfied with! Would it be too much to ask what the total parts cost of a stereo pair was, not counting work hours?
The front speakers costed approximately €12.000. This includes the outsourcing of the CNC work.
If I would have just built the fronts it would have been more.
I think I need to explain something about this project.
I have made 7 speakers in total that are powered by 9 amps (well 11 to be exact, as I am bi-amping the fronts)
The 3 way 5 speaker fronts
The 2 way 3 speaker surrounds that include a 2 way built-in Atmos upfiring
The 2 way 3 speaker ceiling speaker
A 3 way 4 speaker center speaker
I have made 7 speakers in total that are powered by 9 amps (well 11 to be exact, as I am bi-amping the fronts)
The 3 way 5 speaker fronts
The 2 way 3 speaker surrounds that include a 2 way built-in Atmos upfiring
The 2 way 3 speaker ceiling speaker
A 3 way 4 speaker center speaker
One of THE BEST HT speaker design & construction posts I have seen.
-polar directivity response best suited to your HT listening
-top ranked individual drivers
-design and construct cabinets with low diffraction and vibration
-conquer cost and complexity required for passive crossovers
-measurements at listening room seating position
-polar directivity response best suited to your HT listening
-top ranked individual drivers
-design and construct cabinets with low diffraction and vibration
-conquer cost and complexity required for passive crossovers
-measurements at listening room seating position
- Home
- Loudspeakers
- Multi-Way
- “Building the best 3-way full range speaker in the world”