which brand transistor was it, and was there a spike in your supplies.Yup, Q2 (BC556B) is indeed shorted (C to E). R4 was fine and correct (5K6).
Wonder if a bad solder joint caused this failure? Can this kind of failure situation occur after 2 years of use?
though if there was spike lot more would have been affected.
Mr auriga2001
Circlophone is a tested circuit and fully balanced as far as current and voltages of each stage is concerned. I have made two prototype and two running stereo amplifiers BJT and MOSFET based and all are working fine at +/- 32V rail voltage. One set is permanently connected to my PC for more than a year. No problem at all.
May be in your case a component failure took place. The transistor might be fake.
I have used either CDIL India make transistors or other ST/Philips make transistors procured from RS.
Please check all active components for failure since it is a directly coupled circuit before replacement.

Mr Vincent77,And another Circlophone is alive!
I made my own PCBs. The sources (Eagle) and the PCB fabrication files are attached here, in case they might be useful for the community.
R21 is made of two series resistors on the PCB, which makes it easier to get the necessary value, depending on the supply voltage.
I used MJW21194 power transistors, BD140-16 drivers, and TTC004B VAS.
It's a pretty good amp - it sounds clear, fast, good details, powerful and tight bass. When I first turned it on, I found the treble to be on the harsh side - but, surprisingly, it got better after a couple of days. So it needs some burn-in time before giving its best.
It is powered from a pair of simple cap multiplier PSUs, +/-21VDC. It draws 21W from the mains when idle. The heatsinks barely get warm. It's completely silent with the input shorted. DC offset is negligible (0.7mV).
I think I will keep it for daily listening while working on the computer, and the next step is to make an enclosure for it.
Welcome to Circlophone family.
Extremely good DIY work. Nice PCB layout.
I think you will need a large heatsink for higher rail voltages. You can use all aluminium Class A chassis to house your work.
Last edited:
Thank you!
As promised, I made a box for my Circlophone:


I have some woodworking tools and machines at home, so I've built the box myself, using walnut wood with oak and meranti inserts, and plywood for the back and bottom panels. The color is natural, no dye has been used, only water-based polyurethane finish.
Because real wood grows or shrinks depending on humidity, precautions have been taken - for example, the top panel is only fixed in the central part, allowing it to grow on the sides without bowing.
This is how it looks inside:

There are big ventilation holes inside also, under the PCBs, invisible in the photo.
As an evolution to my first test, I have removed the small film capacitors that I had bypassing the local reservoir electrolytic caps. The power supplies are now separated per channel, and is using good quality Panasonic FR capacitors. The power transformer has secondary snubbers tuned with Quasimodo.
These modifications have improved the audio quality - it sounds great now, I'm very pleased with it.
I have added a relay module on the output that does turn-on delay, AC loss detection, DC protection and amp bypass (I'm using the same speakers with two different amplifiers).
I have reduced the power voltage to +/-18V, because my speakers don't need a lot of power. The heatsinks are just warm, +15°C above ambient.
One thing is missing: soft start for the big toroid transformer, I will add it when I have the time.
In conclusion, this is a great sounding project, I recommend it!
As promised, I made a box for my Circlophone:
I have some woodworking tools and machines at home, so I've built the box myself, using walnut wood with oak and meranti inserts, and plywood for the back and bottom panels. The color is natural, no dye has been used, only water-based polyurethane finish.
Because real wood grows or shrinks depending on humidity, precautions have been taken - for example, the top panel is only fixed in the central part, allowing it to grow on the sides without bowing.
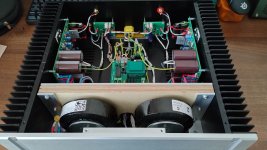
This is how it looks inside:
There are big ventilation holes inside also, under the PCBs, invisible in the photo.
As an evolution to my first test, I have removed the small film capacitors that I had bypassing the local reservoir electrolytic caps. The power supplies are now separated per channel, and is using good quality Panasonic FR capacitors. The power transformer has secondary snubbers tuned with Quasimodo.
These modifications have improved the audio quality - it sounds great now, I'm very pleased with it.
I have added a relay module on the output that does turn-on delay, AC loss detection, DC protection and amp bypass (I'm using the same speakers with two different amplifiers).
I have reduced the power voltage to +/-18V, because my speakers don't need a lot of power. The heatsinks are just warm, +15°C above ambient.
One thing is missing: soft start for the big toroid transformer, I will add it when I have the time.
In conclusion, this is a great sounding project, I recommend it!
Last edited:
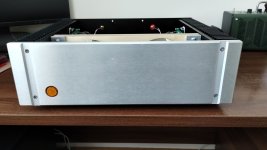
I finished packing the Circlophone into a box as well. It took me around four months. In fact, I have finished and have closed the lid today.
Two DC protection boards are at the back panel. I borrowed the schematic from this thread in the forum: https://www.diyaudio.com/community/threads/rtr-ssr-speaker-protection-gb5.392399/ (big thanks to xrk971 for sharing). The board in the middle is the transformer soft-start module, auxiliary PSU and AC loss detector (to drive the DC protectors).
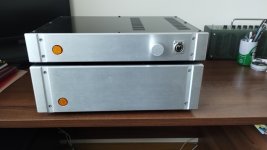
In the last picture, there is Salas DCG3 (the thread) which will be acting as a preamp for the Circlophone. I built it almost four years ago and nearly forgot about it. It got the branch new and matching enclosure too 🙂
In general I am satisfied with end result, although some parts were challenging to do. Imporant lesson learned: stop making excuses and get a decend pillar drill - your life will be much easier. This is something to think about for another project (I guess I am making an excuse now 😉 )
Two DC protection boards are at the back panel. I borrowed the schematic from this thread in the forum: https://www.diyaudio.com/community/threads/rtr-ssr-speaker-protection-gb5.392399/ (big thanks to xrk971 for sharing). The board in the middle is the transformer soft-start module, auxiliary PSU and AC loss detector (to drive the DC protectors).
In the last picture, there is Salas DCG3 (the thread) which will be acting as a preamp for the Circlophone. I built it almost four years ago and nearly forgot about it. It got the branch new and matching enclosure too 🙂
In general I am satisfied with end result, although some parts were challenging to do. Imporant lesson learned: stop making excuses and get a decend pillar drill - your life will be much easier. This is something to think about for another project (I guess I am making an excuse now 😉 )
Attachments

@frd__ really lovely build, almost like a master piece. I am still to get a case for my Circlophone, My softstart and power supply with standard speaker protection boards are ready assembled and used open on table occasionally - only thing pending is PGA2311/20 pcb fab and Cabinet fabrication ( need some one to do the 3d cad so i could get it laser cut and bent ( with powder coating ).
I love the way you have done the yellow / green wiring part.
I love the way you have done the yellow / green wiring part.
- Home
- Amplifiers
- Solid State
- Building Elvee's Circlophone: Documentation, Parts, Accessories, & beginner friendly