I haven't been able to do much over the last few days due to work, the rain and the fact that I am currently out of MDF and can't get any untill it stops raining which should be tomorrow. But I did manage to do a few things with the little bit of MDF that I did have and it should be enough to show what my plans are for making the top part of these speakers. I'm makeing a lot of work for my self.

Start with a piece of MDF the size of the one above.

Using a router with a flush cut top bearing bit I will I will make the pattern.

Using double sided sticky tape I attach the piece of MDF to the top rear of the speaker and then use the router to flush cut the MDF.

Just pluging the site.

The top piece is the pattern that I just created and it will be used to shape the remaining pieces. By my count I will need 18 and 1/2 pieces per speaker to close them up. It's going to take a fair amount of time to make all 36 and two half pieces. It is also kind of a wasteful process but I can cut down on some of the waste by marking up all of the parts ahead of time and trying to get as many parts as I can per square foot but no matter what there will be a lot of waste.
Hopefully I will be able to get to the lumber yard tomorrow and pick up another sheet of MDF (sheet #3) to finish these speakers if it's not raining. I might just have to go and get it regardless of the rain and just wrap it in plastic for the ride home.
Till the next update
Cheers.
Start with a piece of MDF the size of the one above.
Using a router with a flush cut top bearing bit I will I will make the pattern.
Using double sided sticky tape I attach the piece of MDF to the top rear of the speaker and then use the router to flush cut the MDF.
Just pluging the site.
The top piece is the pattern that I just created and it will be used to shape the remaining pieces. By my count I will need 18 and 1/2 pieces per speaker to close them up. It's going to take a fair amount of time to make all 36 and two half pieces. It is also kind of a wasteful process but I can cut down on some of the waste by marking up all of the parts ahead of time and trying to get as many parts as I can per square foot but no matter what there will be a lot of waste.
Hopefully I will be able to get to the lumber yard tomorrow and pick up another sheet of MDF (sheet #3) to finish these speakers if it's not raining. I might just have to go and get it regardless of the rain and just wrap it in plastic for the ride home.
Till the next update
Cheers.

Okay. A slight change in plans. I decided it was to much work routing all those parts and the router bit kept grabbing the parts every time I would get to the ends and it was more then I wanted to deal with. The parts kept snapping and getting chewed up and I wasn't to keen on the idea of getting my fingers chewed up so I decided to go to plan B. Here is what I've got done as of this morning.


Everything is attached to a piece of cork underlayment with carpet glue applied with a notched trowel.
This stuff works great as a backer for this application because it's flexible and it's pretty durable and
doesn't tear easy. You just need to clamp the parts together before applying the glue to keep it from gluing
the strips together. After the carpet glue dries it ain't coming apart.


After I get both speakers to this point I will fill all of the voids with polyester resin mixed with glass bubbles and sand it out. Then I will glass it with some fine cloth and work it until it is flat and smooth then it's time to put a finish on them. That's when the real work begins. It will probably take a good while to put a proper finish on these suckers.
That's all for now. I will up date when I start doing the fill and all of the sanding.
Till then cheers.
Everything is attached to a piece of cork underlayment with carpet glue applied with a notched trowel.
This stuff works great as a backer for this application because it's flexible and it's pretty durable and
doesn't tear easy. You just need to clamp the parts together before applying the glue to keep it from gluing
the strips together. After the carpet glue dries it ain't coming apart.
After I get both speakers to this point I will fill all of the voids with polyester resin mixed with glass bubbles and sand it out. Then I will glass it with some fine cloth and work it until it is flat and smooth then it's time to put a finish on them. That's when the real work begins. It will probably take a good while to put a proper finish on these suckers.
That's all for now. I will up date when I start doing the fill and all of the sanding.
Till then cheers.
That seems like a more practical idea 🙂 Always interested in how builders create curved parts. Thanks for posting that.
Just a small update. Time has been hard to come by but things are moving along.

Cabisal or fumed silica.

Glass bubbles.

Mix some of both into polyester resin until you have a near paste to fill in the gaps.
The first application.


The second application.


After sanding. The black felt tip marks are the defects I will bee filling in with some Bondo.


Defects filled.

So this is where I am as of now. I have a couple more things to do before I take a router to the edges and round them over. After that I will have to decide what finish I will be going with. I know I will be going with a polished polyester with a 2k poly final finish but I haven't decided what to put under them yet. Decisions decisions. It needs to be epic.

Until the next update Cheers.
Cabisal or fumed silica.
Glass bubbles.
Mix some of both into polyester resin until you have a near paste to fill in the gaps.
The first application.
The second application.
After sanding. The black felt tip marks are the defects I will bee filling in with some Bondo.
Defects filled.
So this is where I am as of now. I have a couple more things to do before I take a router to the edges and round them over. After that I will have to decide what finish I will be going with. I know I will be going with a polished polyester with a 2k poly final finish but I haven't decided what to put under them yet. Decisions decisions. It needs to be epic.
Until the next update Cheers.
I really don't like using that much Bondo especially on things like this. Bondo has a tendency to shrink and after you spend a lot of time & effort to get everything flattened and smoothed and looking good you put a finish over it and a couple months later everything starts telegraphing through the finish. It's really bad with finishes like lacquer. In my experience this is a much more stable way of doing it and you have more options and control over things this way. I still have one more step to complete before it's done though but I'm waiting for things to be delivered.Have ever tried just Bondo to directly fill the wood gaps?
In the last step I will take some C-Veil glass cloth which is a very fine light weight fiberglass cloth used to finish laminates and give them a finished look and hides the weave of heavier cloth and or mat used in the layup. It's also used in RC models like planes to cover balsawood construction to give the model a lot more strength and durability. I will be draping it over the top part of the speaker to tie it into the bottom part. This way there will be less chance of it developing a crack in the finish over time as it will effectively become one continuous encapsulated surface and much less likely to telegraph as well due to the fact that you won't have the alternating compositions of materials butting right up against the finish.
Like I say I'm just waiting on delivery of the materials right now so I can "Get er Done". I can't wait to hook these up to the amp I just got done building for them. That is one thing about DIY is you can't just unbox the thing and plug it in. You got to have patience and resist the urge to get ahead of yourself and start doing things that you know are out of order or will compromise the finish product just because you want it done so you can use it.🙄
Thanks, I was thinking that may happen. Bondo will telegraph on metal but it takes part of a year. I was hoping for a "trick".
The thin fiberglass idea sounds good and should also take spot putty to smooth blemishes. I've seen that technique used by several designers to get a stable smooth skin. I build a lot of test boxes (ugly but fast) trying to find my preferred sound, but eventually I`ll want it pretty. Tricky, because I prefer everything rounded as well. Thanks for posting it.
The thin fiberglass idea sounds good and should also take spot putty to smooth blemishes. I've seen that technique used by several designers to get a stable smooth skin. I build a lot of test boxes (ugly but fast) trying to find my preferred sound, but eventually I`ll want it pretty. Tricky, because I prefer everything rounded as well. Thanks for posting it.
I have a couple of pics of the test box I made for these speakers some where on the first page I think. Have you seen them or is that what you are referring to? It went through a couple of transformations but it wasn't going to win any beauty contests that's for sure. I used a bunch of screws to hold it together instead of clamps because it is much quicker but the finish versions that I'm working on now have very few screws in them. The ones that are there are used on some of the internal bracing but because I will be rounding the corners over I couldn't have any screws or brads on the out side at all so it is all glue and clamps. When ever I am considering using some new drivers in a speaker build before I commit to them I always put them in a test box and audition them to get a feel for how they will behave. I use to have a pile of test boxes with interchangeable front baffles and internal dividers that could be moved into an assortment of different dado slots the enlarge or shrink internal air space depending on which slot they are in allowing me to put the driver under test into different arrangements easy enough. I don't build enough speakers these days to justify storing those boxes anymore so I build them as I need them and afterwards they get cut up and thrown out.Thanks, I was thinking that may happen. Bondo will telegraph on metal but it takes part of a year. I was hoping for a "trick".
The thin fiberglass idea sounds good and should also take spot putty to smooth blemishes. I've seen that technique used by several designers to get a stable smooth skin. I build a lot of test boxes (ugly but fast) trying to find my preferred sound, but eventually I`ll want it pretty. Tricky, because I prefer everything rounded as well. Thanks for posting it.
It was referring to my current state of designs and why I'm interested in your build technique(s).
It's been a little while since my last update but things have been trudging along. I received my supplies and things are looking pretty good so far. So here are some pics of my progress starting from where I left off.

Since I will be using a fiberglass cloth over the curved top part that needs to tie into the bottom part I needed to "key" the transition area so the glass cloth can interface with it. So I took my router and carved out a small 1/8" "key".


When using fiberglass you want to avoid sharp straight lines because they are sure to form cracks along those lines so I took my sander and sanded the sharp line away. By doing this I can feather the transition into the body of the speaker making it much less noticeable and preventing any later cracking.

So I know how long to cut the fiberglass cloth I put tape on the speaker which I then transfer over to my table and have a gauge to measure the size of the cloth.

Here are some of my supplies that I was waiting for. I picked up this cheap HVLP gravity fed gun off of Amazon for around $40.00 USD because it came with three different needle and air caps sizes that where all large. The two sizes that are important to me with this project and the finishes I will be using are 1.7 and 2.0. I have other much nicer guns but they are more for thinner finishes like lacquer and automobile paints and aren't suited for the finishes I'll be using on this project. I'm using the 2.0 here on the next step.

I have used the spray gun to apply an even coat of polyester resin to the tops of the speakers before applying any glass cloth. This is an initial sealing coat that is put on fairly liberally and allowed to soak in before proceeding with the cloth.

The first of two layers of cloth is applied and saturated with resin. The tape is there to hold the cloth in place because it was pretty windy and kept wanting to blow off. For the other speaker (below) I used spray adhesive to hold the cloth in place until I could get it coated with resin.

So the first of two layers of cloth where applied.


Ready for the next layer.

The second layer is applied and a thicker application of resin with glass bubbles and cabisal is applied over the top of that to fill in low spots and give me something to shape.

Here they are after the sanding and trimming. They are getting closer but need one final application then I can do the round overs.

This is a polyester finishing putty like it says on the label. As it turns out it is a very good product and gives great results. Much better then Bondo.


After sanding everything out nice and smooth I was ready.

I put the round overs on the speakers. The front one is rather large but the ones on the back are just large enough to take the sharp edge off the box.


Here you can see the epoxy that I had to use to bridge the gaps created by the cuts being 46-1/2 degrees instead of 45 like they should have been. Oh well. The epoxy worked so all's good but it still kind of bugs me because I'm a bit of a perfectionist and my saw shouldn't have been out of adjustment like it was. In the 10 years that I have owned that saw it has never been off even one half of a degree until now.

Anyways that's it for now. Tomorrow I will be spraying a base coat of primer and I should get a better look at where I need to do any fill in or sanding once it is one color. The primer is a two part high build polyester primer that gives great results. I'll post some pics once I'm done. Then I will be visiting family for the next week so the speakers will be on hold until I get back after the holiday weekend.
Till then cheers.
Since I will be using a fiberglass cloth over the curved top part that needs to tie into the bottom part I needed to "key" the transition area so the glass cloth can interface with it. So I took my router and carved out a small 1/8" "key".
When using fiberglass you want to avoid sharp straight lines because they are sure to form cracks along those lines so I took my sander and sanded the sharp line away. By doing this I can feather the transition into the body of the speaker making it much less noticeable and preventing any later cracking.
So I know how long to cut the fiberglass cloth I put tape on the speaker which I then transfer over to my table and have a gauge to measure the size of the cloth.
Here are some of my supplies that I was waiting for. I picked up this cheap HVLP gravity fed gun off of Amazon for around $40.00 USD because it came with three different needle and air caps sizes that where all large. The two sizes that are important to me with this project and the finishes I will be using are 1.7 and 2.0. I have other much nicer guns but they are more for thinner finishes like lacquer and automobile paints and aren't suited for the finishes I'll be using on this project. I'm using the 2.0 here on the next step.
I have used the spray gun to apply an even coat of polyester resin to the tops of the speakers before applying any glass cloth. This is an initial sealing coat that is put on fairly liberally and allowed to soak in before proceeding with the cloth.
The first of two layers of cloth is applied and saturated with resin. The tape is there to hold the cloth in place because it was pretty windy and kept wanting to blow off. For the other speaker (below) I used spray adhesive to hold the cloth in place until I could get it coated with resin.
So the first of two layers of cloth where applied.
Ready for the next layer.
The second layer is applied and a thicker application of resin with glass bubbles and cabisal is applied over the top of that to fill in low spots and give me something to shape.
Here they are after the sanding and trimming. They are getting closer but need one final application then I can do the round overs.
This is a polyester finishing putty like it says on the label. As it turns out it is a very good product and gives great results. Much better then Bondo.
After sanding everything out nice and smooth I was ready.
I put the round overs on the speakers. The front one is rather large but the ones on the back are just large enough to take the sharp edge off the box.
Here you can see the epoxy that I had to use to bridge the gaps created by the cuts being 46-1/2 degrees instead of 45 like they should have been. Oh well. The epoxy worked so all's good but it still kind of bugs me because I'm a bit of a perfectionist and my saw shouldn't have been out of adjustment like it was. In the 10 years that I have owned that saw it has never been off even one half of a degree until now.
Anyways that's it for now. Tomorrow I will be spraying a base coat of primer and I should get a better look at where I need to do any fill in or sanding once it is one color. The primer is a two part high build polyester primer that gives great results. I'll post some pics once I'm done. Then I will be visiting family for the next week so the speakers will be on hold until I get back after the holiday weekend.
Till then cheers.
How did you mill the front roundover, the radius looks too large for a hand router ?
I used a Dewalt 1.7 HP router with a fixed base and a large round over bit. Later I will take a pic of the bit and post it. It's a big one but not the largest that I have though. Of course I was nervous the whole time I was making the pass because all it takes is one little opps and all that hard work is for not because it is next to impossible to repair a big gouge in the front baffle caused by the router tipping or a bunch of chatter if the router gets away from you. With bigger bits like this two things that are important is a bit with a 1/2" shank and motor speed of the router. Not to fast. This is assuming you are using a good strong router. I like my Dewalt.How did you mill the front roundover, the radius looks too large for a hand router ?
My router table has a Porter Cable which I also like a lot.
You have really good skills to use that size of bit in a hand-held router. I would not trust myself, but I am not a professional wood worker like you.
The radius on the inside corner (re-entrant corner) shown with an arrow looks to me like there must have been some hand work? Yes? The round-over bit would not make that shape... perhaps the photograph is deceiving me.
The radius on the inside corner (re-entrant corner) shown with an arrow looks to me like there must have been some hand work? Yes? The round-over bit would not make that shape... perhaps the photograph is deceiving me.
Attachments
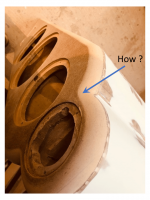
Thanks for the compliment. Besides a bit of sanding to smooth everything out there was nothing else done to it. What you might be seeing is that I didn't use the bit to it's full depth that would have produced a thru 1/4 radius. If I had done that it would have run into the tweeter. So to keep the round over from cutting into the tweeter and also to give it more of a drop off if that makes sense I used a large bit but not at it's full depth. In a way this method achieves kind of the same thing you have been experimenting with in regards with the beveled edges on your baffles. Of course I haven't spent nearly the time you have simulating everything in VituixCad (an amazing and very powerful program) but I have a pretty good idea how these will perform when I'm done. There is one thing that I am trying here that I am not totally sure how it will work out in the end but I have a good feeling about it and that is the port design. It is not your typical port design. To start with it is flared like a horn and it is folded like a transmission line. So I'm curious to see how it works out. It is a bit of an experiment.You have really good skills to use that size of bit in a hand-held router. I would not trust myself, but I am not a professional wood worker like you.
The radius on the inside corner (re-entrant corner) shown with an arrow looks to me like there must have been some hand work? Yes? The round-over bit would not make that shape... perhaps the photograph is deceiving me.
I sprayed one of the cabs today with it's first coat of primer. It's a 2k polyester primer from Eastwood and works better then any other primer/sealer I have ever used with MDF. It seals the "end grain" right up with a single coat even though there isn't any end grain technically but you know what I mean. If you have ever worked with MDF and tried to get a piano flat finish with it you know just how difficult it can be. Knowing the tricks and the proper products to use makes a huge difference in your ultimate success. Polyester is the way to go. You use basically the same resin you use to lay fiberglass that can be colored with any number of different dies and colorants including mica powders. But here are a couple of shots of the one cab that I primed today. This is just the first coat. It will get block sanded and sprayed again and block sanded one more time then I will begin with the finish. Ultimately in the end I will hopefully end up with a mirror flat highly polished furniture grade finish that will make these rather large speakers an attractive addition to any living room with a high WAF rating. At least that's my goal.
This will likely be the last update until after the three day weekend as I will be visiting family but once I get back I will have to make up my mind as to how I'm going to proceed with these. I've got a couple ideas. It should be interesting.
Till later cheers
Okay one last post before I take my leave for the week. I was able to get the other cab primed with it's first coat of primer and sanded the other revealing some areas I need to focus on. This was expected. So a few more pics.

The transition area is still a bit low so I applied a bit more of the filler. This will need to be done on both speakers I can tell just by looking at the picture above. I still need to sand it out but I will do that when I get back.

I said I would post a pic or two of the router bit I used for the round overs.


A good sized bit but not my biggest. Here is the biggest round over bit I have. A full 2 inch round over. This one won't fit in my Dewalt with out removing the base plate but I wouldn't use this one hand held anyway.

Comparison.

This is my go to router for handheld and plunge routing.

I prefer to use a router table when ever I can so I built this one ahead of starting this speaker build as my last one was at it's end of life.

It has a porter cable router mounted in it and if any one is considering getting a router lift for their own router table I highly recommend the Kreg lift that I have here. Not only does it do a great job it has one of the best means to clamp the router to it compared to others and the over all design of the unit is one of the best in my opinion and the best part is it is also one of the least expensive lifts on the market. I really like it especially with the Porter Cable router attached to it. I have no affiliation with either companies.
Well that's all for now. I will be back after the coming three day weekend. Next weekend is Labor Day here in the US and I want to be back home before the weekend because the roads will be packed with idiots, although maybe not as many as usual with the gas prices being so high. This road trip is going to cost me a small fortune I know that.
Till then Cheers.
The transition area is still a bit low so I applied a bit more of the filler. This will need to be done on both speakers I can tell just by looking at the picture above. I still need to sand it out but I will do that when I get back.
I said I would post a pic or two of the router bit I used for the round overs.
A good sized bit but not my biggest. Here is the biggest round over bit I have. A full 2 inch round over. This one won't fit in my Dewalt with out removing the base plate but I wouldn't use this one hand held anyway.
Comparison.
This is my go to router for handheld and plunge routing.
I prefer to use a router table when ever I can so I built this one ahead of starting this speaker build as my last one was at it's end of life.
It has a porter cable router mounted in it and if any one is considering getting a router lift for their own router table I highly recommend the Kreg lift that I have here. Not only does it do a great job it has one of the best means to clamp the router to it compared to others and the over all design of the unit is one of the best in my opinion and the best part is it is also one of the least expensive lifts on the market. I really like it especially with the Porter Cable router attached to it. I have no affiliation with either companies.
Well that's all for now. I will be back after the coming three day weekend. Next weekend is Labor Day here in the US and I want to be back home before the weekend because the roads will be packed with idiots, although maybe not as many as usual with the gas prices being so high. This road trip is going to cost me a small fortune I know that.
Till then Cheers.
Well it's been a little while since my last update. I'm still working on them but my priority has shifted and I have to do some repairs on my roommates deck. It's a large wooden deck on the rear of the house that I built some 18 years ago and there are some beams and posts that have rotted out and need replacing so that has been eating up a lot of my free time as of late. I do have all of the primer done on the cabs and I'm just doing the final sanding and I'm ready for paint. I'm still not certain what I want to do with the finish yet but hopefully I figure that out soon. I'll update when I do.
Cheers
Cheers
iamjackalope you were saying before about the bondo shrinking too much on uneven surfaces, have you tried using what the car audio guys call a milkshake.
Its a blend of about 10~20% polyester resin into bondo and some MEK or acetone for thinning, pour it on and spread it around with a brush it would have worked a treat on the top of those tombstones... a few coats would do the trick.
Who the hell paints a craftsman quality bar in white paint... they need a'shootin!
Corvette is not mine but the mustang is.interesting build. love the bar! corvette and a mustang?
I did just trade my wore out 2003 Chevy Silverado work truck in for a like new 2019 Toyota Tundra 4X4 a couple weeks ago that I am enjoying quite a bit. Had to dip into my savings pretty deep to get it but It should last me the next 10 to 15 years so I'm pretty happy with it.
The Corvette belongs to my room mate who is the owner of the house. It's a flawless 1999 with about 9,000 miles on it. Not a scratch on it. He hardly ever drives it. I think I put 3,000 of the miles on it.
I love driving my Mustang though.
There are plenty of different ways to fill the top in but the way I did it, besides not shrinking, it also has a stronger bond to the wood and acts like a glue holding the pieces together. The product I used after I laid the glass to fill in and smooth out the final stages is very similar to what you are describing but sands really fine and makes a great finishing putty.iamjackalope you were saying before about the bondo shrinking too much on uneven surfaces, have you tried using what the car audio guys call a milkshake.
Its a blend of about 10~20% polyester resin into bondo and some MEK or acetone for thinning, pour it on and spread it around with a brush it would have worked a treat on the top of those tombstones... a few coats would do the trick.
Who the hell paints a craftsman quality bar in white paint... they need a'shootin!
One thing I can honestly say is that the polyester primer that I'm using made by Eastwood is by far the best way to prepare MDF for ultra flat buffed mirror finishes. It does require that you have a 2.0mm capable spray gun and a large CFM compressor to put it down but It seals everything up nice and sands out real flat.
As for the bar goes yea I agree but the property owner doesn't care about the bar. If the new tenant didn't need the bar for their business it would just get torn out completely so the landlord don't care. To him it's a business there to make money and nothing more.
- Home
- Loudspeakers
- Multi-Way
- Build Thread-SB Acoustic WWMT Floor Standing Goodness. Come check it out.