Okay. Let me set the scene for this build. At the time of me starting this thread I am already pretty far into building these speakers. I've waited this long to post because I've been very busy with work and that means that there are times where it could be a week or two that I can't find the time or energy to work on them and for anybody following the thread that is waiting for some update might get board waiting and stop following the build. So I waited until they where pretty far along to start this thread so I could put part of it up and discuss what I did then a little more and discuss that and that way I can update the thread and not have to worry about running out of project because I couldn't work on them last week or what ever. So anyways, the build.
The last set of speakers I built are the two way book shelf speakers that I currently have on my desk top flanking both sides of my monitor. They are ideally suited for near field monitoring and are reference flat. I actually like them quite a bit and I have no complaints. In truth I certainly don't need another set of speakers so why have I decided to build some?
Do I really need a reason?
Over the last couple of years I have been thinking about building a real high end set of floor standing speakers but my budget has always held me back. That changed as of 2021 and I now have the resources to make this project happen. I have had this idea of how I wanted to finish them and if I could get it right they would be a real show stoppers but as of yet all of my attempts have thus far only yielded mediocre results. But I do think it is possible to get to where I could actually make it work but it will take some more R&D because I'm not there yet. I will talk about this aspect of the build a little later if I decide to do it.
So I decided that I go ahead with a build. I wanted to build a tree way set of floor standers but hadn't bought any drivers in years so onto the innerwebs I go.
Tomorrow I will go over what was out there and what I ultimately chose to use. I will post some pics and share some test data as well. I'm to tired to do that tonight so until tomorrow here is a couple of pics of my trusted and true daily drivers and the X-overs I built for them although I did eventually change them out for a new design.

6 1/2" silver Flutes and some tweeters I removed from some Niles in wall speakers I salvaged from a remodeling job I did some years ago. I doubt that Niles makes the drivers themselves but they seem to me to be Peerless or Vifa maybe. Not sure but they sound pretty good though. These speakers have got several years mileage on them now as daily drivers but still look decent but could probably use some attention now that I'm looking at them.

And here is the job that has been taking up so much of my time. I'm finished with it now but it was a lot of work. Someone had painted it white to cover up damage caused after a bad water leak flooded the soffit above it and the wall behind it required it to be dismantled to facilitate repairs. I had nothing to do with that but I was tasked with returning it to it's prior glory. I think it looks pretty darn good if I must say so my self.


Cheers
The last set of speakers I built are the two way book shelf speakers that I currently have on my desk top flanking both sides of my monitor. They are ideally suited for near field monitoring and are reference flat. I actually like them quite a bit and I have no complaints. In truth I certainly don't need another set of speakers so why have I decided to build some?
Do I really need a reason?
Over the last couple of years I have been thinking about building a real high end set of floor standing speakers but my budget has always held me back. That changed as of 2021 and I now have the resources to make this project happen. I have had this idea of how I wanted to finish them and if I could get it right they would be a real show stoppers but as of yet all of my attempts have thus far only yielded mediocre results. But I do think it is possible to get to where I could actually make it work but it will take some more R&D because I'm not there yet. I will talk about this aspect of the build a little later if I decide to do it.
So I decided that I go ahead with a build. I wanted to build a tree way set of floor standers but hadn't bought any drivers in years so onto the innerwebs I go.
Tomorrow I will go over what was out there and what I ultimately chose to use. I will post some pics and share some test data as well. I'm to tired to do that tonight so until tomorrow here is a couple of pics of my trusted and true daily drivers and the X-overs I built for them although I did eventually change them out for a new design.
6 1/2" silver Flutes and some tweeters I removed from some Niles in wall speakers I salvaged from a remodeling job I did some years ago. I doubt that Niles makes the drivers themselves but they seem to me to be Peerless or Vifa maybe. Not sure but they sound pretty good though. These speakers have got several years mileage on them now as daily drivers but still look decent but could probably use some attention now that I'm looking at them.
And here is the job that has been taking up so much of my time. I'm finished with it now but it was a lot of work. Someone had painted it white to cover up damage caused after a bad water leak flooded the soffit above it and the wall behind it required it to be dismantled to facilitate repairs. I had nothing to do with that but I was tasked with returning it to it's prior glory. I think it looks pretty darn good if I must say so my self.
Cheers
So I start looking for drivers to use. There was a time when I was looking at the Eaton Arcosia line of drivers but they where to expensive. I just couldn't bring my self to shell out that kind of cash on some drivers that I had never heard before and there was so little review wise about them on the web I decided to pass on those. But then I started looking at SB Acrostic's line, unparticular their Santori Textream drivers. After seeing the manufacture's spec sheets and reading several reviews that spoke very favorable about them I decided I would pull the trigger on a pair of 6 1/2" MW16TX-4 ohm mid woofers and a pair of 29mm TW29TXN-B-8 ohm tweeters. I probably would have opted for the 5" version of mid woofer had they been available at the time but they had not been released yet.
The drivers arrived quickly and where undamaged. They where packaged in very sturdy boxes and I was pretty impressed. Once I got a look at these drivers in person I was immediately impressed with the top notch build quality. Every component was fitted together perfectly. No stray glue, no cheap terminals, no cone misalignment. Just really nicely built drivers. So I set them up for some testing.


Here are the data.

The two mid woofers in a small sealed box for determining the VAS. The two drivers have almost identical impedance curves.

Frequency graph for one of the mid woofers. I don't remember if this was free air or in the box. I think it was in a box.

Tweeter impedance

And frequency graphs. This was in a small baffle.
After having one of the mid woofers mounted in a small sealed box with the tweeter attached to it in a baffle and a close enough x-over hobbled together with some parts I had laying around I started listening to the speakers and liked them quite a bit but noticed the mid woofer was a little anemic in the base registrars so I a had an idea of what I needed to complete the drivers so I went back on the interwebs and started looking for something to pair with these drivers with. More about that tomorrow.
Cheers for now
The drivers arrived quickly and where undamaged. They where packaged in very sturdy boxes and I was pretty impressed. Once I got a look at these drivers in person I was immediately impressed with the top notch build quality. Every component was fitted together perfectly. No stray glue, no cheap terminals, no cone misalignment. Just really nicely built drivers. So I set them up for some testing.
Here are the data.
The two mid woofers in a small sealed box for determining the VAS. The two drivers have almost identical impedance curves.
Frequency graph for one of the mid woofers. I don't remember if this was free air or in the box. I think it was in a box.
Tweeter impedance
And frequency graphs. This was in a small baffle.
After having one of the mid woofers mounted in a small sealed box with the tweeter attached to it in a baffle and a close enough x-over hobbled together with some parts I had laying around I started listening to the speakers and liked them quite a bit but noticed the mid woofer was a little anemic in the base registrars so I a had an idea of what I needed to complete the drivers so I went back on the interwebs and started looking for something to pair with these drivers with. More about that tomorrow.
Cheers for now
So where was I? Oh yea woofers. I kind of knew what I was looking for and Silver Flute came to mind. I have used these drivers in the past so I knew what they sounded like. Two of them are in my two way build that I showed at the beginning. After checking the specs on the 8" version I decided to go with the Silver Flutes. At this time I only planed to use one 8" driver as I was trying to keep the size of the box down to a minimum probably more like a three way on a stand then a true floor stander but that would change.
Anyway I got the drivers and ran some test and stated to simulate the three way set up and things looked pretty good so I ordered x-over components and started cutting some MDF for a test box.
Here are some of the simulation.


For the test box I wanted to try miterlock corners. I had used this joint on plywood columns before with good success but not on MDF. As it turned out the joint worked without glue but as soon as you put glue in the joint it made it very difficult to get it to squeez out making the joint a no go.

Dry assembly.

Finished test box. Mind that this box is never intended to be part of the finish speakers. Just for testing.

With speakers mounted.

Here is the x-over hobbled together next to the speaker.

Here is a waterfall measurement.

Doesn't look to bad. I have the top end rolled off on purpose but there is a not enough base for me. This is the only graph I saved. The rest was mostly just listening to it. It sounded pretty good but I was wanting more low end. So I started thinking about what I was going to do. The amp I had wasn't really enough to drive the speakers like I wanted them to be driven. So new plan. True floor standing three way active system with two 8" poly prop woofers (the paper cones of the Silver Flutes where a little to warm for the Textream's), DSP and new amps to drive them. Yep...Things just got a whole lot more involved and expensive. I'll get into the details of the new plan in the next update.
Till then
Cheers
Anyway I got the drivers and ran some test and stated to simulate the three way set up and things looked pretty good so I ordered x-over components and started cutting some MDF for a test box.
Here are some of the simulation.
For the test box I wanted to try miterlock corners. I had used this joint on plywood columns before with good success but not on MDF. As it turned out the joint worked without glue but as soon as you put glue in the joint it made it very difficult to get it to squeez out making the joint a no go.
Dry assembly.
Finished test box. Mind that this box is never intended to be part of the finish speakers. Just for testing.
With speakers mounted.
Here is the x-over hobbled together next to the speaker.
Here is a waterfall measurement.
Doesn't look to bad. I have the top end rolled off on purpose but there is a not enough base for me. This is the only graph I saved. The rest was mostly just listening to it. It sounded pretty good but I was wanting more low end. So I started thinking about what I was going to do. The amp I had wasn't really enough to drive the speakers like I wanted them to be driven. So new plan. True floor standing three way active system with two 8" poly prop woofers (the paper cones of the Silver Flutes where a little to warm for the Textream's), DSP and new amps to drive them. Yep...Things just got a whole lot more involved and expensive. I'll get into the details of the new plan in the next update.
Till then
Cheers
hi iamjackalope,
nice project!
have a look at the following post to adjust the waterfall settings for loudspeaker measurements.
the rise time and window setting is too high in your measurement, thus your are measuring the room, not the speaker.
https://www.audiosciencereview.com/...aker-measurement-waterfall.21753/#post-722739
suggested values here
window: 6,5 ms
time range: 4 ms
rise time: 0,2 m2
(I found out about these settings in a thread on diyaudio, but could not find it again...)
Thanks. It's trudging along. The amp is finished and works pretty awesome. I'm liking that.hi iamjackalope,
nice project!
have a look at the following post to adjust the waterfall settings for loudspeaker measurements.
the rise time and window setting is too high in your measurement, thus your are measuring the room, not the speaker.
https://www.audiosciencereview.com/...aker-measurement-waterfall.21753/#post-722739
suggested values here
window: 6,5 ms
time range: 4 ms
rise time: 0,2 m2
(I found out about these settings in a thread on diyaudio, but could not find it again...)
When I did the measurements in the test box I had the speaker aimed out my sliding glass door out onto a balcony up on the second floor with the mic just outside the door so I wouldn't get the room reflections. I might have picked up some floor bounce but not much. Not a prefect way to do test measurements but it works. Measurements help you determine where the deficiencies are but ultimately it's my ear that will decide what I have when I'm done. With the single Silver Flute I wouldn't have been happy with out a sub and the sound was a little bit to warm to mix with the Textreams in my opinion, but it wasn't bad. Honestly it wasn't any worse then many of the speaker systems offered by companies like Polk Audio but for this project I'm aiming quite a bit higher then that. We will have to wait and see how good my aim is.
Ok. As of this point I am shopping for different woofers and have decided I don't want to buy a bunch of new components for a standard passive X-over so I do some digging into the world of DSP. I've used active electronic X-overs plenty in car audio which is where the majority of my experience comes from and to great success. I've always used electronic X-overs in conjunction with passive X-overs and I liked the results as long as I went with a good X-over but I never really cared much for DSP in the past. But that was back in the 2000's and honestly I haven't been paying much attention to DSP since then so I figured I should maybe check it out. It's bound to have improved. Right?
So I see this 4 X 8 DSP unit over at Parts Express for under $200 and figure what the hell it ain't going to break the bank so I got it. I also found the woofers That I wanted, SB23MFCL45-4. Actually I wanted the 8 ohm versions but all I could find in the middle of the COVID nonsense where the 4 ohm versions so I got four of them.
So it did not take long before I had my woofers sitting on my door step. I was surprised how quickly they arrived actually. After unboxing the drivers I was pleasantly surprised with SB Acoustic's attention to fit and finish. Although not their Satori line these drivers still had that same well made feel about them. Nothing cheep about these drivers and I figured they would likely be a great match for the Textreams. So i needed to do some measurements so I could get started on a box design. Here is the only graph I have though. It's the impedance graph of the driver in a small sealed box that I use for measuring the VAS.

Ok. So I want to hear these drivers in a box that should be close to what I will end up putting these in so I take the drivers out of my test box and take it out side for some modifications and after a few choice cuts, some more MDF and some glue and I have a modified test box that ended up looking like this.

While I was waiting for the DSP to arrive I hooked it up to the passive X-over with a few modifications to get a feel for the new drivers and right away I could tell these drivers where the right choice. I still wanted the 8 ohm versions for the 4ohm load when paired in parallel but the 8 ohm load in series is workable. Now it was time to go dig through my storage unit and find one of my other amps so I could hook up the DSP seeing how it just arrived. It was also time to get to work on building the finish boxes.
More on that in the next installment where I will show everyone how to create more work for yourself by changing your mind mid box build. But I'm glad I did.
Till then
Cheers.
So I see this 4 X 8 DSP unit over at Parts Express for under $200 and figure what the hell it ain't going to break the bank so I got it. I also found the woofers That I wanted, SB23MFCL45-4. Actually I wanted the 8 ohm versions but all I could find in the middle of the COVID nonsense where the 4 ohm versions so I got four of them.
So it did not take long before I had my woofers sitting on my door step. I was surprised how quickly they arrived actually. After unboxing the drivers I was pleasantly surprised with SB Acoustic's attention to fit and finish. Although not their Satori line these drivers still had that same well made feel about them. Nothing cheep about these drivers and I figured they would likely be a great match for the Textreams. So i needed to do some measurements so I could get started on a box design. Here is the only graph I have though. It's the impedance graph of the driver in a small sealed box that I use for measuring the VAS.
Ok. So I want to hear these drivers in a box that should be close to what I will end up putting these in so I take the drivers out of my test box and take it out side for some modifications and after a few choice cuts, some more MDF and some glue and I have a modified test box that ended up looking like this.
While I was waiting for the DSP to arrive I hooked it up to the passive X-over with a few modifications to get a feel for the new drivers and right away I could tell these drivers where the right choice. I still wanted the 8 ohm versions for the 4ohm load when paired in parallel but the 8 ohm load in series is workable. Now it was time to go dig through my storage unit and find one of my other amps so I could hook up the DSP seeing how it just arrived. It was also time to get to work on building the finish boxes.
More on that in the next installment where I will show everyone how to create more work for yourself by changing your mind mid box build. But I'm glad I did.
Till then
Cheers.
Notice that these cut parts are for a square box. Originally a square box is what I was going to make but then I remembered all of the times I'd seen people use someone else's speaker as a convenient place to set their beer upon at parties and thought , I don't want people to be able to set any thing on top of these speakers. So I decided to make a design change. Now they look like this.
I'm thinking I might call them The Tombstones, or not. I don't know. They kind of look like tombstones. Here is the back side.
You might be wondering right about now, what are all of the cut outs are for and that would be good question. The rectangle in the middle is for the binding posts and the top cut out is the handle that I will use to move them with along with the wheels that are going in the notches at the bottom.
I've never seen anybody do this and I don't know why. In a cheap set of commercially available speakers that don't weigh much who cares but with as much as these puppies are going to weigh by the time I am done I want to be able to move them around with out having to physically pick them up. The front will rest on out riggers on spikes while the rear will rest on the rubber wheels and all I have to do to move them is lean them back and roll them. I figure this feature will come in handy when I have to clean and vacuum around them.
So here is some of the assembly. It should be stated that I don't really have any build plans other then a general idea about how much internal volume there needs to be, what the front baffle layout will be and a rough idea what the port length will be. Other then that I am designing it as I go. You would be surprised at the things I have built with nothing more then a rough idea in my head and maybe a rough sketch on a note pad.
No the Corvette is not mine. The mustang behind it is though.
The router table you see poking out from behind the speaker cabinet is another DIY project I built mostly in preparation for building these speakers. That and I do use it for work when I need one.
Here you see the sealed inner box for the 6 1/2 inch mid range. It is an octagon. This shape will help prevent standing waves from prorogating inside of it. It will also be heavily damped.
One thing I realized after I started gluing things together was that my table saw had run out of adjustment and what I thought where 45 degree cuts turned out to be more like 46 and 1/2 degree cuts. My saw has always cut dead nuts on but something went wrong this time so now my corners don't fit tight and have a open gap. So I could make the trip to the lumber yard 100 miles round trip to get more MDF and recut every thing or I can make these pieces work. So, NO, I'm not re-cutting all of the parts. Instead I will use a two part epoxy to glue up the corner joints and fill in the gaps which I did and it was a pain in the butt but it worked. I hate having to do things like that because I'm kind of a perfectionist but I wasn't going to cut every thing all over again if I didn't have to and in the end it all worked out fine.
Any ways. That's all for now. I will try and post a few more pics a little later on today or this evening.
Till next time,
Cheers.
That bar/coctail lounge looks very nice!Okay. Let me set the scene for this build. At the time of me starting this thread I am already pretty far into building these speakers. I've waited this long to post because I've been very busy with work and that means that there are times where it could be a week or two that I can't find the time or energy to work on them and for anybody following the thread that is waiting for some update might get board waiting and stop following the build. So I waited until they where pretty far along to start this thread so I could put part of it up and discuss what I did then a little more and discuss that and that way I can update the thread and not have to worry about running out of project because I couldn't work on them last week or what ever. So anyways, the build.
The last set of speakers I built are the two way book shelf speakers that I currently have on my desk top flanking both sides of my monitor. They are ideally suited for near field monitoring and are reference flat. I actually like them quite a bit and I have no complaints. In truth I certainly don't need another set of speakers so why have I decided to build some?
Do I really need a reason?
Over the last couple of years I have been thinking about building a real high end set of floor standing speakers but my budget has always held me back. That changed as of 2021 and I now have the resources to make this project happen. I have had this idea of how I wanted to finish them and if I could get it right they would be a real show stoppers but as of yet all of my attempts have thus far only yielded mediocre results. But I do think it is possible to get to where I could actually make it work but it will take some more R&D because I'm not there yet. I will talk about this aspect of the build a little later if I decide to do it.
So I decided that I go ahead with a build. I wanted to build a tree way set of floor standers but hadn't bought any drivers in years so onto the innerwebs I go.
Tomorrow I will go over what was out there and what I ultimately chose to use. I will post some pics and share some test data as well. I'm to tired to do that tonight so until tomorrow here is a couple of pics of my trusted and true daily drivers and the X-overs I built for them although I did eventually change them out for a new design.
View attachment 1033128
6 1/2" silver Flutes and some tweeters I removed from some Niles in wall speakers I salvaged from a remodeling job I did some years ago. I doubt that Niles makes the drivers themselves but they seem to me to be Peerless or Vifa maybe. Not sure but they sound pretty good though. These speakers have got several years mileage on them now as daily drivers but still look decent but could probably use some attention now that I'm looking at them.
View attachment 1033129
And here is the job that has been taking up so much of my time. I'm finished with it now but it was a lot of work. Someone had painted it white to cover up damage caused after a bad water leak flooded the soffit above it and the wall behind it required it to be dismantled to facilitate repairs. I had nothing to do with that but I was tasked with returning it to it's prior glory. I think it looks pretty darn good if I must say so my self.
View attachment 1033131
View attachment 1033132
Cheers
Where is that located?
Those wooden wheel blocks will not survive.View attachment 1036856
Notice that these cut parts are for a square box. Originally a square box is what I was going to make but then I remembered all of the times I'd seen people use someone else's speaker as a convenient place to set their beer upon at parties and thought , I don't want people to be able to set any thing on top of these speakers. So I decided to make a design change. Now they look like this.
View attachment 1036857
I'm thinking I might call them The Tombstones, or not. I don't know. They kind of look like tombstones. Here is the back side.
View attachment 1036858
You might be wondering right about now, what are all of the cut outs are for and that would be good question. The rectangle in the middle is for the binding posts and the top cut out is the handle that I will use to move them with along with the wheels that are going in the notches at the bottom.
View attachment 1036861
I've never seen anybody do this and I don't know why. In a cheap set of commercially available speakers that don't weigh much who cares but with as much as these puppies are going to weigh by the time I am done I want to be able to move them around with out having to physically pick them up. The front will rest on out riggers on spikes while the rear will rest on the rubber wheels and all I have to do to move them is lean them back and roll them. I figure this feature will come in handy when I have to clean and vacuum around them.
So here is some of the assembly. It should be stated that I don't really have any build plans other then a general idea about how much internal volume there needs to be, what the front baffle layout will be and a rough idea what the port length will be. Other then that I am designing it as I go. You would be surprised at the things I have built with nothing more then a rough idea in my head and maybe a rough sketch on a note pad.
View attachment 1036862
View attachment 1036863
No the Corvette is not mine. The mustang behind it is though.
View attachment 1036864
View attachment 1036865
The router table you see poking out from behind the speaker cabinet is another DIY project I built mostly in preparation for building these speakers. That and I do use it for work when I need one.
View attachment 1036867
View attachment 1036868
Here you see the sealed inner box for the 6 1/2 inch mid range. It is an octagon. This shape will help prevent standing waves from prorogating inside of it. It will also be heavily damped.
View attachment 1036869
One thing I realized after I started gluing things together was that my table saw had run out of adjustment and what I thought where 45 degree cuts turned out to be more like 46 and 1/2 degree cuts. My saw has always cut dead nuts on but something went wrong this time so now my corners don't fit tight and have a open gap. So I could make the trip to the lumber yard 100 miles round trip to get more MDF and recut every thing or I can make these pieces work. So, NO, I'm not re-cutting all of the parts. Instead I will use a two part epoxy to glue up the corner joints and fill in the gaps which I did and it was a pain in the butt but it worked. I hate having to do things like that because I'm kind of a perfectionist but I wasn't going to cut every thing all over again if I didn't have to and in the end it all worked out fine.
Any ways. That's all for now. I will try and post a few more pics a little later on today or this evening.
Till next time,
Cheers.
Bad design.
Steel is better.
You'll be replacing them for sure.
I don't see how that's any different in reality to a cylinder in terms of avoiding radial standing waves.It is an octagon. This shape will help prevent standing waves from prorogating inside of it.
Use expanding PU glue. It will fill the gaps, but clamp it well.One thing I realized after I started gluing things together was that my table saw had run out of adjustment and what I thought where 45 degree cuts turned out to be more like 46 and 1/2 degree cuts. My saw has always cut dead nuts on but something went wrong this time so now my corners don't fit tight and have a open gap. So I could make the trip to the lumber yard 100 miles round trip to get more MDF and recut every thing or I can make these pieces work.
Thanks. That was a lot of work. When I started most of it had been painted white. It's in Santa Ynez, CA. North Santa Barbara County. It's going to be a tequila tasting bar for a boutique tequila called Casa Del Sole I believe. I've tried a couple shots of the stuff. Not a big tequila drinker but it's pretty good.That bar/coctail lounge looks very nice!
Where is that located?
Nah, they will survive. They are locked in tight. It's not like I'm going to be dragging them down a dirt road or anything. As for the saw blade I usually don't have to check it because it has always been dead on. I've had this saw for a long time and it's never been off but I had just recently cleaned the trunnion and I must have knocked something out of adjustment.Those wooden wheel blocks will not survive.
Bad design.
Steel is better.
You'll be replacing them for sure.
I would have used PU but I'm going to round over the front corners and Pu glue has a tendency to foam when it expands leaving soft bubble filled glue seams that don't machine well. Epoxy on the other hand dries hard and machines well.Use expanding PU glue. It will fill the gaps, but clamp it well.
To be honest I don't think standing waves will be a problem to begin with but I wasn't comparing it to a cylinder as it basically is a cylinder I was thinking more along the lines of a square box.I don't see how that's any different in reality to a cylinder in terms of avoiding radial standing waves.
On octagon has parallel opposite sides so will be the same as a square section or cylinder in how bad standing waves would be, if, they are an issue.To be honest I don't think standing waves will be a problem to begin with but I wasn't comparing it to a cylinder as it basically is a cylinder I was thinking more along the lines of a square box.
Comes off OK if it's still wet, but agreed it's a pain.I would have used PU but I'm going to round over the front corners and Pu glue has a tendency to foam when it expands leaving soft bubble filled glue seams that don't machine well.
I love epoxy and have some ideas coming for it's use in the next round of builds.Epoxy on the other hand dries hard and machines well.
Some concern about the wheels not being strong enough I think you can see that they are actually locked in pretty good. Before I glue the last panel in I fill in that recess with epoxy and then with the last panel in place it's not going any where. I would have to drop the speaker in order to damage it and I don't plan on doing that. Here you can see more of the internal bracing and the support for the motor structure of the woofers that I was in the process of installing.
Here you can see a method I've used a lot when building boxes for subs in my car audio builds. First I use a carpet adhesive and a notched trowel to adhere a layer of cork to the MDF and then I attach lead sheets to the walls with screws (as few as I can get away with). The lead is held off the walls by small cork squares stacked on top of each other with the screws running through them. Lead is extremely effective at deadening box resonances in my experience. It makes the box really heavy but that is part of what makes it effective. I attach lead to all of the out side panels.
I changed the port from what you see above to what's below because it actually flares out and I figured because of that it would need more length so I added on to what was there and doubled it back upon it's self narrowing the ports cross section to about 1 1/4 inch by 3 inch. It's hard to get an exact size for the port length when it's flared like I have it. For a 3 1/2" X 3 1/2" square port it was something like 29 cm which is roughly what you see here only the bottom part is flared so I added an additional 10 or 11 cm's to the length to make up for it.
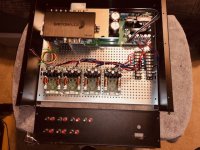
Here is a couple pics of the amp I put together for these speakers. I started a couple of threads for it over in the class D amp forum,
https://www.diyaudio.com/community/...ance-icepower-1500s-psu-400a-x4.383340/latest
https://www.diyaudio.com/community/threads/why-do-i-have-56v-on-my-vdrive.383620/latest
I've built many a speaker system before but never tried building an amp even if it's more like assembling an amp I am still way out of my element, but It's come together. There are a few things I'm trying to iron out but is working though.
Anyways I have kind of caught up to where I'm at and have got both speakers done to the same point and will be starting on the hard part now and that is the tops of the speakers. I will post some more on my progress in a day or two or maybe three. We will see how it goes. I've got 3 new jobs I'm starting this week and another I'm finishing so I'm going to be busy again.
Till the next update
Cheers
Attachments
And now we know why you included the wheels!!I attach lead to all of the out side panels.
")
Pattern cut with the router. Once I have everything cut out and glued up I will sand it smooth round over the front baffle then use polyester resin to seal the whole box then do some more sanding until I can get it completely flat. Then I need to decide how I want to finish it. I have something I want to do but I haven't yet perfected it's application and I don't know how to get it to a level that I will be satisfied with, as it's not something that anyone has done before. So if I figure out a way to make it work I will have been the first to do so. The test panels that I have done so far have only been partially successful which is a good sign because it proves that it can be done but there are still a couple major hurdles to get over before I can call it successful and would even consider doing it to these speakers. But no matter what the finish on these speakers will be it will be a showroom quality finish. That much is for sure.Very nice build. I like the rounded and reduced cabinet head which should also improve the HF off axis. It will most likely keep the plants and beers off as well.
Yep. They are already heavy and there ain't even any drivers in them yet. But heavy is good unless you are shipping them then not so much.And now we know why you included the wheels!!
- Home
- Loudspeakers
- Multi-Way
- Build Thread-SB Acoustic WWMT Floor Standing Goodness. Come check it out.