Hi everyone, I'm going to be building Jim Griffin's 10.3 MLTL as per this thread. This will be my third build so we'll see how we go. I'm mostly documenting it to remember any mistakes for the next one and because I enjoy reading others' build threads.
I've had the 18mm BB ply cut for over a year but life got in the way. I'm intending to make the ports downfiring with some fun feet which I haven't made yet (I need to plane some timber and I've had to order a replacement bolt for my plane).
The cabs are not going to be braced as I feel it will add too much complexity for my skills. The stuffing will be some Romney long-haired sheep's wool which I'm sure will make a big difference 😉. I think I'm going to tape some thin stocking feet around the ports to prevent any moths from getting in.
Today I'm going to get the speaker holes/recesses routered and if I have any time, the holes for the Neutrik NL4FRX connectors.
Clamp numbers will be a problem so glue-up will be slow but we work with what we have.
Any advice along the way appreciated! Thanks

ollyboyd,
Good luck with your build, and keep us posted on the progress.
And don't forget to chamfer the insides of the driver cutouts.
Good luck with your build, and keep us posted on the progress.
And don't forget to chamfer the insides of the driver cutouts.
Attachments
Last edited:
Thanks zman01, well today I was unable to router the driver's hole/recess as I realised the driver is wider than the plywood face panel of my speakers so I will need to glue the sides on first then router. Not ideal as this will make it very tricky to do as you suggested as it will be impossible to fit the router into the back of the speaker. The only way I can imagine is to find a router bit like so however I'm reluctant to spend any money on esoteric router bits...

Last edited:
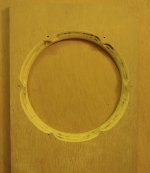
However I spent a couple of hours flush mounting the female Speakon connectors.

Drill pilot for router circle jig:

Router out 4.5mm deep recess:

I'll take a razor blade to those stringy bits before oiling:

Hole bit to cut out the 22mm hole:

Test fit:

Drill pilot holes:

Screw in self-cutting Monacor MZF-8616 hex socket wood screws 4mm:

Nice! Now repeat

Drill pilot for router circle jig:
Router out 4.5mm deep recess:
I'll take a razor blade to those stringy bits before oiling:
Hole bit to cut out the 22mm hole:
Test fit:
Drill pilot holes:
Screw in self-cutting Monacor MZF-8616 hex socket wood screws 4mm:
Nice! Now repeat
ollyboyd,
Nice work with the Speakon connectors.
For the chamfers on the insides of the cutouts - you can use a rasp to do them after the sides are glued on or even after the whole box is made for that matter; you need to vacuum up the wood dust and debris though. It's better to glue the lining material (if any) ot put in the stuffing after this has been done.
Doing the work with a rasp is a bit laborious but work fine. You can sand the chamfers smooth after the rasp has done it's work.
Actually, FWIW the rougher the better in theory, especially with small wide range drivers since a ~uniform round one can set up one or more ~infinite sets of eigenmodes while a very rough/uneven one just creates a bunch of random inaudibly low amplitude high frequency reflections, so what I've done/recommended.
That said, I didn't own a router till after my active DIY audio 'career' and often used much thicker baffles due to working with big building construction scrap, so doubtful it really matters which way it's done with ~3/4" (18 mm) panels, so just a 👍 that there's no need for 'fineness' beyond a very coarse rasp or a hand grinder driven wood rasp bit (my tool of choice).
That said, I didn't own a router till after my active DIY audio 'career' and often used much thicker baffles due to working with big building construction scrap, so doubtful it really matters which way it's done with ~3/4" (18 mm) panels, so just a 👍 that there's no need for 'fineness' beyond a very coarse rasp or a hand grinder driven wood rasp bit (my tool of choice).
Your off to a start
And it is all that matters.
Keep going
Build threads are always the best at any level.
And was looking forward to seeing something pop up
And it is all that matters.
Keep going
Build threads are always the best at any level.
And was looking forward to seeing something pop up
It’s been my understanding that placing of port terminus on an MLTL design on any of the 4 vertical panels, or even adjusting from round to rectangular or slot of same effective CSA/length is of minor consequence - other than ensuring minimal proximity to side or rear boundaries, but wouldn’t relocating it to the bottom change several of the system’s performance characteristics?
Several of the many enclosures I’d built had bottom firing vents, but they were specifically designed as such.
Several of the many enclosures I’d built had bottom firing vents, but they were specifically designed as such.
Hmm I am currently routering the port holes, it's not too late to have a change of plans...if anyone wants to chip in feel wlecome. I shall do a bit of research.It’s been my understanding that placing of port terminus on an MLTL design on any of the 4 vertical panels, or even adjusting from round to rectangular or slot of same effective CSA/length is of minor consequence - other than ensuring minimal proximity to side or rear boundaries, but wouldn’t relocating it to the bottom change several of the system’s performance characteristics?
Several of the many enclosures I’d built had bottom firing vents, but they were specifically designed as such.
OK change of plan, down venting ports are out, front venting ports are in. An aesthetic tradgedy. I don't have the space for rear venting ports unfortunately. I'm going to order some aluminium pipe to use, as black PVC is not going to fly.
edit: apparently alu will ring too much,
edit: apparently alu will ring too much,
Last edited:
Spray paints are available that are formulated to work on plastics- Krylon, Rustoleum, etc. - but I’d await confirmation as to my earlier assertion based on possible mis-remembrance; something I’m doing a lot more in the past several years.
edit - indeed, I’m surprised Dave or Scott haven’t yet piped in, but then I’m vacationing in a different time zone right now (Bermuda)
edit - indeed, I’m surprised Dave or Scott haven’t yet piped in, but then I’m vacationing in a different time zone right now (Bermuda)
Last edited:
OK I've ordered a transparent acrylic tube for use as the front facing port. I'm going to router the hole in the front panel the same diameter as the inner diameter of the tube. Then I'll mount the acrylic tube behind so it won't be very visible.

OK, sorry for the delay, life etc....so my acrylic tube came for the port, today I'm going to be routering the port and speaker holes and the speaker recess. Pics to follow. Tube is made by Gammacril in Italy. Outside Ø 70mm Inside Ø 64mm x 500mm
Correct, though like the driver it ideally should be at an odd harmonic of a high aspect ratio cab's internal height.It’s been my understanding that placing of port terminus on an MLTL design on any of the 4 vertical panels, or even adjusting from round to rectangular or slot of same effective CSA/length is of minor consequence - other than ensuring minimal proximity to side or rear boundaries, but wouldn’t relocating it to the bottom change several of the system’s performance characteristics?
Bottom firing; what matters is where the vent's inside terminus is, which again should be at said odd harmonic and of course how much cab/floor gap there is. Many sim Vs measured discrepancies are due to the latter if the terminus extends high enough to place it above the cab's pipe fundamental (usual reason for going down firing) or worse, in an even harmonic (null). 🙁
Note that for typical cab aspect ratios the net volume (Vb) is presumed to have a ~uniform particle density, so ideal driver position is ~ L*0.42 and the vent can be anywhere, though the pioneers found that a driver in vent layout was technically the ideal.
Thanks GM, I am front mounting the port as per the plans!
Today wasn't a good day! I had a sheared router bit and a chipped tooth as the fruits of my labour. I shall continue my overly-detailed build thread with details:
OK so first mark-up the port hole on the front and the back of the ply (you can see my experiment with frosting the acrylic in the background):

Next I stick carpet tape to the back-side to hold the core of plywood left after routing, to prevent the router drifting once it's cut through its anchor:

Peel and stick down onto the sacrificial board underneath:

I don't know if friction fitting the port tube in 18mm ply will be secure enough so i'm making these little squares with a hole cut out which I'll glue to the back of the speaker face giving a 36mm friction-fit tunnel for the port to sit in.

I began routering and after a few passes I suddenly felt no resistance. I turned off the router and lifted it, finding the bit had sheared just below the shank but before the cutter. This seriously spooked me as I always have images of the bit flying out while routering. Luckily it was just sitting in the channel. I'm not quite sure what happened. My pass was about 5mm and I was taking it slow. Trend brand bit.

.JPG")
I took a break, fitted my larger router bit, had to re-measure my settings on my Chinese circle-jig then commenced.

I was test-fitting the port tube. It was a perfect size hole, just needed a little bit of persuasion from the soft-faced hammer to reach the bottom. Then I'm trying to extract it, leaning over, pulling hard on the tube, gently wiggling it out when BOOM it comes free, my muscles don't have time to react and reduce their pulling force when the end of the tube smacks into my jaw, my mouth fills with blood, there's a bit of tooth rattling about in there. Goodness me!! That went a bit wrong quite quickly. Took a 2mm corner off a front tooth. I'm going to finish the ports tomorrow, Then glue the face and sides.
Today wasn't a good day! I had a sheared router bit and a chipped tooth as the fruits of my labour. I shall continue my overly-detailed build thread with details:
OK so first mark-up the port hole on the front and the back of the ply (you can see my experiment with frosting the acrylic in the background):
Next I stick carpet tape to the back-side to hold the core of plywood left after routing, to prevent the router drifting once it's cut through its anchor:
Peel and stick down onto the sacrificial board underneath:
I don't know if friction fitting the port tube in 18mm ply will be secure enough so i'm making these little squares with a hole cut out which I'll glue to the back of the speaker face giving a 36mm friction-fit tunnel for the port to sit in.
I began routering and after a few passes I suddenly felt no resistance. I turned off the router and lifted it, finding the bit had sheared just below the shank but before the cutter. This seriously spooked me as I always have images of the bit flying out while routering. Luckily it was just sitting in the channel. I'm not quite sure what happened. My pass was about 5mm and I was taking it slow. Trend brand bit.
I took a break, fitted my larger router bit, had to re-measure my settings on my Chinese circle-jig then commenced.
I was test-fitting the port tube. It was a perfect size hole, just needed a little bit of persuasion from the soft-faced hammer to reach the bottom. Then I'm trying to extract it, leaning over, pulling hard on the tube, gently wiggling it out when BOOM it comes free, my muscles don't have time to react and reduce their pulling force when the end of the tube smacks into my jaw, my mouth fills with blood, there's a bit of tooth rattling about in there. Goodness me!! That went a bit wrong quite quickly. Took a 2mm corner off a front tooth. I'm going to finish the ports tomorrow, Then glue the face and sides.
Yikes! That bit broke like it was made of cheap steel, though when I looked up the brand and found that it's only available at Atlanta's premier 'one stop shop' emporium I have to assume it's a plenty 'good enough' quality brand overall. It's been so many decades since I've bought any though that all I remember is that I've always paid the premium $$$ for industrial grade tools that I needed to last, etc., though no clue if still the quality of the '60s-'80s.
I sympathize with the freak accident, got both a chipped and missing tooth when I didn't strike a large/long nail just right and it shot up inside the face shield, so heartily recommend spending whatever it takes for full protection.
I sympathize with the freak accident, got both a chipped and missing tooth when I didn't strike a large/long nail just right and it shot up inside the face shield, so heartily recommend spending whatever it takes for full protection.
Thanks for the kind words GM, that sounds sore! Yes I think you're right, I'm probably going to get a 'made in USA' Uvex Bionic face shield. Especially as I recently joined a collective near me who own 4 wood lathes in a shipping container on waste land (plus a container with electric wood workshop and one for hand tools) that you can use for USD 6 per month. I don't fancy taking a block of wood to the face from the lathe.
I finished rounting the port holes. The fit is super perfect which I'm really happy about.
.JPG")
I finished rounting the port holes. The fit is super perfect which I'm really happy about.
Right speaker glue-up underway! Would that I had more clamps! Thankfully I was able to rope my gf into helping. It's always a bit frenzied adjusting the panels to be flush, then wiping the glue with a wet towel against the clock. Phew, progress finally. I'm a bit worried about routering the speaker hole as a mistake will ruin 3 panels but I'll just have to be extra careful. I've got a replacement 1/4 inch straight bit in the post.

Meant to ask, how did you 'frost' the vent pipe?
Re 'perfect' hole, that's what a DIY tool guide is for. 😉
Re 'perfect' hole, that's what a DIY tool guide is for. 😉
- Home
- Loudspeakers
- Full Range
- Build thread: Alpair 10.3 MLTL designed by Jim Griffin