Hmmm....I see...
So can you describe the results you have gotten so far by using transperancy...pretty good?
So can you describe the results you have gotten so far by using transperancy...pretty good?
I really only tried once, but the results were promising. It's definately possible to get this to work *great*, but it might prove difficult, time-consuming, or expensive to get the image to be a perfect matching inverse for the shape and intensity of your bright areas.
I THINK WE HAVE A WINNER!
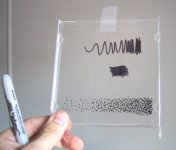
I was so excited about this I had to hurry up and try it on my lunch break.
I didn't have a transparency laying around so I used a moderatly clean CD jewel case cover.
I made some test patterns and taped the cover to the OHP's internal mirror. I also strung a piece of dental floss on the mirror.
The floss shows up plain as day.... but:
The *very* quick and dirty dot pattern gradient that I made with a *sharpie pen* blends smoothly and nicely... I really think this is going to work!
It all works on the principle that objects on the main mirror are very blurry in the projected image - so one tiny dot is virtually unnoticeable.... however, a diffuse cloud of dots can be used to screen out brighter areas on the panel.
I think this is the way to go. Of course it will be a lot of trial error work, but at least the time between trials is brief - not to mention FREE! The next few posts contain images I took of this test in process...


nice...so a few dots should do it then!
Also, how about buying a cheap $1 pair of Mickey Mouse sunglasses (not too dark) and seeing how one of it's lenses does?
Also, how about buying a cheap $1 pair of Mickey Mouse sunglasses (not too dark) and seeing how one of it's lenses does?
I printed out a 50 dpi diffusion pattern on a transparency at kinko's... that would save a lot of time over drawing all those dots.
One small problem - it's really hard to get the transparency to lay perfectly flat against the mirror, maybe impossible since the heat seems to make the transparency warp and swell a little bit. (I don't think it's enough to actually melt it, though.)
This is important because where the transparency isn't flat, it creates reflections that are plainly visible in the darkened parts of the projected image.
Other than that, the effect is *very* promising!
Maybe a piece of glass, cut to size from the hardware store, to sit right on top of the mirror will do the trick. It would squash the transparency flat against the mirror, or it could be the actual surface for the dot pattern "artwork."
An extra piece of glass would cut the overall light output some, but it seems I have light to spare with my 400W EVD Buhl 2900, creating a 7' wide image.
Overall brightness has never been a problem. (I have a Dukane 680 that will probably be on sale on Ebay shortly. It's actually TOO bright for my application. I would only recommend the 575W MH bulb OHPs for very large screens 9'+, or projection in a dimly lit room.)
Probably the only thing that would happen to the ink on glass is that it would eventually cook to dust.
Here's a GIF of the diffusion pattern I printed at Kinko's... it's possible someone else may want to use this. This is the full resolution... just open it in PhotoShop, set it to 8.5'x11'@50dpi, and print it to a transparency. (I printed mine to Kinko's KDF format... that makes it real easy on them - and fast for you - when you bring it into the store.)
Attachments

Just to clarify - this 1-bit image works *way* better than the previous grayscale images... the printers at kinko's just don't print shades of gray real well on the transparencies.
This cannot go directly on the stage glass, or it will be too focused and the dots will be visible. It must go on the OHPs internal mirror. (At your own risk - I do not know of anyone having done this before!)
My next step is to get a piece of glass cut to hold the film flat to the mirror. You'll notice that without the glass, it will swell out slightly and cause reflections that will show up in the projected image.
It's $1 for each trial at Kinko's. This is so close to what I need I doubt it will take more than 4-5 tries to get it right. Any irregular shapes in your bright areas could later be corrected by manually adding dots with a sharpie pen.
If anyone would like a diffusion GIF with modifications to the one I posted, let me know and I'll make you one and e-mail it to you - it's really easy.
Maybe if this idea works out we could get a collection going on a web site, where there would be certain GIFs for certain OHPs... I'll bet when I refine my GIF for my Buhl 2900 that anyone else with a Buhl 2900 could use the same GIF and get pretty much the same results.
- Status
- Not open for further replies.
- Home
- General Interest
- Everything Else
- The Moving Image
- DIY Projectors
- Brighter Areas on Screen