
The 'counterbore' was probably cut using a wood router and circle jig/hole cutter attachment, but one could also use a piece of string attached to the center of the intended hole.
Well I have a router (black and decker KW900E) but I just don't see myself doing something like that with this one.
For me the router looks to big and because of the shape of the bowl, you can easily go out of bound or slip up.
For me the router looks to big and because of the shape of the bowl, you can easily go out of bound or slip up.
Ideas....
http://www.diyaudio.com/forums/full-range/253217-ikea-blanda-speaker-driver.html#post4011946
https://www.google.co.uk/search?q=i...X&ved=0ahUKEwjx1_P_yKLOAhUmKcAKHbQEBD8QsAQIKQ
...not so much the concept - as the realisation of it. Clues to the construction in many of the articles.
HTH
J.
http://www.diyaudio.com/forums/full-range/253217-ikea-blanda-speaker-driver.html#post4011946
https://www.google.co.uk/search?q=i...X&ved=0ahUKEwjx1_P_yKLOAhUmKcAKHbQEBD8QsAQIKQ
...not so much the concept - as the realisation of it. Clues to the construction in many of the articles.
HTH
J.
Well user kingfisher did it with the use of a Jasper jig and user ErikW did it with the use of an oversized template.
If anybody else has any tips/hints, I'm glad to know.
@Jerms: Most of the builds I find online or flush mounted ones, but when I saw the insert I really wanna try it for my project.
If anybody else has any tips/hints, I'm glad to know.
@Jerms: Most of the builds I find online or flush mounted ones, but when I saw the insert I really wanna try it for my project.
Attachments
Do I understand your question correctly, in that you wonder how the rebate was cut after the hole? If that's the issue, I'd use a router table, with a template bit. The bit would have the bearing at the 'top', and would be a smaller diameter than the the cutter. It would take a bit of playing with the bearing size, and its height above the table to get the correct rebate, but it's safe and doable.
Maybe a better word is recess.
I don't have a router table, but thanks for the tip... It's something that I can look into
I don't have a router table, but thanks for the tip... It's something that I can look into
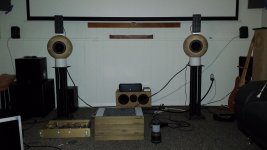
Well right now I've done a flush mounted one, this is just a test build with an old speaker set from the PC. I just wanted to see if I can make it, cost, design,... and when I saw a recessed one, I knew I will have to try it when I get the new speakers (just wished somebody would sugest me some in my other threat)
(also it gives that extra $$$ look ;-)
(also it gives that extra $$$ look ;-)
Attachments
Maybe a better word is recess.
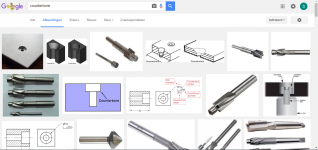
For the second time, the feature you are asking about is called a counterbore. Why not look it up since you don't believe me?
@Andersonix: It's not that I don't want to believe you, because I looked up couterbore. But when you open google you receive these images, counterbore or countersink are things I know and I even used a counterbore on this project for the foot where a screw goes into and a soft padding to hide the screw.
It's just not a term I would use for my project, as english isn't my native language. I don't see a counterbore as that big a hole, because I knew it more as a means to hide screws or go lower into wood,...
I'm looking for tips, hints from people who did it
It's just not a term I would use for my project, as english isn't my native language. I don't see a counterbore as that big a hole, because I knew it more as a means to hide screws or go lower into wood,...
I'm looking for tips, hints from people who did it
Attachments
@Andersonix: It's not that I don't want to believe you, because I looked up couterbore. But when you open google you receive these images, counterbore or countersink are things I know and I even used a counterbore on this project for the foot where a screw goes into and a soft padding to hide the screw.
It's just not a term I would use for my project, as english isn't my native language. I don't see a counterbore as that big a hole, because I knew it more as a means to hide screws or go lower into wood,...
I'm looking for tips, hints from people who did it
I think the ones that are going to show, have shown what they will. You have to dig through Ikeahackers and Google images to get further info.
Well I tried a version of it this weekend.
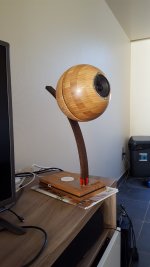
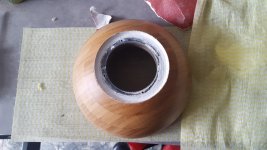
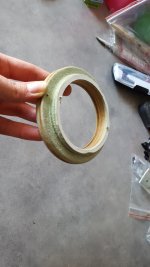
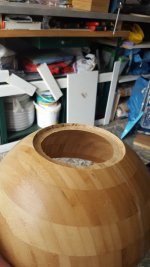
I made a ring to sit inside the bowl, glued it with pu expanding woodglue...then with the use of woodfiller for the small space because of the holedrill.
When I have my new speakers its gonna be a tighter fit, but the process stays the same. So if anybody wants the look, this is another option to go about it.
Attachments


Looks good with one "BUT!"
Depending on the venting arrangements for the back of the speaker your ring mount may restrict. It's usually better to chamfer/bevel or rebate the back of the ring to allow the driver to breath more easily.
Depending on the venting arrangements for the back of the speaker your ring mount may restrict. It's usually better to chamfer/bevel or rebate the back of the ring to allow the driver to breath more easily.
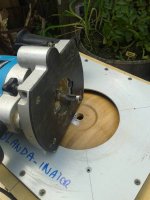
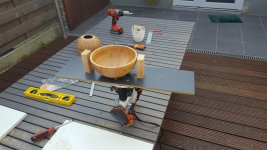
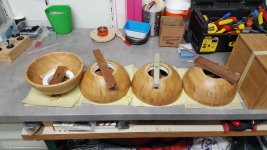
So here is my jig that I used to create the couterbore in the bowls...
Warning: when I was almost full circle in the second bowl, the remaining wood broke from the jig. So I had to touch it up with some paste made from glue and bamboe dust. But a steady hand and patience and then knowing that this could happen was all I needed for the remaining two.
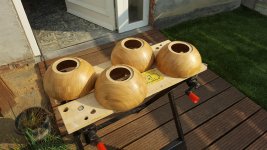
I still had to use my rings after routing the circle because I ended up with round 2mm of wood, so I played it save and added some for the screws.
I made the hole bigger in the rings for these speakers so they can breath more easily, but just enough for the screws to bite into. Didn't chamfer it, because I forgot to do it (posting this and seeing your comment again made me realise that). But I can still do it because I noticed today that my screws for the speakers are not level.
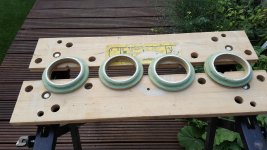
So for anybody that wants to do a similar project, this is another jig
Warning: when I was almost full circle in the second bowl, the remaining wood broke from the jig. So I had to touch it up with some paste made from glue and bamboe dust. But a steady hand and patience and then knowing that this could happen was all I needed for the remaining two.
I still had to use my rings after routing the circle because I ended up with round 2mm of wood, so I played it save and added some for the screws.
I made the hole bigger in the rings for these speakers so they can breath more easily, but just enough for the screws to bite into. Didn't chamfer it, because I forgot to do it (posting this and seeing your comment again made me realise that). But I can still do it because I noticed today that my screws for the speakers are not level.
So for anybody that wants to do a similar project, this is another jig
Attachments

Last edited:
- Status
- Not open for further replies.
- Home
- Design & Build
- Construction Tips
- Blanda matt inlay speaker