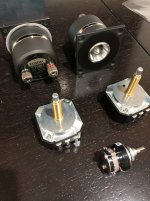
Tweeters and attenuators arrived today,
My friend started on the input for the CNC to cut the front baffles today. Maybe a test panel first of the week.
The switch in the pic is a 4 pole, 3 position switch to select between passive, semi active, and active. Not a cheap switch, price wise, rated for 1 amp and has silver contacts. Is this a suitable switch?
Caps, coils, and resistors got held up in customs today, Memphis (FedEx). After a few emails back and forth with Jantzen for info the package is moving again.
In between coats of paint on my Babelfish project today I cut the backer boards for the crossovers. 1/2”, 9 layer Baltic Birch.
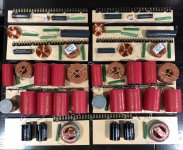
When I got home I spread out all the components to get a perspective of the pockets the cabinets will need.
Quick pic. Each side is roughly 18” x 11” x 2 1/2”.
I went ahead and ordered Path Audio resistors for everything but the 18”. Although the correct values, the resistors in the pic are just placeholders.
Playing around with my cabinet design again. The front two vertical corners will be radiused 1 1/2”. The cabinet walls will be comprised of one layer of 3/4” Medex on the outside and 3/4” Baltic Birch on the inside. The two layers will be bonded together with a polyurethane dampening product.
I keep thinking about how much energy/pressure that 18” driver can produce with 500 watts behind it. I thought about it before, but after actually having it my hands scares me!
Pretty excited about this project, I hope it turns out well.

Interesting resistors you have ordered,,never heard about them
The 18" is big ,,but i do not think the pressure in the box is so bad,,maybe the refleks port take some of the pressure
i use 30mm wood to my speaker,,and not much vibration,
i really like the way the 18" is playing,,,it plays so easy ,,and deep ,never sound muddy
for me it is ,on many way, the best speaker i have build,,,my last speaker was
GR Research LS9 Line array
Best Bjarne
Good to hear positive results for your build of The Loudspeaker!
So your accustomed to large speakers. What amp(s) are you using? Can’t remember if you said. How well do they play at low volume?
Thanks for posting,
So your accustomed to large speakers. What amp(s) are you using? Can’t remember if you said. How well do they play at low volume?
Thanks for posting,
I use a Gryphon Encore amp 500watt
i think the Loudspeaker plays alright with low volume,,better than my old speaker
easy to hear what going on ,on the record,,,but i normally listen a good deal higher on volume.. concert dvd with good volume is just me
i think the Loudspeaker plays alright with low volume,,better than my old speaker
easy to hear what going on ,on the record,,,but i normally listen a good deal higher on volume.. concert dvd with good volume is just me
Nice amp! So now I understand your previous comments about driving your speakers completely from your amp. Plenty of power by itself.
Thanks for sharing.
Thanks for sharing.
I have also tried a Aksa amp (100w) no problem ..very fine sound
i think ,if the amp is stable in lower ohm,,,it will play without problem..so no need for big amp,,but stable amp ( tube amp to woofer normally not the best choise)
i think ,if the amp is stable in lower ohm,,,it will play without problem..so no need for big amp,,but stable amp ( tube amp to woofer normally not the best choise)
Now that the holidays are over, life is getting back to normal.
Here is a first draft cutout from the CNC. Some tweaking to do, so will have at least one more mock-up.
This is going to be a BIG speaker. I will have a 2 1/2” skirt around the bottom to cover wheels/feet. Still sketching and calculating for final cabinet dimensions.
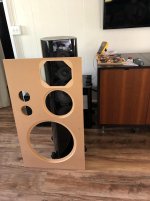
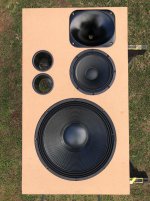
A test fit for the drivers. I’m going to modify the midrange driver flange to be a circle.
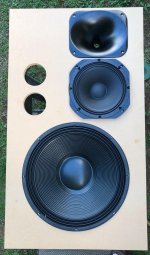
Here is a first draft cutout from the CNC. Some tweaking to do, so will have at least one more mock-up.
This is going to be a BIG speaker. I will have a 2 1/2” skirt around the bottom to cover wheels/feet. Still sketching and calculating for final cabinet dimensions.

A test fit for the drivers. I’m going to modify the midrange driver flange to be a circle.

It will be really nice speaker when they are finished,,,,they play so good,,,
just heard Peter Gabriel, growing up live, on dvd...can really make the house shake
Best Bjarne
just heard Peter Gabriel, growing up live, on dvd...can really make the house shake
Best Bjarne
It will be really nice speaker when they are finished,,,,they play so good,,,
just heard Peter Gabriel, growing up live, on dvd...can really make the house shake
Best Bjarne
Thanks for the vote of confidence.... and your support of this design!
I just saw another build has been posted on Troels site, this one in the Netherlands;

Looks great!
They delivered the wood yesterday and I finished my latest amp project, so ready to start cutting this weekend.
Besides the Maple plywood for the inner layer I purchased some Maple planks to mill up a 1” x 1” frame for all the interior corners. I’m concerned with the structure, due to the size and weight this speaker will end up being. I’m also thinking about adding an extra horizontal brace centered on the 18” driver.
Later on i will send some picture to Troels ,,,i have in those days a mesh with my pre and dac--- wire all over the place..not pretty to look at
i am waiting for a dac ,,and tube pre,,,also diy
i think it will be a good idea to make some brace .about the 18",,,,i am going to do that later on
when you are finished with the speaker,,give them many hours to play,,,they get better then,,,more open sound,,, more clear sound from middle tone -and deeper bass
Looks great.
I'm thinking about adding some bigger diy speaker for my diy sub.
Good thoughts in this process
I'm thinking about adding some bigger diy speaker for my diy sub.
Good thoughts in this process
Later on i will send some picture to Troels ,,,i have in those days a mesh with my pre and dac--- wire all over the place..not pretty to look at
i am waiting for a dac ,,and tube pre,,,also diy
i think it will be a good idea to make some brace .about the 18",,,,i am going to do that later on
when you are finished with the speaker,,give them many hours to play,,,they get better then,,,more open sound,,, more clear sound from middle tone -and deeper bass
Thanks for your input. Looking forward to seeing your “version”.
I was wondering about break-in. Do you have a rough idea yet of how many hours playing to get to reasonable sound?
Thanks for chiming in!Looks great.
I'm thinking about adding some bigger diy speaker for my diy sub.
Good thoughts in this process
Woodwork starts
This week they delivered the wood.
Today I had the cabinet shop almost all to myself. So much quicker jumping from machine to machine without me getting in the way of the “real” cabinet makers.
The cabinet will finish out to 43.5” tall x 25.5” wide x 19” deep. Will sit on a set of 2.75” tall casters behind a “skirt” that can be changed out for feet. Walls are 3/4” Medex outside, 3/4” Maple plywood inside. Holding all the Medex corners together will be a 7/8” x 7/8” solid Maple frame.
Started off with rough Maple planks;

Cut them up into rough lengths and ran them through the planer;
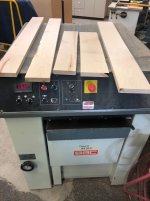
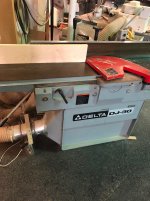
Then the joiner;
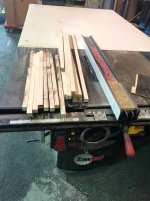
Then ripped them into strips;
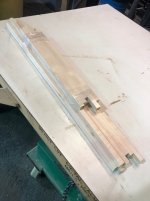
Then sawcut edges, both sides, through the planer, wrapped up and ready to go.
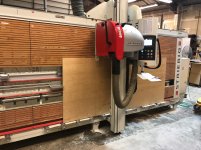
Started on the Maple ply next. The Maple ply will be bonded to the Medex, in between the Maple framing members, with a Polyurethane based adhesive. This will be similar to what I tried in my last speaker project and I believe this “Constrained Layer Dampening” concept provided a benefit. So sheets into the panel saw.
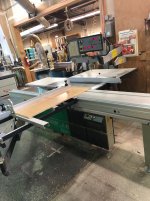
Then into a more accurate table saw than the SawStop;
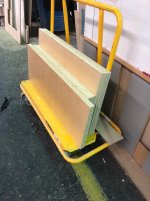
So everything cut up and ready to start going together after the Medex comes out of the CNC. Planning on starting assembly next Saturday.
This week they delivered the wood.
Today I had the cabinet shop almost all to myself. So much quicker jumping from machine to machine without me getting in the way of the “real” cabinet makers.
The cabinet will finish out to 43.5” tall x 25.5” wide x 19” deep. Will sit on a set of 2.75” tall casters behind a “skirt” that can be changed out for feet. Walls are 3/4” Medex outside, 3/4” Maple plywood inside. Holding all the Medex corners together will be a 7/8” x 7/8” solid Maple frame.
Started off with rough Maple planks;

Cut them up into rough lengths and ran them through the planer;

Then the joiner;

Then ripped them into strips;

Then sawcut edges, both sides, through the planer, wrapped up and ready to go.

Started on the Maple ply next. The Maple ply will be bonded to the Medex, in between the Maple framing members, with a Polyurethane based adhesive. This will be similar to what I tried in my last speaker project and I believe this “Constrained Layer Dampening” concept provided a benefit. So sheets into the panel saw.

Then into a more accurate table saw than the SawStop;

So everything cut up and ready to start going together after the Medex comes out of the CNC. Planning on starting assembly next Saturday.

Thanks for your input. Looking forward to seeing your “version”.
I was wondering about break-in. Do you have a rough idea yet of how many hours playing to get to reasonable sound?
I would consider running them in free air at low frequency moderately high excursion for a day before installing. I have a pair of 15N850's for PA use at much higher power levels and still noticed a difference after a couple weeks.
I would consider running them in free air at low frequency moderately high excursion for a day before installing. I have a pair of 15N850's for PA use at much higher power levels and still noticed a difference after a couple weeks.
ErnieM thanks for the suggestion and commenting.
I’ll have try it.
So I’ll probably take some backlash from what I did today.
I really don’t like the extra 4 corners/attachment points on the 18 Sound midrange driver. So they disappeared today.
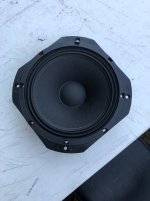
After sealing up the driver, all the way around 100%, a few passes with a cut-off blade on the angle grinder and they are gone. Aluminum heats up pretty fast when cutting like this, so it took 5 passes cutting, cooling, to keep the heat from building up.
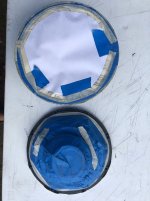
Didn’t get a pic, but after a little smoothing gave the cut area a couple coats of black paint. Looks like it was made that way.
Ordered some ports from Parts Express, and in the process of designing and ordering speaker trim rings and covers for the crossover.
So another trial fit today, final version should get cut up this week.
As they say, all work and no play makes Jack a dull boy, so to enjoy the day, the sun, and the beauty of Hawaii, my wife and I drove over on the Like Like Hwy and had brunch at Haleiwa Joe’s. Not a bad place to Eat and Enjoy.

I really don’t like the extra 4 corners/attachment points on the 18 Sound midrange driver. So they disappeared today.

After sealing up the driver, all the way around 100%, a few passes with a cut-off blade on the angle grinder and they are gone. Aluminum heats up pretty fast when cutting like this, so it took 5 passes cutting, cooling, to keep the heat from building up.

Didn’t get a pic, but after a little smoothing gave the cut area a couple coats of black paint. Looks like it was made that way.
Ordered some ports from Parts Express, and in the process of designing and ordering speaker trim rings and covers for the crossover.
So another trial fit today, final version should get cut up this week.

As they say, all work and no play makes Jack a dull boy, so to enjoy the day, the sun, and the beauty of Hawaii, my wife and I drove over on the Like Like Hwy and had brunch at Haleiwa Joe’s. Not a bad place to Eat and Enjoy.

Put in 8 hours today on this project. Assembled the sides, tops, and bottoms. Installed the 7/8” x 7/8” solid Maple frame. I rounded two opposing corners on the Maple. One on the inside to leave room for glue to ease out and then outside corner just to make nice.
All the Maple pieces are cut about 1/8” short to allow for a difference in shrinkage/movement and not put pressure on the exterior painted corners. In case you see the gaps and think I can’t measure 😉
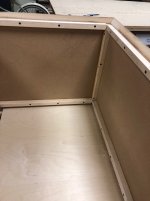
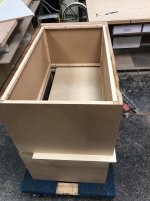
Then final cut the Maple ply to fit between the Maple frame. When the cabinet is complete the Maple frame will be buried in the corners. This gives me a way to really secure the perimeter of the cabinet. The Maple ply will be bonded to the Medex with 1/8” polyurethane adhesive.
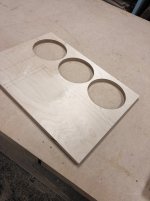
For the horizontal braces, there will be one on each side of the 10” midrange for support and to create its separate chamber, and then one cut around and centered on the 18” driver. Due to all the holes and cutting I went with multi-ply 3/4” Baltic Birch for strength. Started on the transfer holes.
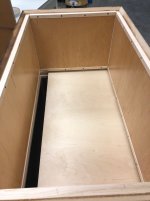
Getting scared on how big these cabinets are! Also going to take a lot of elbow grease to sand and prep them for paint.
All the Maple pieces are cut about 1/8” short to allow for a difference in shrinkage/movement and not put pressure on the exterior painted corners. In case you see the gaps and think I can’t measure 😉


Then final cut the Maple ply to fit between the Maple frame. When the cabinet is complete the Maple frame will be buried in the corners. This gives me a way to really secure the perimeter of the cabinet. The Maple ply will be bonded to the Medex with 1/8” polyurethane adhesive.

For the horizontal braces, there will be one on each side of the 10” midrange for support and to create its separate chamber, and then one cut around and centered on the 18” driver. Due to all the holes and cutting I went with multi-ply 3/4” Baltic Birch for strength. Started on the transfer holes.

Getting scared on how big these cabinets are! Also going to take a lot of elbow grease to sand and prep them for paint.
- Home
- Loudspeakers
- Multi-Way
- Big Speaker Project, 18” + 10” + CD/horn, super tweeter
