juma said:NowI'm under impression that you would like to have some of these PCBs. 😀
If so, PM me.
EMAIL SENT!
Question...separate regulators for each channel??
sandyhooker said:Question...separate regulators for each channel??
No, one set of regulators is used for both channels.
YGM
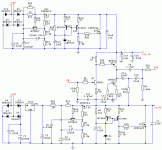
In the meantime I added shunt regs (fellow member Salas published this reg) to the preamp, so final schematic now looks like this:
Attachments
Last edited:
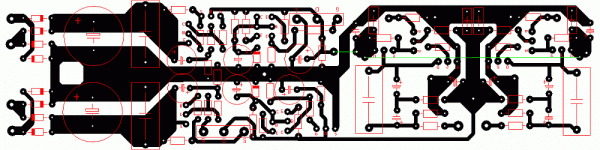
PCB looks like this (picture shows bottom view, dimensions are 16cm x 4cm):
Note: This PCB does not contain prereg (7915) in negative shunt reg as well as pi filter after 7915. I used that prereg just because my transformer had too high voltage (15V AC). 9V AC is OK.
Note: This PCB does not contain prereg (7915) in negative shunt reg as well as pi filter after 7915. I used that prereg just because my transformer had too high voltage (15V AC). 9V AC is OK.
Attachments
Last edited:
juma:
nice job - looks impressive!
i am curious to know if you ever thought about using an emitter follower buffered reference to supply the negative voltage for the first bf862 and parallel a couple of nice, large value film caps instead of series electrolytics for the output.
to me, that's a lot of negative regulator for the purpose it's serving ...
again, not complaining, just curious ...
mlloyd1
Member
Joined 2002
juma:
nice job - looks impressive!
i am curious to know if you ever thought about using an emitter follower buffered reference to supply the negative voltage for the first bf862 and parallel a couple of nice, large value film caps instead of series electrolytics for the output.
to me, that's a lot of negative regulator for the purpose it's serving ...
again, not complaining, just curious ...
mlloyd1
Thanks mlloyd!
- output coupling can be solved in many different ways (film caps, dc servo...). The solution shown is my preference (anti-serial elkos with negative polarization in the middle, bypassed with stacked foil cap) because it sounds most neutral to me (those elkos are nice rubycon caps)
- negative rail is actually crucial because just the first JFET is preamplifier (the other two are variation of Nelson's B1) and it has almost no PSRR. Anything bad from negative rail will not be just present in output signal but also amplified. Positive shunt I added just for good measure 😉
Now I see that I made a big MISTAKE in the last schematic drawing - R17 (in the Source of Q2) should be 10-15R, not 1k
Compliments Juma this is a great schematic ....... i go to build it to drive an F5 amp.
Well, then this should be the circuit in accordance with the PCB?
The potentiometer is put breferibile at the input.... or output?
What Pot value is good to drive an F5?
Regards
Giuseppe.
Well, then this should be the circuit in accordance with the PCB?
An externally hosted image should be here but it was not working when we last tested it.
The potentiometer is put breferibile at the input.... or output?
What Pot value is good to drive an F5?
Regards
Giuseppe.
the buffer/amplifier is inserted immediately after the volume pot.
The output through the 33r drives the cable feeding the F5
The F5 Rin and the pot value are completely independant of each other.
The output through the 33r drives the cable feeding the F5
The F5 Rin and the pot value are completely independant of each other.
Ok ..... if the pot is at the input 😉The F5 Rin and the pot value are completely independant of each other.
Thanks AndrewT.
....
Well, then this should be the circuit in accordance with the PCB?....
Thanks Giuseppe,
yes that's the circuit - there's an error on the sch. - C14 (in the +V shunt) is the wrong way around but it's OK on the PCB.
Thanks Giuseppe,
yes that's the circuit - there's an error on the sch. - C14 (in the +V shunt) is the wrong way around but it's OK on the PCB.
True ...... thanks Juma.
Could you make a sound comparison with other pre NP?
True ...... thanks Juma.
Could you make a sound comparison with other pre NP?
I suppose I could - but I don't want to 🙂
Last edited:
Juma have you used bf selected?
The 470r (grid stopper) is only in the adapter ...... and not in a preamp PCB?
thanks
Giuseppe.
The 470r (grid stopper) is only in the adapter ...... and not in a preamp PCB?
thanks
Giuseppe.
No, they are all pretty much close in Idss (12-14mA, most of them about 13mA)Juma have you used bf selected?
RightThe 470r (grid stopper) is only in the adapter ...... and not in a preamp PCB?
You can use lower value for gate stopper, Scott Wurcer says that even ferrite bead is enough
Ferrite in audio applications? .... Never use it for distorction and dinamic reduction.Scott Wurcer says that even ferrite bead is enough
On the Psu cable? ...... Never.
thanks Juma.
Last edited:
Intrigued by good reports (Scott Wurcer and EUVL) on BF862 JFET I also got some. The idea was to build a preamp based on JBOZ and B1 concepts with gain of 2 (enough to drive F5) and ability to drive 5K next stage impedance. Also, 6-7 V of undistorted output signal is needed.
This is what I ended with and it's all I hoped for, it sounds great, better than 2sk170 in same topology - I suppose it's due to much higher transconductance and smaller parasitic capacity. The only "problem" is that BF862 is an SMD part but that's easily cured with small adapter PCB.
This is the preamp and PSU schematic:
Hi
I have a bunch of 2SK170.
Can I use my 2SK170 as drop-in replacement of the bf862, in this bf862 preamp or do I need somes mod to do ?
Thanx
Paul
Hi
...Can I use my 2SK170 as drop-in replacement of the bf862....
Yes, if you have 2sk170V. BL grade needs minor adjustments (because of lower Idss). If your JFETs are GR grade only, you can use them here too (with adjustments and/or paralleling them maybe) but with sub-optimal results.
Alas, Old Age (and its consequences) is keeping me from this project. If you go to post #10 you will see a strip of miniature PCB's made for the BF devices used in this project. I have one of these strips and the BF862's to go on the strip.
I have made numerous attempts to solder the devices to the strip but poor eyesight and shaking hands keeps success at bay. Believe me, this is not a one or two attempt scenario but a concerted daily ongoing trial and error thing that creates suicidal tendencies!!
There are 14 pads on the strip as shown in post#10 . What I seek is an individual with the ability and courage to solder these together,with a barter deal of some sort to show my gratitude. It would be best if that (wonderful) person were in the US to keep it more manageable.
I can furnish solder and a flux pen for the job.
- Home
- Amplifiers
- Pass Labs
- BF862 Preamp