I completely agree with your choice here because of the way that the wood will be attached to the MDF. I will have screws going through the side of the MDF, which is reasonably strong as opposed to try to get a grip on the edge of the MDF which is notoriously weak no matter what attachment is being used. 1" wood will be really good enough to hold in this case. I think that you mention that you would glue and screw them into place and then use screws from the bottom of the base into the battens. You won't regret this procedure.
Since I find both of your ideas very interesting even though I wasn't able to exactly view your descriptions in my mind, could you both please post a rough sketch that shows what you two mean?
A warm thank you to both of you! 👍👍
P. S.: I would also like to reach out (and fill) page 3. 😉
Randy, Since I think that you and I are on the same page, would you be able to sketch something for us here? I do not have the capability to do it. In my head it is simple but a drawing would clear things up.
Now with a cup of breky kofiii it can work, but last night bowy had different priorities being 12th wedding anniversary weekend and things 😉Curious to see if it works when you ask him too...
Tell me more about this steel plate base, dimensions and also the inner dimensions for the box opening? Also, about the wood plinth type too. Metric please. A sketch in FreeCAD is quicker and easier to do than a rough drawing
Randy, thanks so much for breaking out the method with alloy bar. Working out of a more modest skill-set and shop, I think I'll end up doing battens out of 1"x2" or 1"x3" lumber, trying to get an actual 1" rather than 3/4". Battens glued and screwed into the inner face of the MDF, then screwing the plinth straight into the battens. I don't expect to have to remove plinths more than once, and I think this construction will be adequate for that.
Ecaroh
The workflow that you describe is totally fine, being basic woodworking tech using wooden battens for structural fillets
Do you have a pic of that insert with the crossover on it? Is this supposed to fit into the opening as the base of the cab? If so, then there wouldn't be any space for the battens anyway and the plinth would attach to that instead. I had missed this detail earlier in the thread. But with that baseplate glued in, it just screws onto that
A representation of the batten ring done in cad. The bars are 20x40mm and the threaded holes are M10. This ring gets glued up inside the cab opening, and screws can be used if desired. Just epoxy is fine for my use
The plinth gets bolted to this


The plinth gets bolted to this

There's a pic up at Post 25 in this thread but I'll try to attach a bigger one here. The crossover is on the underside of the plate you mention. I think there's enough space for battens, but they can't go across the rear and probably shouldn't go across the front; shouldn't need to go across front really because the facing battens (on the sides) would only be about 6" apart or less.Ecaroh
The workflow that you describe is totally fine, being basic woodworking tech using wooden battens for structural fillets
Do you have a pic of that insert with the crossover on it? Is this supposed to fit into the opening as the base of the cab? If so, then there wouldn't be any space for the battens anyway and the plinth would attach to that instead. I had missed this detail earlier in the thread. But with that baseplate glued in, it just screws onto that
Attachments
Ecaroh, considering how the cavity is populated, change of recommendations. Can you please measure the available wall height on the inside side panels?
This one can do with a lil bit of fine touch, do you have access to home or online 3D printing? We can design a custom bracket for the side panels that will accept plinths or steel plates while not compromising any future access to xover or portability and handling
A better lit pic will help to see space around the terminals to see if the bracket bars can be run the length of the cavity. Basically the largest bars that would drop in and still be able to clear the PCB and inside back of the speaker terminals. These bar pairs would get permanently epoxied in and feature threaded holes for attaching any baseplates
Wood battens would work fine in that place, but a printed or machined solution would be more elegant overall
Even better
As an alternative to wooden battens. A printed inlay for the cavity. Such a structure gets epoxied in, the PCB fitted into that and the baseplate or plinth over that using the 8 threaded M10 holes
If you know your way around FreeCAD, you can modify the file to suit your application

As an alternative to wooden battens. A printed inlay for the cavity. Such a structure gets epoxied in, the PCB fitted into that and the baseplate or plinth over that using the 8 threaded M10 holes
If you know your way around FreeCAD, you can modify the file to suit your application
Congratulations! 👍🙂being 12th wedding anniversary weekend and things 😉
@Ecarohan iron plate of considerable thickness
Please note that I (still) don't know how to use a 3D drawing program or maybe even Paint, but the following plan view sketch roughly describes what I would do if the speakers were mine in an attempt to leave things as they were originally built as much as possible and also so that they could be reversible.
The iron or steel base plate with spikes in the 4 corners and four perpendicular plates welded in the center which exactly reflects the internal perimeter of the speaker in which it is inserted like a sort of (iron) box inside the (wooden) box, fixed with appropriate screws placed laterally on the external sides of the wooden cabinet of the loudspeakers.
Thousand thanks to Randy and Ulogon. Sorry about the ridiculous delay in answering; domestic emergencies. I have to agree with Randy that for mounting a wooden plinth, the printed or machined solution would be more elegant than affixing wood battens. I think the latter is going to work pretty well, however, and this won't be an ideal time for me to get up to speed on 3D printing. Though out of curiosity, what material would that printed inlay with threaded holes get printed with?
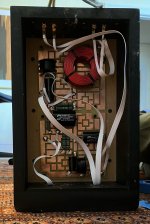
Just to close the loop, attaching here a better-lit photo. Height of available side walls is about 3.25", and there's nearly an inch of margin between the circuit board and those walls. So two battens approximately 1"x3.25" can screw into the side walls and abut the existing baseplate where the crossover is mounted. The rear, where with terminal cups are, isn't practical to work with. The front may be able to accommodate an additional batten, not flush with the board; resulting in a U-shape. Again many thanks to all.

Just to close the loop, attaching here a better-lit photo. Height of available side walls is about 3.25", and there's nearly an inch of margin between the circuit board and those walls. So two battens approximately 1"x3.25" can screw into the side walls and abut the existing baseplate where the crossover is mounted. The rear, where with terminal cups are, isn't practical to work with. The front may be able to accommodate an additional batten, not flush with the board; resulting in a U-shape. Again many thanks to all.
Cool man, the wooden battens sounds like a plan. For the thread length available, with M10, just PLA+ is fine. Going with wood, please allow a few recommendations
See if you can carefully take that PCB off and that unfinished backing plate. Do a thorough inspection. Check what that backing is being screwed to. Is it a full plate? Is there a hole behind there? And such. This is because once you glue those battens on, there is no further access
How much effort can you afford? Are the speakers ok types and a working solution is adequate? Or are they something special and worth a finer touch?
I have adopted a boat building process for screwing to ply. And works with MDF. I don't enjoy using screws directly with either of these materials, and I don't think they were meant to be screwed into. I think you can keep the battens removable by using this process as it will preserve the cab
Drill much wider holes than your screws. Fill this hole with a goop made of epoxy and wood flour. Before filling that hole, place a nut with a bolt on into it. Use a fine brush to coat only the bolt thread with fluid from a silicone spray. Try to wick back as much access fluid from the bolt. Embed this nut bolt combo in the hole. Once cured for over 24hrs, you can back the bolts off and attach the battens. M6 is a good size here. The holes should be sized to the nuts, of course. You can use a flexi drive to make these holes. Create a template from a nylon chopping board and use this to drill, This way the holes will match up once same is done with the battens. This can also be used with metal angle instead of wood battens
Basically, for bolt connections, create a real mounting point
Thanks so much for following up. Several ingenious suggestions. Template pops out at me. And agreed, it would be good if battens were removable. --Much appreciated.
Hello guys, Is here owner or builder of Thor evo04? I wanna build one but i'm confused about Transmission line damping, Any help?
- Home
- Loudspeakers
- Multi-Way
- Best way to attach plinth/base? — SEAS Thor