Use whatever you have and if you are concerned with sound, bypass with 1uF to 2.2uF film cap.
Or whatever you have in for first sound - it will sound pretty good even with Chinese no name ones. You can skip the output coupler but risk blowing your cans with a DC burp.
Or whatever you have in for first sound - it will sound pretty good even with Chinese no name ones. You can skip the output coupler but risk blowing your cans with a DC burp.
A note about the power switch. You need a DPST or just use a 3 pin 2.54mm pitch PCB header pin and jack. Plug in straight for simultaneous application of positive and negative rail. Make sure all ground paths from headphone jack and audio input and battery GND are large low impedance paths with star hub at the audio input GND to prevent ground loops. If using DPST switch, add 1uF 10R snubber across contacts to reduce arcing and prolong switch life.
Generally high voltage caps are better electrically.I have some nichicon ufg 2200uf 25v.
Volt does matter in cap's. I have seen different Voltage sounds different. Even different caps has different sound.
They are also bigger.
For example high quality big film caps can sometimes be rated 400 Volt.
This cicuit can also be paralleled for 150mA max current and drive lower impedance headphones, or to get more power. Also, you can have 4x9v batteries for up to +/-18v supplies for high impedance phones. Gain can be increased a bit by changing feedback resistor to as high as 22k for 20dB gain.
Hi Dibya,
Are you getting close to building the schematic I presented? I’m curious how it will sound - I expect it should work quite well. I have used this opamp in several projects and it’s a real good one. I have a 1688 sitting in a breadboard ready for components to be added - I might whip one up if I have time.
X
I am building it on a veroboard. I am trying to find 4.7uf film capacitor . I will use 2.2uf film if I don't get any.
I am sure it will sound great.
I hope I will finish it by Saturday .
Looking forward to drive my headphones.
I am sure it will sound great.
I hope I will finish it by Saturday .
Looking forward to drive my headphones.
By the way it is working really well. I believe it will perform better with PCB.
But sound is flat to my taste . How can I improve bass slightly?(I don't like heavy bass)
But sound is flat to my taste . How can I improve bass slightly?(I don't like heavy bass)
Glad it’s working well for you. That’s my first amp designed on the back of an envelope! 🙂
If you like gentler bass, change the 220uF feedback shunt capacitor (connected 2k2 and GND) to 100uF and bypass it with 1uF MKP film cap.
What feedback resistor gain are you using?
Photos?
I might make a hand etched PCB to test this out too looks fun and easy.
If you like gentler bass, change the 220uF feedback shunt capacitor (connected 2k2 and GND) to 100uF and bypass it with 1uF MKP film cap.
What feedback resistor gain are you using?
Photos?
I might make a hand etched PCB to test this out too looks fun and easy.
I have just build everything like your design nothing changed.Glad it’s working well for you. That’s my first amp designed on the back of an envelope! 🙂
If you like gentler bass, change the 220uF feedback shunt capacitor (connected 2k2 and GND) to 100uF and bypass it with 1uF MKP film cap.
What feedback resistor gain are you using?
Photos?
I might make a hand etched PCB to test this out too looks fun and easy.
Lol I ashamed of putting the photo. Soldering is beyond the word terrific.
I boarded to train with my family for a trip . I will post it once I return.
But make me sure no one will laugh at me after seeing my soldering.
Specifically those SMD x7r caps are my nightmare to solder.
Just wait for 3 to 4 days for my return.
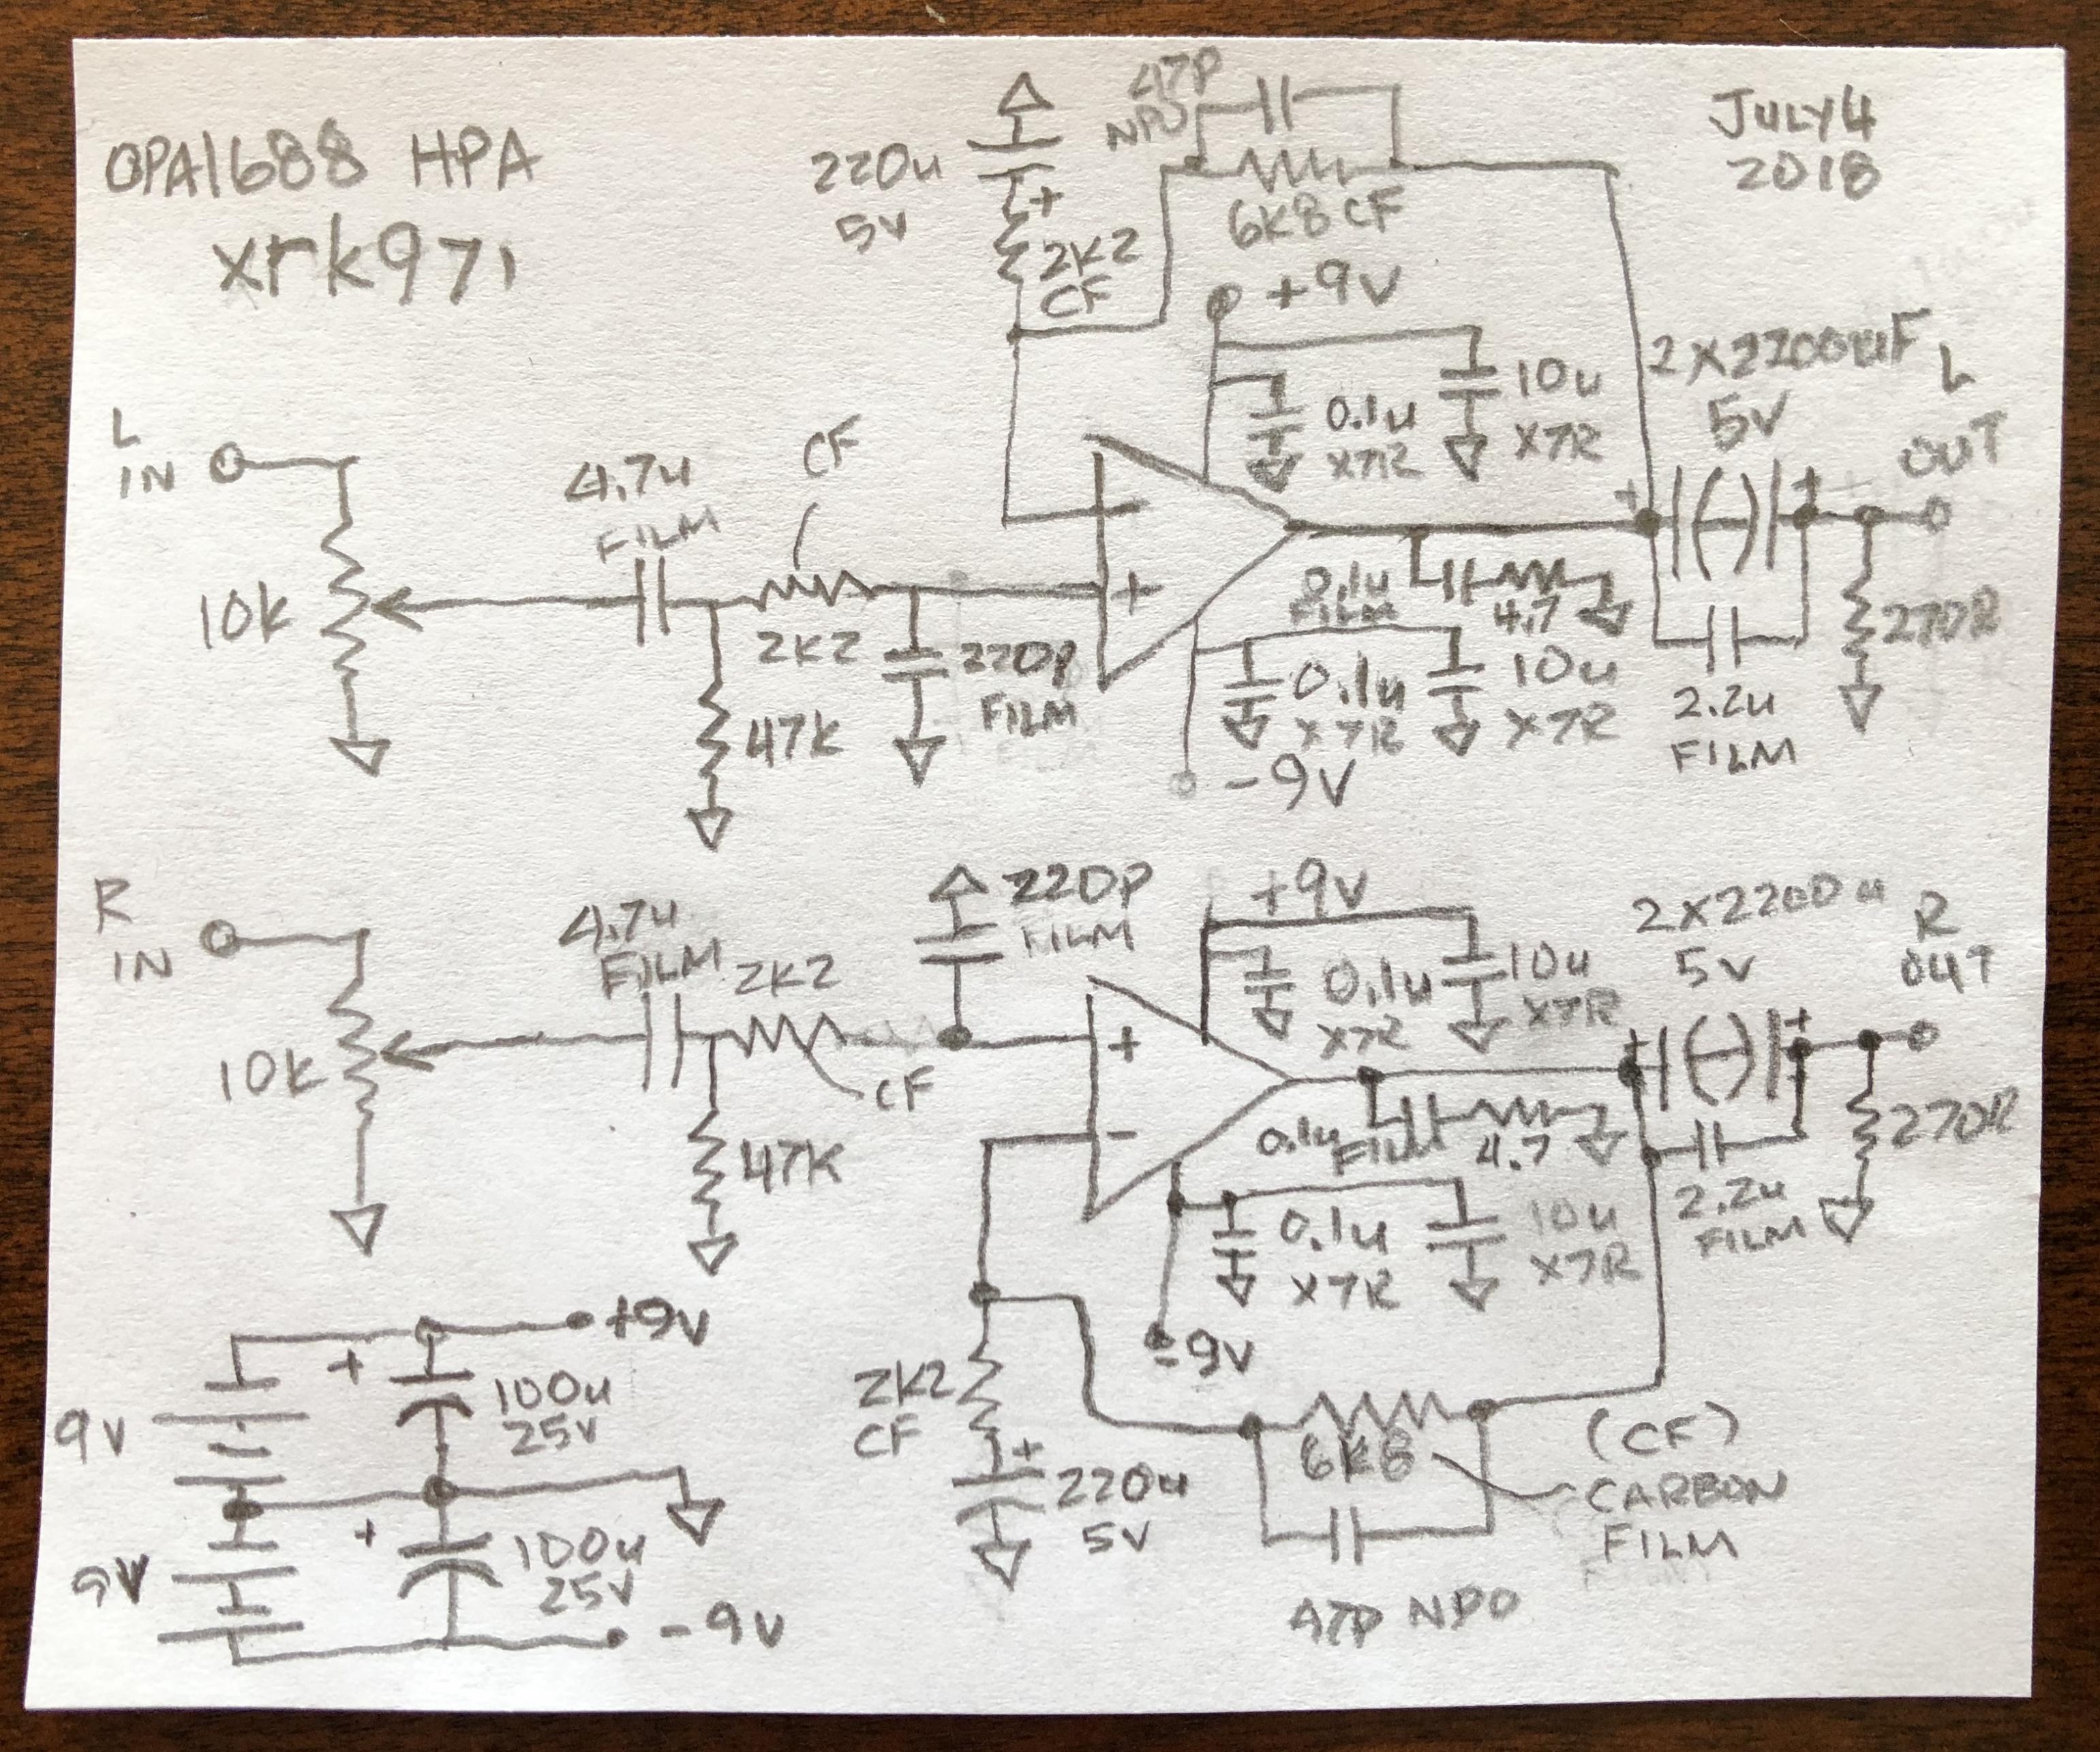
JPS64 to the Rescue!
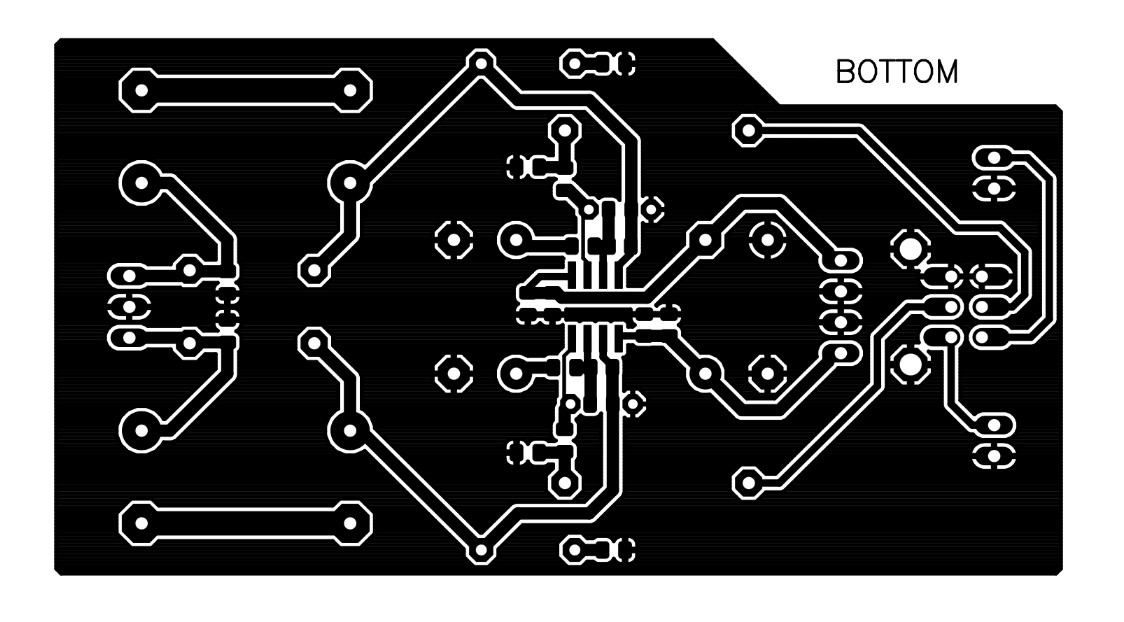
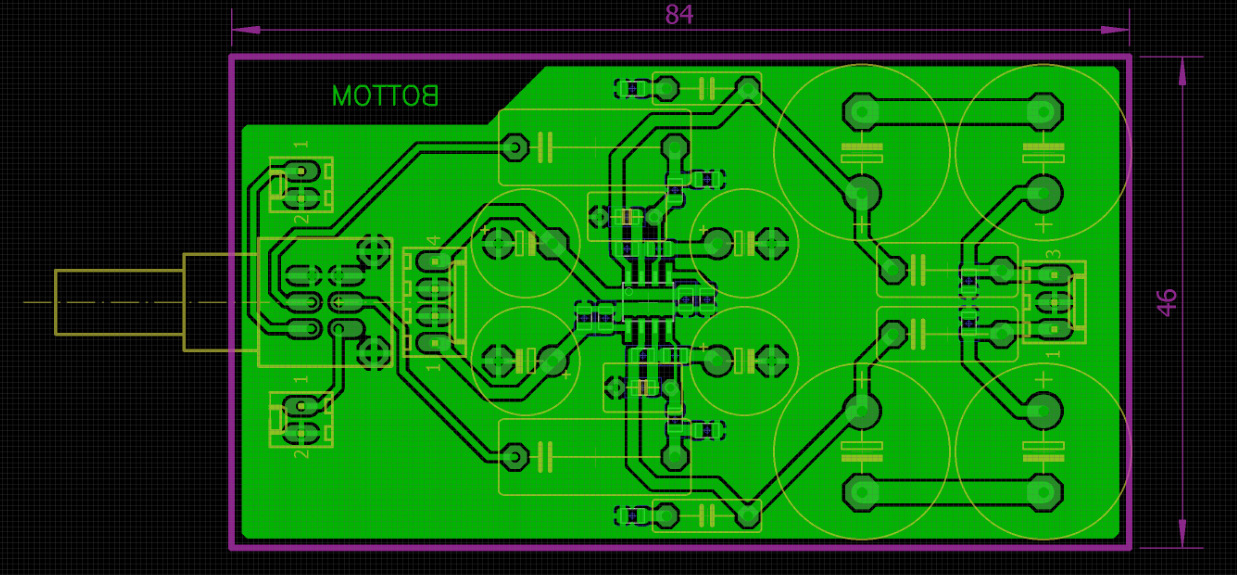
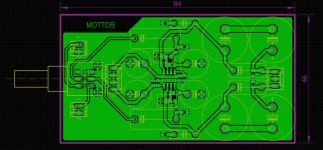
We are really lucky as I was making a hand layout and asked JPS64 to look at this and he was very generous to give us a pro layout in no time. This is specifically made for single layer home etching. The SMTs are on the bottom and through hole parts on the top. Looks superb.
Thanks, JPS64!
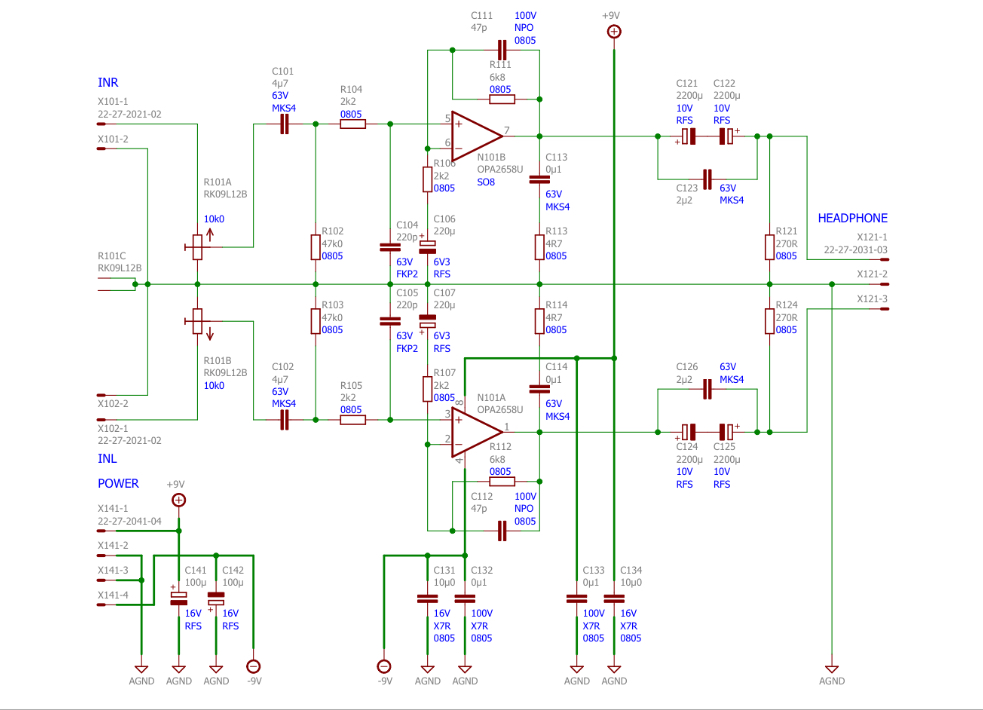
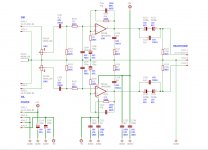
Schematic:
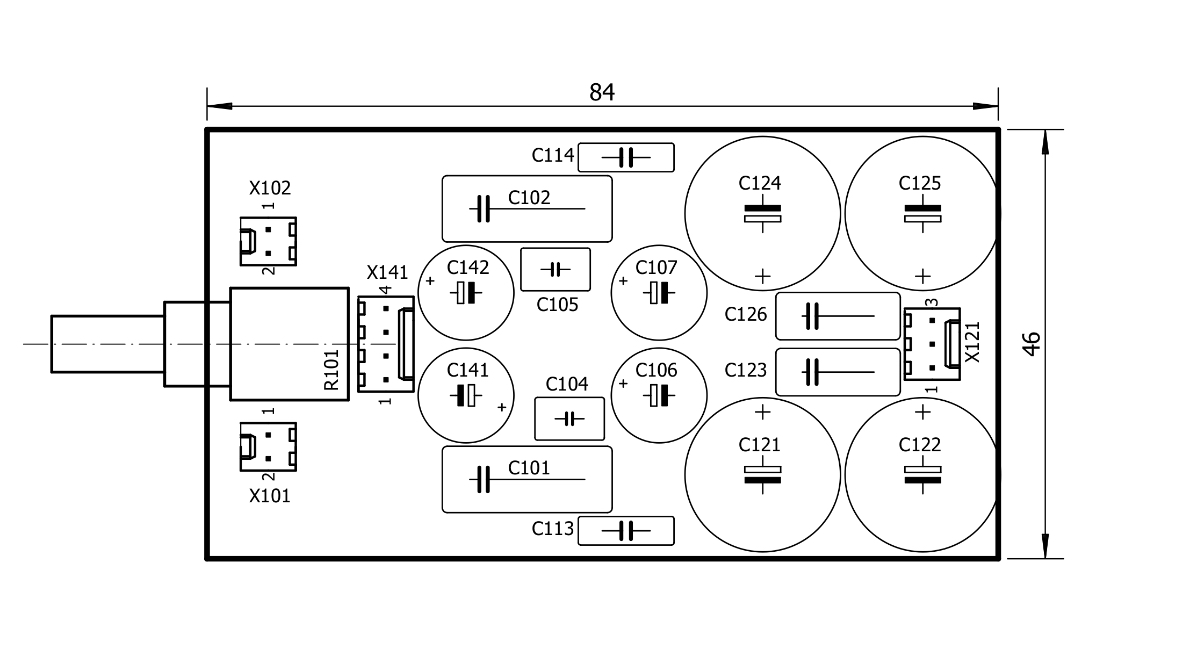
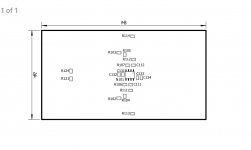
Top placement guide:
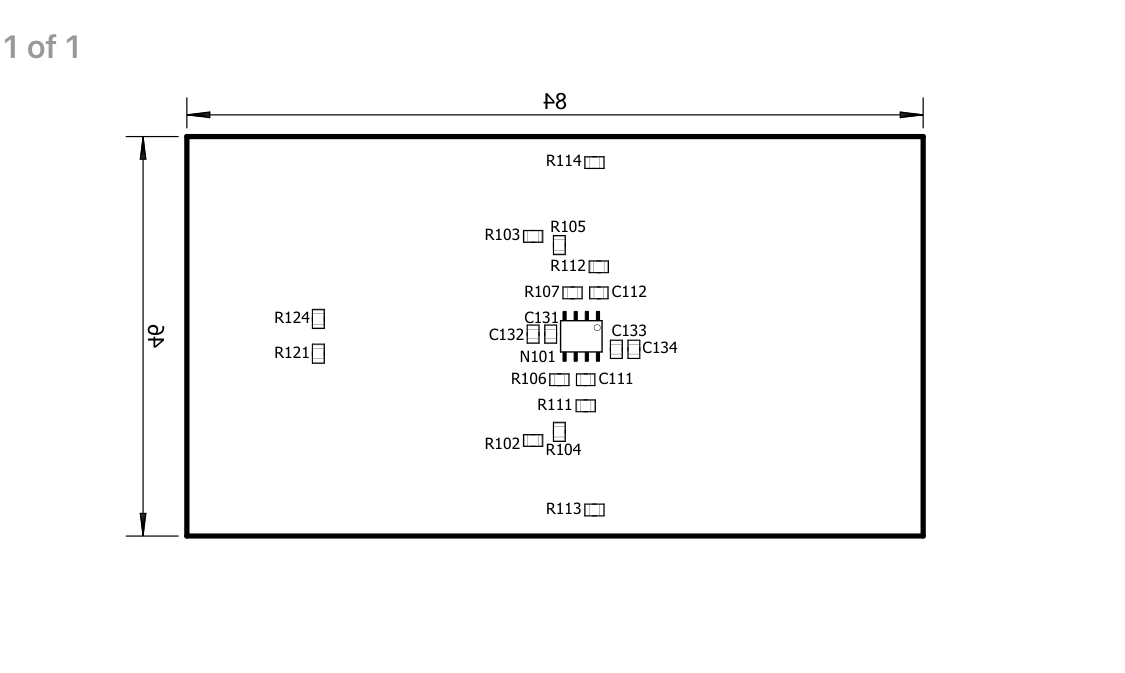
Bottom placement guide:
Bottom copper image:
Viewed from top with parts:
Pdf of copper attached below.
We are really lucky as I was making a hand layout and asked JPS64 to look at this and he was very generous to give us a pro layout in no time. This is specifically made for single layer home etching. The SMTs are on the bottom and through hole parts on the top. Looks superb.
Thanks, JPS64!
Schematic:
Top placement guide:
Bottom placement guide:
Bottom copper image:
Viewed from top with parts:
Pdf of copper attached below.
Attachments
-
 E27F2AD6-4D38-4641-B1E9-5ABCF67367C3.jpeg278.8 KB · Views: 444
 -
 3D740071-0BDD-4121-9327-DCA9BAC9B659.jpeg160.2 KB · Views: 443
 -
 30BF17E9-1D08-4D83-8A31-1713B506FE62.jpeg71.6 KB · Views: 442
 -
 B22FE755-7DEA-40AD-A993-F8F0767BA2E4.jpeg260 KB · Views: 440
 -
 1CC677DE-3C06-4AD1-A36D-27291170C6E5.jpeg915.2 KB · Views: 458
 -
OPA1688_PCB.pdf28.6 KB · Views: 112
Last edited:
This is a good preamplifier too and can be powered up to +/-18v just increase cap voltages to accommodate higher rail voltages.
Thanks man .I cannot wait to return home and ask granny etch one PCB for me but I have to get some more opa1688 . I bought 5 for usb DAC project. Now all used up.
Why granny don't allow me to etch PCB myself? Does ferric chloride is harmful?
Why granny don't allow me to etch PCB myself? Does ferric chloride is harmful?
I use HCl (muriatic acid "concrete sidewalk cleaner" from hardware store) and H2O2 (first aid hydrogen peroxide from drugstore) in 2:1 proportions (by volume HCl:H2O2). Much cheaper than ferric chloride and you can flush down drain after diluting. I just printed my iron on transfer and about to cut FRP board for etching. Don't forget to mirror the bottom image before printing transfer. On my printer, 50% scale works perfectly (check by putting OPA1688 pins to see if they fit). I happen to have 9 on hand so can go wild. 🙂
Last edited:

- Home
- Amplifiers
- Headphone Systems
- best op amp for C'moy amp