XMachina is a passive crossover designer.
XMachina works unassisted. Define your goals, import drivers characteristics start XMachina and let it create designs for you.
There are several goals that XMachina tries to achieve:
- use only "real" component values (specified on lists),
- get close to the target dBspl system response,
- do not go under specified system impedance limit,
- do not exceed electro-acoustical slopes defined for ways,
- do not use many components unless it's necessarily.
XMachina works in any Win32-compatibile environment.
It has been tested on Win10/64, Win7/64, WinXP/32. O/S version 5.9.16-1-MANJARO Wine version wine-6.4
(It should probably work with other Wine / Linux versions too)
The .exe file size is about 3MB.
XMachina is free of charge for DIY personal use.
Latest version info & download
XMachina briefly
A humble .pdf with instant instructions
Index of later features (not included in the pdf):
Few tutorials on YouTube
XMachina works unassisted. Define your goals, import drivers characteristics start XMachina and let it create designs for you.
There are several goals that XMachina tries to achieve:
- use only "real" component values (specified on lists),
- get close to the target dBspl system response,
- do not go under specified system impedance limit,
- do not exceed electro-acoustical slopes defined for ways,
- do not use many components unless it's necessarily.
XMachina works in any Win32-compatibile environment.
It has been tested on Win10/64, Win7/64, WinXP/32. O/S version 5.9.16-1-MANJARO Wine version wine-6.4
(It should probably work with other Wine / Linux versions too)
The .exe file size is about 3MB.
XMachina is free of charge for DIY personal use.
Latest version info & download
XMachina briefly
A humble .pdf with instant instructions
Index of later features (not included in the pdf):
- Power Response target with off axis measurements LINK
- System off-axis responses on charts LINK
- Polar Maps LINK
- Automatic Curve Reader LINK
- Parallel processing LINK
- Force common GND filter architecture LINK
- Design time manager LINK
- Impedance phase equalization LINK
- Impedance calculation up to 200kHz LINK
- Target follows the woofer at LF LINK
- Optimise for crossover price LINK
Few tutorials on YouTube
Last edited:

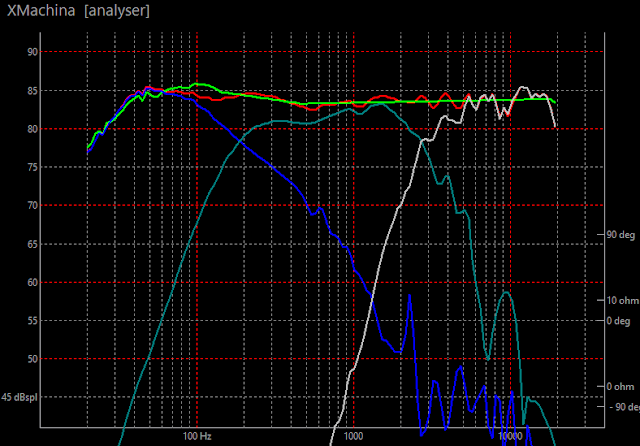
Example of a circuit design from scratch for a Full Range system having only a screenshoot of frequency and impedance characteristic. FR Driver employed: Dayton PS220. The real design should of course take into account the influence of the box. The presented activities are intended to illustrate how XMachina works.
(a 15-min screen record)
(a 15-min screen record)
This looks very good.
Is it really some machine learning algorithms or other traditional optimization algorithms?
Is it really some machine learning algorithms or other traditional optimization algorithms?
Not being a computer scientist I have to admit that I'm not sure. For this reason I used the term in double quotes. If this makes the classification more clear:This looks very good.
Is it really some machine learning algorithms or other traditional optimization algorithms?
1)each time when asked for a solution XMachina can deliver a bit (sometimes even completely) different result for the seame problem setting
2)XMachina doesn't store any experience. It does not get wiser from frequent use.
XMachina is a passive crossover planning application. Contrary to other solutions dealing with crossovers XMachina is a fully automatic, "machine learning" sort of approach.
The basic idea is to let the automatic designer fill the pad with components in order to reach the targets you specify. The designer can only use "real" components, i.e. specified on lists.
There are several goals the automatic designer tries to achieve:
- get as close to the target dBspl system response as possible,
- not to go under the system impedance limit specified,
- not to exceed the (electro-acoustical) slopes specified,
- observe parts application strategy settings (in order not to make the circuits complicated if it is not necessary).
XMachina works in a Win32-compatibile environment.
Exe file size is 3MB.
It's free.
If anayone is interested it is avaliable here (download):
Latest version info
A humble .pdf with instant instructions:
If you have not done so already, I suggest that you create a new post about your software on the Parts-Express TechTalk forum:
Tech Talk Forum - Techtalk Speaker Building, Audio, Video Discussion Forum
There are lots of speaker designers over there who would be interested in knowing about this program. Nice job!
New version of XMachina has been released: [1171228]
Download page: LINK.
New characteristcs in the design chart preview: electrical transmitance per way, system spl for reversed polarity of odd drivers.
Issues fixed: dense FRD and ZMA files loading, double separators (tab and space) between clolums in FRD and ZMA files (now acceptable).
Download page: LINK.
New characteristcs in the design chart preview: electrical transmitance per way, system spl for reversed polarity of odd drivers.
Issues fixed: dense FRD and ZMA files loading, double separators (tab and space) between clolums in FRD and ZMA files (now acceptable).
Another XMachina demo has been uploaded to YouTube: 3-way crossover design example LINK
It is divided into short videos covering the following steps:
(1) loading components LINK
(2) loading measurements LINK
(3) target dBspl and cross points setup LINK
(4) task setup LINK
(5) design process LINK
(6) inspecting results LINK
Drivers applied:
- Tweeter: Dayton DC28F (link)
- Midrange: Dayton RS180P (link)
- Woofer: Dayton RSS265HF (link)
There are 4 coils, 7 capacitors and 6 resistors in the result circuit.
System dBspl characteristic of the design fits the target with c.a. +-2dB tolerance margin:
Design process shown in the demo is only a software functionality presentation. The files used are not suitable for application in a real design, as they reflect the "infinite baffle" conditions.
Nevertheless, they are great for playing and experimenting with XMachina. The project file is available here: link
XMachina has now a measurements simulator. Check out the new version [1180114]
Take measurements whenever you can. But if for any reason you can not - try measurements simulator.
The quality of the simulator results depends on several factors:
- precision and reliability of manufacturer data,
- accuracy of computer models predicting baffle diffraction and enclosure bass response
- consistency of XMachina measurements simulator procedure (which has not yet been proven in practice).
It's possible to use any diffraction and bass response tools with XMachina. It can cooperate with the tools via easy to use "chart picture" interface. You can configure shortcut keys for starting these tools when working with XMachina.
Using the simulator: complete dedicated subnodes with relevant data one by one. When you get to the last node, choose "Apply result" from the menu.
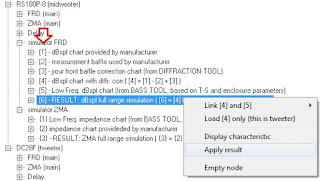
From that moment your simulation will be available for automatic crossover design.
A demo presenting 2way design with XMachina measurements simulator has been uploaded to YT.
Drivers employed:
- Dayton DC28F as tweeter (LINK),
- Dayton RS180P-8 as midwoofer (LINK).
For bass response calculation WinISD application was used (WinISD - Linearteam).
For baffle diffraction prediction Edge application was used (Tolvan Data) .
The entire demo as a playlist is available here (LINK)
The demo is divided into the following chapters:
1) simulating Midwoofer FRD (LINK)
2) simulating Midwoofer ZMA (LINK)
3) simulating tweeter FRD (LINK)
4) simulating tweeter ZMA (LINK)
5) target and task setup, design process (LINK)
6) inspecting reults (LINK)
Take measurements whenever you can. But if for any reason you can not - try measurements simulator.
The quality of the simulator results depends on several factors:
- precision and reliability of manufacturer data,
- accuracy of computer models predicting baffle diffraction and enclosure bass response
- consistency of XMachina measurements simulator procedure (which has not yet been proven in practice).
It's possible to use any diffraction and bass response tools with XMachina. It can cooperate with the tools via easy to use "chart picture" interface. You can configure shortcut keys for starting these tools when working with XMachina.
Using the simulator: complete dedicated subnodes with relevant data one by one. When you get to the last node, choose "Apply result" from the menu.
From that moment your simulation will be available for automatic crossover design.
A demo presenting 2way design with XMachina measurements simulator has been uploaded to YT.
Drivers employed:
- Dayton DC28F as tweeter (LINK),
- Dayton RS180P-8 as midwoofer (LINK).
For bass response calculation WinISD application was used (WinISD - Linearteam).
For baffle diffraction prediction Edge application was used (Tolvan Data) .
The entire demo as a playlist is available here (LINK)
The demo is divided into the following chapters:
1) simulating Midwoofer FRD (LINK)
2) simulating Midwoofer ZMA (LINK)
3) simulating tweeter FRD (LINK)
4) simulating tweeter ZMA (LINK)
5) target and task setup, design process (LINK)
6) inspecting reults (LINK)
New version of XMachina: [1180209].
An option to digitize impedance characteristics in logarithmic scale has been added to the axis definition window. (For example Scan-Speak data datasheets use logarithmic impedance charts).
Few simple tools have been implemented in the measurement simulator, supporting to estimate characteristics outside the loaded range.
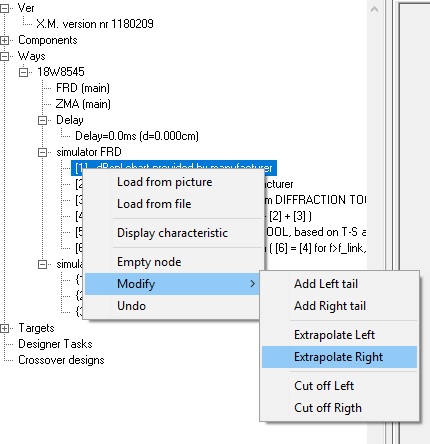
The characteristics can be “tailed” with a specified slope or extrapolated with a slope calculated from the characteristic shape at the edge. In case of impedance characteristics, values of DC resistance (Re) and voice coil inductance (Le) can be utilized for the estimation (Re for low and Le for high frequency range).
Estimation improves the accuracy of phase calculation. It was used also in the previous version but only as an “on the fly” action during the acceptance of measurements simulator results.
An option to digitize impedance characteristics in logarithmic scale has been added to the axis definition window. (For example Scan-Speak data datasheets use logarithmic impedance charts).
Few simple tools have been implemented in the measurement simulator, supporting to estimate characteristics outside the loaded range.
The characteristics can be “tailed” with a specified slope or extrapolated with a slope calculated from the characteristic shape at the edge. In case of impedance characteristics, values of DC resistance (Re) and voice coil inductance (Le) can be utilized for the estimation (Re for low and Le for high frequency range).
Estimation improves the accuracy of phase calculation. It was used also in the previous version but only as an “on the fly” action during the acceptance of measurements simulator results.
Hi... i have downloaded the link and pdf doc. can i get the pdf in english version.
Open the page xmachina-ai.blogspot.com and then:
1) click the "Documents" tab,
2) click on the link next to the "(EN)" to download pdf.
This pdf should be in English (that was at least my intention 🙂).
An externally hosted image should be here but it was not working when we last tested it.
Last edited by a moderator:
Few improvements and corrections in the new version [1180415]:
- Measurements simulator: front baffle characteristic is applied also on the LF response.
- “Recent" submenu was added in the "File" menu for easy re-opening previous works and experiments.
- Circuit price calculation: when moving mouse over a design node, the price appears in the status bar. This works only if all of the elements included in the circuit have price defined (check your components lists), otherwise it is displayed as "n/a". Remember to use the same currency for all elements when creating lists of components for a design.
Last edited:
???
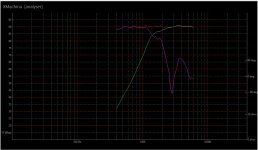
I was trying Xmachina, a two way xover, using actually measured frd and zma files (Klipsch K24K woofer, Visaton TW70 tweeter). I set the constraints to medium accuracy, 90dB spl target, 400 to 7000Hz range optimization.
Program give three solutions, I liked the second one, but, but.. I have no clue on how to interpret the proposed filter schematic... any idea?
Attachments
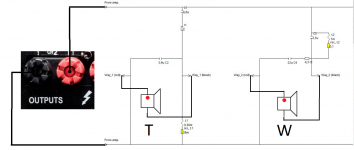
I have no clue on how to interpret the proposed filter schematic... any idea?
It's just that:
Maybe one remark here, in the task setup windows the first Way is named "Woofer" and the Way with the highest index is named "Tweeter". It looks that it is swapped in your design but there is nothing wrong with this as it is only a naming convention.
After grounding the amp's black connector and inverting polarity of both speakers, the designed crossover appears like this:
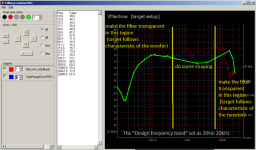
One more comment, it's about the "Design frequency band" in the task setup window. It defines the focus frequency range for XMachina. In other words, XMachina assumes that it's not importatnt what's going on outside, which may lead to undesirable effects if the range is set too narrow.
If the intention is to optimise (shape) characteristic in a region but also make filters "transparent" outside, just let the target spl follow the drivers characteristics outside, keeping the "Design frequency band" wide enough.
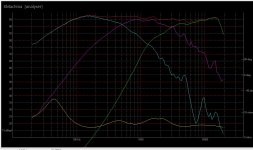
To clarify, I attach a screenshot from XMachina doc as an example (chapter "Target dBspl setting", target characteristic is marked green, woofer is red, tweeter blue):
Attachments
Thanks, I can see it, my error was setting the optimization band too narrow, not understanding the logic of the program.
Nevertheless, I persisted and now this thing is throwing good data, a truly fantastic tool, once You learn how to use it..
Double checking the filters on Xsim is a very good idea too.
Again many thanks for sharing this amazing tool
Nevertheless, I persisted and now this thing is throwing good data, a truly fantastic tool, once You learn how to use it..
Double checking the filters on Xsim is a very good idea too.
Again many thanks for sharing this amazing tool
XMachina latest version: [1180918]
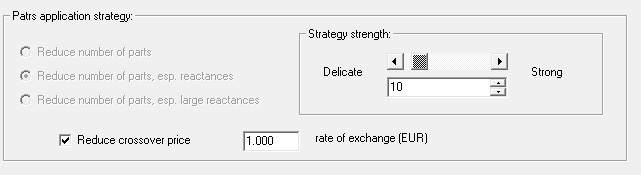
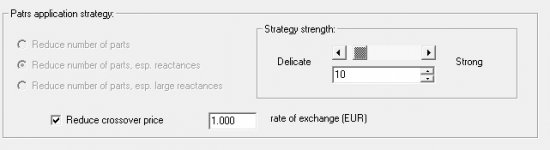
There is a new option in „Parts application strategy” task settings: „Reduce crossover price”.
Remarks on the new feature:
There is a new option in „Parts application strategy” task settings: „Reduce crossover price”.
Remarks on the new feature:
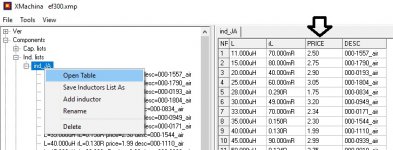
- All components on lists selected for the design should have prices entered (see "Loading componets" chapter in the .pdf).
- This feature was tested with prices converted to EUR, but I think it should also work with a currency that has roughly similar exchange rate like USD or CHF. It’s still possible to use any currency, just enter the exchange rate in the task settings (with reference to EUR).
- If bipolars are undesirable in the tweeter circuit, create a separate list without bipolars for the tweeter. When „Reduce crossover price” is checked, bipolars are preferred over other cap types (because bipolars are usually cheaper). For simular reasons, creating separate list with ferrite-less (or core-less) inductors for the tweeter should be considered.
- With the “Reduce crossover price” feature you can easily encourage XMachina to prefer a subset of parts from list. For example, apply half (or quarter) price for the components that you have in your drawer.
Attachments
- Home
- Design & Build
- Software Tools
- Automatic crossover designing with XMachina