
Yes, both.
Ideal would be to have a tool turning at very low RPM and advancing so slow that it cuts a long spiral shaving.
We won´t but whatever gets us closer to that, helps a lot.
The other extreme is to use a tool with a small very sharp very high RPM cutting head : a CNC type mill, which cuts small chips, but there the problem becomes how to guide it with precision.
Thinking better, try to get some affordable CNC to get the job done.
I am worrying not only about "cutting" itself but overall hole alignment.
And you can only try once 🙁 ; not worth the risk.
Last edited:
Find a milling / machining shop, ordinary vertical mill (ram turret type), with a digital read out is enough.
They are sometimes called Bridgeport type mills..
No real need for CNC, one off job. And they will have the right tools, and much more important, lots of experience.
They are sometimes called Bridgeport type mills..
No real need for CNC, one off job. And they will have the right tools, and much more important, lots of experience.
Last edited:
https://materialsdata.nist.gov/bitstream/handle/11115/200/Machining of Al.pdf?sequence=3&isAllowed=y
Very detailed, free from a government resource, worth a look.
Or elsewhere, many free sources, explaining the concept of peripheral tool speed, feed rates, and the lubricants needed and so on.
Too much information for a one off job, but for those who do it regularly, worth a look.
Very detailed, free from a government resource, worth a look.
Or elsewhere, many free sources, explaining the concept of peripheral tool speed, feed rates, and the lubricants needed and so on.
Too much information for a one off job, but for those who do it regularly, worth a look.
There is nothing special about this but, I can suggest two other methods for attaching (or connecting) switches to 10mm front panels:
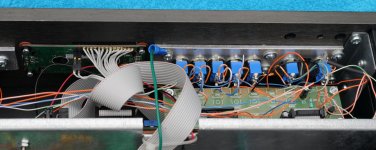
1. For toggle switches with long actuators, mount the switch to a small metal plate which, in turn, is mounted to the inside of the front panel. The inside of the front panel must be bored to accommodate the barrel of the switch and the nut holding the switch to the sub-plate. A couple of threaded holes on the inside of the front panel will hold the sub-plate in place. The advantage of this approach is that no nut is visible from the front of the panel. The first two photos demonstrate this approach.
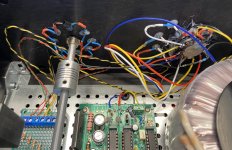
2. For rotary switches (e.g., source selectors and attenuators), use extension rods, shaft couplers and bushings. The third and fourth photos show an attenuator located at the rear of the chassis and the final photo is of an encoder mounted to the inside of the rear panel using standoffs and an extension rod, bushing and shaft coupler. The use of an extension rod makes the length of the shaft on the switch itself a non-issue.
Regards.
1. For toggle switches with long actuators, mount the switch to a small metal plate which, in turn, is mounted to the inside of the front panel. The inside of the front panel must be bored to accommodate the barrel of the switch and the nut holding the switch to the sub-plate. A couple of threaded holes on the inside of the front panel will hold the sub-plate in place. The advantage of this approach is that no nut is visible from the front of the panel. The first two photos demonstrate this approach.
2. For rotary switches (e.g., source selectors and attenuators), use extension rods, shaft couplers and bushings. The third and fourth photos show an attenuator located at the rear of the chassis and the final photo is of an encoder mounted to the inside of the rear panel using standoffs and an extension rod, bushing and shaft coupler. The use of an extension rod makes the length of the shaft on the switch itself a non-issue.
Regards.
Attachments
Thanks for the details, appreciated.
Using extension rods for rotary switches is probably the best option as, say, input selection, can be done closer to the input connectors.
There does not, however, seem to be a plethora of suppliers for these extensions. Any suggestions?
Regards,
Tony
Using extension rods for rotary switches is probably the best option as, say, input selection, can be done closer to the input connectors.
There does not, however, seem to be a plethora of suppliers for these extensions. Any suggestions?
Regards,
Tony
Tony:
I'm a fan of plastic extension rods, since plastic flexes better than aluminum, but I use both. The diameter of the extension rod is best dictated by the bushings you use; given your apparent location, metric sizes will likely be easier for you to source (so 6mm rather than 6.35mm might be the way to go). Many folks here have recommended buying inexpensive 1/4" jacks and dismantling them for their bushing. I've gone the more expensive (perhaps idiotically so) route of sourcing both Imperial and metric panel bushings for my projects (e.g., the 1/4" bushings at https://www.surplussales.com/ShaftHardware/ShaftH-9.html), but the metric ones are harder to find. I buy shaft couplers from aliexpress, where they are ludicrously inexpensive (e.g., https://www.aliexpress.us/item/3256...00029478904733!sea&curPageLogUid=JsluBrWxtrtQ). And, finally, you might look at 6mm plastic rods at aliexpress.
I hope this helps.
Regards,
Scott
Thanks Scott for your help, including references. I'll look up your suggestions. Rods/couplers are not that difficult to get hold of locally (there are a few places that do parts for 3D printers - and they have the couplers in various sizes). Bushings are a different matter. I had forgotten about dismantling cheap pots to get the bushings. Thanks for the reminder. 🙂
- Home
- Design & Build
- Construction Tips
- Attaching controls to 10mm front panels