Over the years this forum has helped me out a lot. So now its time to give something back. Didn’t see anyone doing this obvious mod on the internet so I just did it myself.
Context:
The ClEANBox Pro is the cheapest solution I could find for unbalanced to balanced conversion with gain for connection of consumer gear to pro amps. It can also convert balanced to unbalanced but I don’t use this feature. I’m using the ClEANBox to drive 4 dual opposed 15” sub woofers in a small room so I can potentially get a flat in room response <10 Hz, however this needs quite a bit of EQ and I would like to avoid any device in the signal chain causing additional low frequency roll off that will require more EQ. From searching on the internet I found out that the CLEABox Pro is -3dB ~8Hz. I’m going to show you how to lower this to ~0.3Hz which results in a flat response down to 2Hz (limit of how low I could go in REW).
Results:
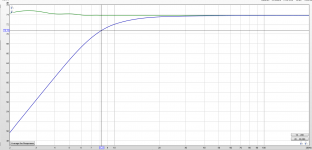
A bit backwards but here are the before (blue) and after measurements (green) showing that the LF corner frequency has been moved way down in frequency. Residual ripple is due to measuring below the corner frequency of my computer sound card and temperature variation causing a change in the loopback compensation calibration).

There are no turn on/ turn off thumps added in my setup by this mod. (PC→CLEANBox Pro → iNUKE6000 DSP → Speaker). I have tested listening to some music through a full range speaker and it sounds normal. I don’t really have the setup to measure distortion performance etc. but don’t expect this mod to change it from stock.
Mod:
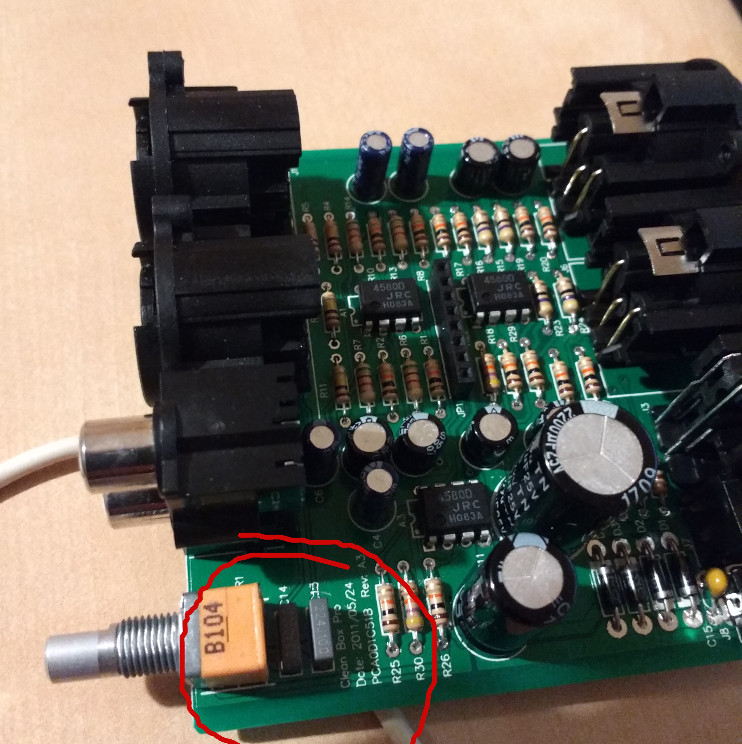
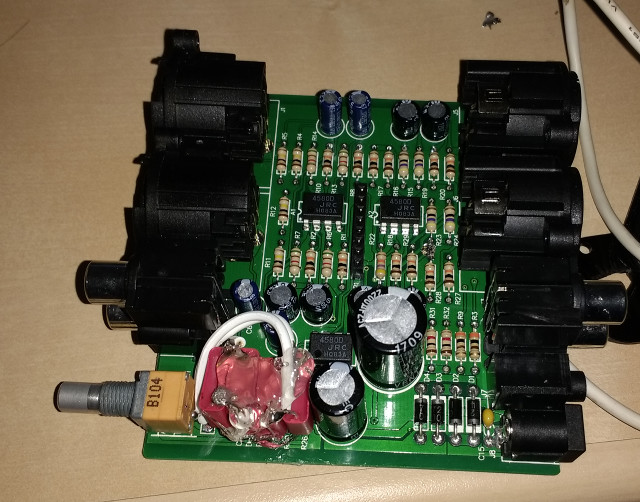
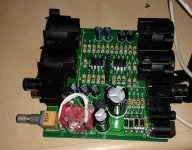
Just replace the two grey capacitors in the picture below with larger value capacitors. The ones installed are 220 nF nominally, I measured one as 235 nF. I replaced them with 2*1uF capacitors which measured as 2.2uF in for both channels. The original capacitors are some kind of film capacitor which I would also recommend for this application. Ceramics are tempting due to the smaller size but they are prone to microphonics which makes them a bad idea for audio!
Notes on disassembly:
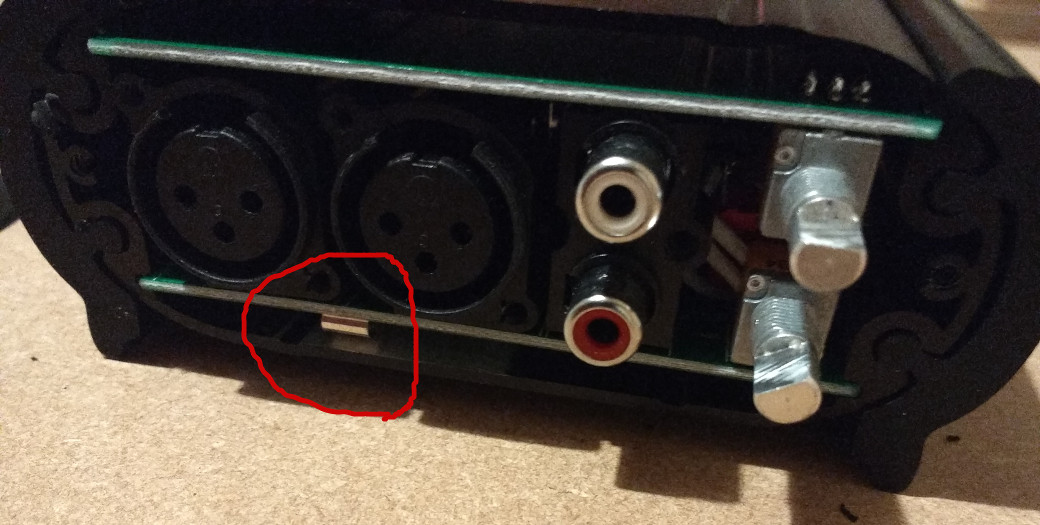
The CLEANBox Pro is quite easy to take apart, just remove the screws. There are two trickier bits; firstly the volume knobs need to be removed, to do this just lever them off with the flat bit of a screw driver they are only a friction fit, the second difficulty is that there is a ground spring on one of the boards that needs to contact the sanded portion of the case on re-assembly.
Where we go from here:
I'm not super impressed with the CLEANBox PRO for my usage as I don't like the circuit design and half of it is superfluous for me, its also in my opinion expensive for what it offers. In the next few months I will design a better device for my own usage which I will share that shall outperform it and cost less.
Context:
The ClEANBox Pro is the cheapest solution I could find for unbalanced to balanced conversion with gain for connection of consumer gear to pro amps. It can also convert balanced to unbalanced but I don’t use this feature. I’m using the ClEANBox to drive 4 dual opposed 15” sub woofers in a small room so I can potentially get a flat in room response <10 Hz, however this needs quite a bit of EQ and I would like to avoid any device in the signal chain causing additional low frequency roll off that will require more EQ. From searching on the internet I found out that the CLEABox Pro is -3dB ~8Hz. I’m going to show you how to lower this to ~0.3Hz which results in a flat response down to 2Hz (limit of how low I could go in REW).
Results:
A bit backwards but here are the before (blue) and after measurements (green) showing that the LF corner frequency has been moved way down in frequency. Residual ripple is due to measuring below the corner frequency of my computer sound card and temperature variation causing a change in the loopback compensation calibration).
There are no turn on/ turn off thumps added in my setup by this mod. (PC→CLEANBox Pro → iNUKE6000 DSP → Speaker). I have tested listening to some music through a full range speaker and it sounds normal. I don’t really have the setup to measure distortion performance etc. but don’t expect this mod to change it from stock.
Mod:
Just replace the two grey capacitors in the picture below with larger value capacitors. The ones installed are 220 nF nominally, I measured one as 235 nF. I replaced them with 2*1uF capacitors which measured as 2.2uF in for both channels. The original capacitors are some kind of film capacitor which I would also recommend for this application. Ceramics are tempting due to the smaller size but they are prone to microphonics which makes them a bad idea for audio!
Notes on disassembly:
The CLEANBox Pro is quite easy to take apart, just remove the screws. There are two trickier bits; firstly the volume knobs need to be removed, to do this just lever them off with the flat bit of a screw driver they are only a friction fit, the second difficulty is that there is a ground spring on one of the boards that needs to contact the sanded portion of the case on re-assembly.
Where we go from here:
I'm not super impressed with the CLEANBox PRO for my usage as I don't like the circuit design and half of it is superfluous for me, its also in my opinion expensive for what it offers. In the next few months I will design a better device for my own usage which I will share that shall outperform it and cost less.
Attachments


I would replace those 20% resistors with 1% (blue) metal film.
I would start with the ones on the balanced inputs, and eventually swap the op-amps too. The Art Promix uses the old hissing 4558, which I swapped by the NE5532.
I would start with the ones on the balanced inputs, and eventually swap the op-amps too. The Art Promix uses the old hissing 4558, which I swapped by the NE5532.
20%? Looks more like gold band = 5% to me, probably carbon film. Still not what I would use in places where matching matters (like balanced ins and outs), mind you. In a 2011 design I would have expected the cheap and cheerful blue 1% Yageo MFs at least.I would replace those 20% resistors with 1% (blue) metal film.
I'm going to design my own using fully differential voltage amplifiers. This was just a quick fix for the most greivous issue.
Ready made Solution. Just add the PSU. I've tried them and they work fine.
THAT InGenius and OutSmarts Breakout Hookup Guide - learn.sparkfun.com
THAT InGenius and OutSmarts Breakout Hookup Guide - learn.sparkfun.com
Ready made Solution. Just add the PSU. I've tried them and they work fine.
THAT InGenius and OutSmarts Breakout Hookup Guide - learn.sparkfun.com
Nice. But a pity they don't have 'metal nosed' TRS sockets to allow proper connection of cable screen direct to a chassis if used on a metal chassis. And an option to disconnect screen from 0V (jumper or track cut).
wrt ceramic caps - regardless of microphonics you'd have a hard time finding any at 1uF that were of any dielectric that would be recommended for audio - basically Class 1 / NP0 / COG.
Preferred film type would be polypropylene.
Preferred film type would be polypropylene.
Just found this topic... I am also using the CleanBOX pro for unbalanced to balanced + gain
i didnt know it was so bad below the 20hz! I have dual 15" sealed with them, and thought it was OK.
Kipman725, could you please specify this lost sould wich part should I but to replace those cap's? I don't want to purchase the wrong part.
Also, for those interested, I found a much cheaper and better way to go from unbalanced to balanced signal, and that's the 3E Audio DSP that uses the Sigma 1701 chip. It's only USD$38, it has single ended input and balanced input @+3v so it will probably drive any amp without problem... and of course you have the DSP function... I already have one but haven't tested it yet.
Thank you!
Just found this topic... I am also using the CleanBOX pro for unbalanced to balanced + gain
i didnt know it was so bad below the 20hz! I have dual 15" sealed with them, and thought it was OK.
Kipman725, could you please specify this lost sould wich part should I but to replace those cap's? I don't want to purchase the wrong part.
Also, for those interested, I found a much cheaper and better way to go from unbalanced to balanced signal, and that's the 3E Audio DSP that uses the Sigma 1701 chip. It's only USD$38, it has single ended input and balanced input @+3v so it will probably drive any amp without problem... and of course you have the DSP function... I already have one but haven't tested it yet.
Thank you!
I just used some wimma film capacitors from my junk box I think 2*1uF in parallel. A 2.2uF per channel would be neater.
wrt ceramic caps - regardless of microphonics you'd have a hard time finding any at 1uF that were of any dielectric that would be recommended for audio - basically Class 1 / NP0 / COG.
Preferred film type would be polypropylene.
Indeed, all high value ceramic caps(*) use ferroelectric ceramics, which are highly non-linear, temperature dependent, microphonic, and even change value with age.
They are great for decoupling, but that's it really... C0G is required for stable values and low distortion in the signal path itself.
(*) Well high energy density to be precise. Barium titanate and related compounds are the most common ferroelectrics used, and the dielectric code is commonly X7R, Y5V
- Status
- Not open for further replies.
- Home
- Source & Line
- Analog Line Level
- ART CLEANBox Pro Low freq modification