Well to be perfectly honest I'm just not a fan of parts that don't physically fit in the original locations. I would want it to look both neat and also be physically robust.
I agree. My plan was to make a fat plastic washer to sit beneath the caps just to give clearance for the component.
Something like that could work. There are various sizes available in nylon for plumbing and so on. Some are quite large, maybe something like could be a neat option.
Another and probably the most correct method of repairing through hold plating damage, is to use copper eyelets. You can find some that will take the capacitor legs, drill the board out slightly and then press fit them through. Solder top and bottom, then replace the capacitors.
All Done!!
Well, its all completed and back in working order! So I had obviously fixed the problem when I replaced that diode, but then having got the green light and no fuse blowing I had decided to go right ahead and replace the capacitors whilst I had the thing open. So when I then got the problems with the right channel I just assumed there was still a fault. Little did I know that I had broken the link between the top and the bottom of the PCB.
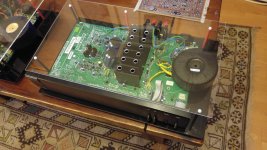
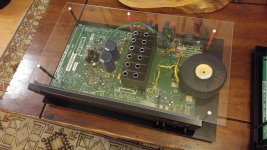
Anyway, it took a couple of turns of trial and error to get the soldering right top and bottom. In the end I didn't need spacers as the short wires are stiff enough and the caps lean against a small foam block sandwiched between them and the heat sink. I have attached a couple of photos of the amps in their new perspex mounts. Sounding great now.
Thanks for sticking with me!
Well, its all completed and back in working order! So I had obviously fixed the problem when I replaced that diode, but then having got the green light and no fuse blowing I had decided to go right ahead and replace the capacitors whilst I had the thing open. So when I then got the problems with the right channel I just assumed there was still a fault. Little did I know that I had broken the link between the top and the bottom of the PCB.
Anyway, it took a couple of turns of trial and error to get the soldering right top and bottom. In the end I didn't need spacers as the short wires are stiff enough and the caps lean against a small foam block sandwiched between them and the heat sink. I have attached a couple of photos of the amps in their new perspex mounts. Sounding great now.
Thanks for sticking with me!
Attachments
Excellent  its always good when a plan comes together.
I probably said way back that fault finding has to follow a definite path and that paid off here.
Good result 🙂
its always good when a plan comes together. I probably said way back that fault finding has to follow a definite path and that paid off here.
Good result 🙂
Yes, thanks. I wish I had done the thorough testing sooner. The bulb test apparatus was such a simple thing to do. Plus I had initially excluded C201 from my testing due to its position, but once I realised the link from D102, crossing over from the underside to the topside of the pcb, and then to C201, it all seemed so obvious!
Well, its all completed and back in working I have attached a couple of photos of the amps in their new perspex mounts. Sounding great now.
Thanks for sticking with me!
Perspex Covers !?
Not much, if anything worth seeing let alone displaying in there.
Presumably only a bodge for repair efforts ?
IMO.. the 'sounding great' is definitely arguable. Be aware there are Many (most? ) amps that sound/perform better.
Rather than merely laughing at the Arcams.
In trying to help here..😎
Suggesting alternate Much improved gear possibles
This one is a good simple 3 quality steps up from the 290 Arcam amps :
http://www.diyaudio.com/forums/chip-amps/267802-modulus-86-build-thread.html
OR even far better than the above.. ANY of the Pass labs Diy Amps Pass Labs - diyAudio
Will humble anything Arcam has yet foisted on the unwitting 😉
Your choice.
Suspect a horses to water situation TBH.
Good luck
Hmmmm!
If there was supposed to be anything helpful or positive in that message I am afraid your ability to convey it appears to be rather lacking.
Happy with what I have got for now and I am well aware of what there is out there. Pass Labs may be something for the future when I have the time.
And the perspex is not so I can look at the guts of the amps it was for sonic benefit. One line of thinking at least (DNM etc). Certainly improved the clarity of the amps quite noticeably.
I have watched this thread with bated breath, hoping that it would all come good in the end......and it did🙂 Sometimes you just feel like giving up. I have in the past.
Good that you got the better of that PCB problem. I think a lot of new and proud DIY folk and lurkers get a thrill out of seeing the array of coloured wires and jelly beans inside their box rather than staring at a plain black box while listening to their favourite music. You can't fool us that using clear plastic is for any technical or cost reason other than visibility though.Perspex Covers !?....
If you have the time to watch audio product review videos, you may notice that the visuals are often just panning over the innards - it seems to impress and sure beats a blank screen or clips of the artists recording the music in studio sound booths for relevance.
Whatever the apparent sound effect of removing the steel covers, I don't like the chances of proper cooling there and the heatsink fitted is truly minimal. You'll need to make a lot more holes or open space above the heatsink to encourage the full vertical, designed air convection flow rate under that top cover sheet - or just wait and see how hot they become and smoke begins to rise while the perspex warps and discolours after a few sessions of some hours at decent volume 🙁
Aha Peter! Well done. When's the party? Or are you having it now?......and the band played on.........
As these amps never seem to get very hot at all I decided it would be fine. If things start getting too hot then I might make changes. Its all open around the sides anyway. And things don't get too hot here in Scotland anyhow!
And yes, it does look better, although that was not my incentive.
Its basically just an acrylic sandwich. Thick black base and thin clear top. Even all the spacers, nuts and bolts (M3) are nylon! The only bit of metal case that I couldn't remove was the front plate which is riveted to the pcb and also it holds the front switches and headphone socket. And anyway it allows me to hang the decorative front fascia back on.
The toroidal units were previously suspended on metal beams but now they are isolated on what can are best described as small bird tables! All in all I am pretty pleased.
Cheers!
Last edited:
Party!
Yes Scott, the party was initially "pooped" once when I discovered I had not fully succeeded in my linking of the through board joint but it was resolved around 1am last night. But I am now just enjoying my music and a can of export!
Yes Scott, the party was initially "pooped" once when I discovered I had not fully succeeded in my linking of the through board joint but it was resolved around 1am last night. But I am now just enjoying my music and a can of export!
- Status
- Not open for further replies.
- Home
- Amplifiers
- Solid State
- Arcam Delta 290P keeps blowing fuse