Pete:I’d be happy with the prototype, unless you’d prefer me to build up the blank board instead.
That's entirely your choice, I no longer need either, and glad to see either put to good use..
The built prototype is quicker & easier. The blank board gets you the enjoyment/frustration of DIY.😆
Either way you do have to add a wire/pin to the main board for -18v, and cut/remove the 4 main board jumpers.
I'll send a PM
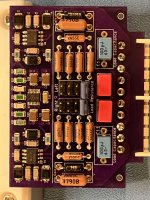
Two Apt MC Boards Complete
I have just finished constructing two of the @seanc Apt MC preamp daughter boards. Both powered up and worked on the first try, but I have to admit getting the LTC3260 soldered is tricky. I chose to try my luck at re-flow soldering on my stove. Sean provided good advice on this and, after an hour's experimenting with a blank board, I came up with a couple stove settings that matched the solder paste's profile.
On the first board, I made a mistake with the solder paste stencil and, upon removing the stencil from the board, the paste lifted off the LTC3260's pads. It turns out that a little better scraping of the excess paste was needed to lessen the paste's adherence to the stencil. I did this one the second board and it worked very well. The saga of fixing the first board required techniques I had to learn (I am a novice in PCB construction). I expect that took an extra 4 hours of googling and fixing. @seanc did an excellent job with labeling the board and providing a list of part numbers. I had very few questions for the answers were right in front of me.
Both boards function nicely. I am an original owner of an Apt MC pre and I noticed immediately that the noise floor is much lower with the new ones. It's a bit soon to tell about nuances sound-wise, and I don't give much credit to most subjective reviews anyway. So I'll leave it to this: they do sound terrific!
Given that I already owned an Apt MC pre, here's what I got out of the deal:
1. Adjustable gain - I bought resistor pairs for 6 different gains, about 3 dB apart, roughly centered upon my old board's gain of 21.4 dB.
2. Adjustable impedance - so between this and #1 I can accommodate a sea of cartridges.
3. Much lower noise floor and, likely, better sound as well.
4. The board is lighter than the old board. This is good. For example, I shipped my Apt preamp to be re-capped. The job was done well and the preamp returned to me. I then experienced drop outs of sound where tapping the preamp would restore it. It turned out to be cracked solder joints where the MC daughter-board connects to the motherboard. I attribute this to shipping vibration. A lighter board improves this.
5. A cosmetically excellent board - much better than the original.
6. Like all DIY stuff, one learns a lot. I'm still Spice'ing the board for fun.
7. I got to work with @seanc, who has been very generous with his time and advice!
Notes:
My total parts+shipping cost for a single board was: $151.75 This does not count solder supplies and tools - people vary too much for this to be a useful figure.
Parts were from Mouser and were all premium parts (@seanc supplies a list of adequate and premium parts).
Boards (I had to buy three) were from OSH Park and these are included in the price above.
I encourage others to try this DIY job and I will help where I can.