I'll be out for 3 days
I hope you'll ba able to tell me how they sound, when I'll be back home 😉
I'm going there: www.eurockeennes.fr
this evening: radiohead concert
I hope you'll ba able to tell me how they sound, when I'll be back home 😉
I'm going there: www.eurockeennes.fr
this evening: radiohead concert
Bricolo said:Hi all,
what's new here? I just came back home 🙂
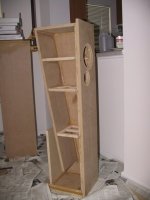
I almost have the Peerless Pipes done, I have to finish stuffing them, and glue on the sides and top. I was going to do it tonight, but went to the movies instead, and I can't find one of the crossover components that I bought... I will look tommorrow.
They both look like the below picture, except that one is stuffed and wired. Construction pics at: http://brian.darg.net
Construction was done with biscuits, yellow glue, then I put Silicon II in the corners.
--
Brian
Attachments
Bricolo said:nice 🙂
what is biscuiting?
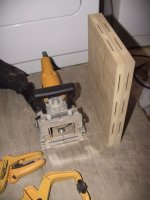
Involves using a plate joiner, then using a wooden "biscuit" to go in between the two pieces, and it expands with the glue to make a good joint. It also makes it easy to line up pieces when clamping.
Here is a picture of the top and bottom, ready for gluing, after being cut with the plate joiner.
--
Brian
Attachments

Hello from Holland,
I,m also building Thor, having fun already!
has anyone tips about dampening material? what? how much?
I cant get information about te line-filling.....
greetings, Roel
I,m also building Thor, having fun already!
has anyone tips about dampening material? what? how much?
I cant get information about te line-filling.....
greetings, Roel
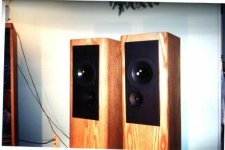
have my Peerless TL speakers playing
I got the speakers playing, with the side panel clamped on for now, the tweeter held in by masking tape, and the crossover sitting along side the speaker. My first impression is that the bass is quite there, going much lower then my jordan jx92s, and the highs seem a bit laid back. I will let them break in, then compare them to my Thor TL speakers, and my other speakers.
I went back and forth between the Jordan JX92S speakers and the Peerless TL speakers, and the Peerless speakers bass really stood out, and the mids and imaging really stood out with the Jordans. Definately not a thorough comparison thus far.
Overall, I am satified with the new speakers. Once they break in, and I do some more listening, I might change the tweeter to a Seas 27TFFC instead.
Pictures at:
http://brian.darg.net/peerlesstl
and my other projects at:
http://brian.darg.net/audio
--
Brian
Bricolo-
If you can't bend the veneer over your rounded edges by wetting, or steaming, I suggest rabbeting the rounded edges to accept some square stock of the same wood as the veneer.
Once this new corner piece is securely glued in place, and veneered, it can be routed with a round-over bit again and the grains will match.
x. onasis said:Bricolo-
If you can't bend the veneer over your rounded edges by wetting, or steaming, I suggest rabbeting the rounded edges to accept some square stock of the same wood as the veneer.
Once this new corner piece is securely glued in place, and veneered, it can be routed with a round-over bit again and the grains will match.
Not true. Bob Brines: http://www.geocities.com/rbrines1 put veneer on his Peerless Pipes, wrapping the veneer around 1 1/2" radius rounded over sides on the front baffle. He has some information on his webpage about this. I have seen his speakers at the DIY Atlanta 2002 event, and the veneer came out rather well. I am not too big into veneer, but the wrapping over the big radius rounded over edge looked pretty good in person. He didn't roundover the top edge, as you can only wrap the veneer around one edge. He has a page about veneering here: http://www.geocities.com/rbrines1/Pages/Veneering.html
--
Brian
Hi Brian,
I'm guessing you missed the "If" (the first word of my post) when stating "Not true".
1 1/2" radius roundover should be easy to bend the veneer. Smaller too, with wetting or steaming. The rabbeting method will work to retrofit already radiused edges, if you then want to veneer over too small a radius.
It's not the only method I can think of to do adjacent edges (tops), but the easiest.
If matching the grain is your concern, like say fiddleback or quilted veneer, you'll have problems, but if planning can utilize straight grain at the corners, it'll be fine.
Brines concerns over "dangerous" vapors can be avoided by using water-based contact adhesive, altho I don't care for the stuff myself, I must admit these products have improved over the last 10 or 15 years.
When placing the veneer on the substrate using contact cement, always place slats (spacers) between them while positioning, then make contact in the center first, working air bubbles out to the edges.
But Bob only rounded the vertical edgesBrianGT said:
Not true. Bob Brines: http://www.geocities.com/rbrines1 put veneer on his Peerless Pipes, wrapping the veneer around 1 1/2" radius rounded over sides on the front baffle. He has some information on his webpage about this. I have seen his speakers at the DIY Atlanta 2002 event, and the veneer came out rather well. I am not too big into veneer, but the wrapping over the big radius rounded over edge looked pretty good in person. He didn't roundover the top edge, as you can only wrap the veneer around one edge. He has a page about veneering here: http://www.geocities.com/rbrines1/Pages/Veneering.html
--
Brian
I want to round all the bafle's edges, that's the problem
Bricolo,
If you have an opportunity to do so, take a look at how JM Labs and B&W do flat wood veneered panels with 4 radiused edges. They both use something that looks like Ranger board, laid up with veneer on probably both front and back faces. On the radiused edges (I am guessing here) they seal them and finish the entire panel with a pigmented finish coat, that color matches the veneer. Because the edge is not very large, the underlying color and texture is pretty regular and the finish color is the same as the veneer, it is a relatively effective solution, and could work if you didn't mind visually flattening out the wood's "personality" with a pigmented top coat.
Dana
Bricolo said:
But Bob only rounded the vertical edges
I want to round all the bafle's edges, that's the problem
Another option would to be to use a solid wood top piece, then radius the vertical edges on the front panel, and then the top piece would have all edges radius'd.
--
Brian
This is one of the solutions I was thinking about
The second is to use MDF everywhere; to round all the 4 bafle's edges. And the edges joining at 45° at aech corner, resulting in a 45° edge, not rounded.
But this way, I also can veneer.
Your solution is the 2nd one. And don't need this 45° trick
But for now, I'm looking for informations about woods. (why to use MDF, and not solid wood)
If someone has a something interesting about this subject....
Thanks
Alex
Bricolo said:But for now, I'm looking for informations about woods. (why to use MDF, and not solid wood)
If someone has a something interesting about this subject....
As for wood choice. My motivation to use mdf for my latest project is strictly due to cost. The only deviation from this is for structural integrity. If you look closely to my latest peerless tl speaker, you will see that I did use 13 layer birch plywood for the structural braces inside the speaker, since plywood is many times better them mdf structurally. I don't think mdf would be nearly as effective here.
For my Thor TL speakers, I spent $150 or so for wood, and the Peerless TL speakers, it was $35 of wood. For the Thor speakers, I built it out of 3/4" mdf, then covered it with 3/4" solid oak on top, bottom and back, along with 3/4" oak plywood on the sides (save on cost), allowing me to roundover the whole thing. Look at my website for pictures. I love the look, but couldn't afford it this time. I have also experimented with using solid wood for the front, then mdf for the rest, painting the entire speaker, except for the front (see my tangband w3-871s speakers).
In strictly terms of structural integrity, and rigidness, 13 layer baltic birch is the best that I have seen. It is lighter, and many times stronger then mdf. It just leads to more problems finishing then mdf if you want nice looking rounded edges. I used all 13 layer baltic birch plywood for my large subwoofer, and it is so much more rigid. For mdf, if it doesn't line up right, lots of clamping pressure will bend the mdf to make it fit. As for finishing, plywood does NOT roundover well for a big radius roundover. I tried to roundover my large tempest subwoofer, and it came out horrible, leaving me with a dilemma of how to finish it. I might have to bondo it and paint it black.
Another consideration that I have to deal with is that I am working in my apartment, with a limited selection of tools, and living on a college student's budget. When I want to drill holes, I have to go out on my patio, bring out the tools, and sit on the ground, use them, clean up and bring the tools back inside, with the exception of the table saw, which I have stored in my friend's garage.
Good luck with your projects.
--
Brian
Thanks!
I know that plywood is better than MDF (3 times more expensive, also), but you said it yourself: I can't round the edges with plywood
What about solid wood?
I know that plywood is better than MDF (3 times more expensive, also), but you said it yourself: I can't round the edges with plywood
What about solid wood?
The problem with using solid wood is that it expands and contracts with humidity changes. That's why doors are traditionally made with stiles and rails, and a floating panel for the field.
Small boxes can be made with tight joints that won't move over time, but the larger the panel, the greater the movement. (mostly across the grain)
Different woods move differently too, some have tighter grains, and some have more natural oils. Surprisingly, the time of the year the timber is harvested and the initial drying process can become critical. Drying hardwood in modern kilns is a true science. Oak, for instance, must be brought down past 5% moisture content, and then back up to become really stable, and avoid casehardening.
There's an old bit of advice that says you shouldn't make fine furniture from wood that hasn't "shelved" under seven years.
The problem with making large boxes from solid wood is just that. You don't want to put a great deal of effort into woodworking and a few years later, have joints move, or worse....split.
One method to use solid wood boards, is to build the box with MDF or Ply and put it in a tube sock, then attach the wood panels (assembled or individually) over the box, using connectors that will allow for movement. Not that difficult with nylon, push-in connectors, but probably mostly suitable for end pieces on center channels.
Sorry if this is off topic.
OK, so solid wood isn't recomanded because it can expand/contracs
not because it's bad sounding, or not strong enough
the nice thing about solid wood, is that you can do almost everything with it, give it the form you want, without finishing problems (no veneer needed, it always look like solid wood, of course, it's solid wood 😀)
not because it's bad sounding, or not strong enough
the nice thing about solid wood, is that you can do almost everything with it, give it the form you want, without finishing problems (no veneer needed, it always look like solid wood, of course, it's solid wood 😀)
- Status
- Not open for further replies.
- Home
- Loudspeakers
- Multi-Way
- Anyone Built Seas Thor TL ?