Have an old speaker but can not buy any surround that's why I am wondering I any of you tried making their own surround? YOur help will be greatly appreciated. thanks!!
There are manufacturers which can deliver surrounds ...
One possibility in making a surround by yourself is
putting textile on a form (O-Ring or similar) and soak it
with glue.
One possibility in making a surround by yourself is
putting textile on a form (O-Ring or similar) and soak it
with glue.
A long time ago I tried repairing old foam with strips of leather and contact cement...
What type of surround is it? Foam? You can't find ANY surrounds or can't find the exact size surround? You should be able to splice together (cut it and overlap) a fully functional surround from one that's close to the right size.
What type of surround is it? Foam? You can't find ANY surrounds or can't find the exact size surround? You should be able to splice together (cut it and overlap) a fully functional surround from one that's close to the right size.
Dear c3conv
I didn’t have some 20$ to buy (it didn’t worth the cost for these speakers anyway) some descent surrounds, so I experimented with an old idea.
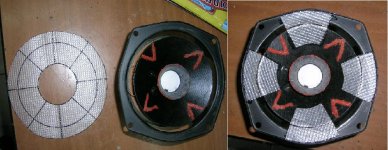
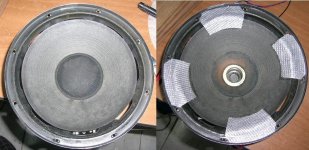
Four strips of some packaging plastic sheet, glued radially on the cone. They leave a vent area around the cone edges, which can serve as the bass reflex vent area. It works particularly well for bass-midrange drivers.
(For the strips, you can use some thicker cloth or some leather instead).
It is important that, before you apply the new surround to have the cone radially centered and held away from it’s axial rest position .
To do this, remove the dust cup and insert some photographic film strips between the center magnet pole and the coil former, pushing the cone in.
Make sure it remains at this position for the rest of the job.
Then glue the four surround strips at the speakers basket.
After the glue has cured, you can glue the strips on the cone. After you are done, remove the centering film strips from the coil former and reapply the dust cup (or place a phase plug over the center pole).
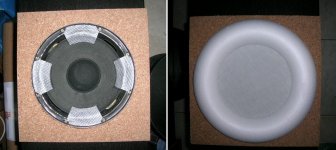
On the 8 inch Philips woofer you see on the photo, I applied a decorative touch to hide the ugly looking mod, by placing a half polystyrene donnut over the speaker.
It had the added benefit of acoustically loading the cone, as the donnut’s inner diameter was a bit smaller than the cone’s outer diameter.
Best Regards
George
I didn’t have some 20$ to buy (it didn’t worth the cost for these speakers anyway) some descent surrounds, so I experimented with an old idea.
Four strips of some packaging plastic sheet, glued radially on the cone. They leave a vent area around the cone edges, which can serve as the bass reflex vent area. It works particularly well for bass-midrange drivers.
(For the strips, you can use some thicker cloth or some leather instead).
It is important that, before you apply the new surround to have the cone radially centered and held away from it’s axial rest position .
To do this, remove the dust cup and insert some photographic film strips between the center magnet pole and the coil former, pushing the cone in.
Make sure it remains at this position for the rest of the job.
Then glue the four surround strips at the speakers basket.
After the glue has cured, you can glue the strips on the cone. After you are done, remove the centering film strips from the coil former and reapply the dust cup (or place a phase plug over the center pole).
On the 8 inch Philips woofer you see on the photo, I applied a decorative touch to hide the ugly looking mod, by placing a half polystyrene donnut over the speaker.
It had the added benefit of acoustically loading the cone, as the donnut’s inner diameter was a bit smaller than the cone’s outer diameter.
Best Regards
George
Attachments
www.minor-audio.com/bibou/speaker/FE167E_200701.html Showes a FE167E
being rebuilt with a handmade cone,spider and paper surroud. I sure hope I
typed that in right.
being rebuilt with a handmade cone,spider and paper surroud. I sure hope I
typed that in right.
- Status
- Not open for further replies.