Please dont persist with the attack dog tactics against pepe. We can all confirm that many pictures all over the place at every site are edited. We can confirm how much they were edited. Your edits were very ethical. Basically cleaning up the pic without changing what they convey. Many are not.
If he said some were edited and they were removed I believe him. Youd be amazed what I can squeeze out of a picture now that i know where to look.
Lets get back on topic.
If he said some were edited and they were removed I believe him. Youd be amazed what I can squeeze out of a picture now that i know where to look.
Lets get back on topic.
I dont think its worth the risk... I'm pretty happy with my picture. I'm just using a 7" Polaroid DVD player LCD and its pretty damn sharp, even at 150" (not that I have a wall big enough for that, but by placing the PJ close on the wall, with screen on the celling and floor.) lol
Attachments


Thanks for antiglare tip.
I used watered toilet paper on 15" benq 557 v2.
It came off easily, I used craft knife to peel the corner.
The image has better contrast and brightness.
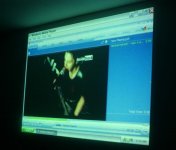
Attached image is better in real life, colors are deeper. I took this pic with canon a60, 1/5sec, 100iso, f2.8.
- SODA
I used watered toilet paper on 15" benq 557 v2.
It came off easily, I used craft knife to peel the corner.
The image has better contrast and brightness.
Attached image is better in real life, colors are deeper. I took this pic with canon a60, 1/5sec, 100iso, f2.8.
- SODA
Attachments

Me2! said:
If he said some were edited and they were removed I believe him. Youd be amazed what I can squeeze out of a picture now that i know where to look.
Lets get back on topic.
They were re"moved" to the protected plog forum in LL not because of cheating but because of pepe who has such negative attitude towards other's projectors, and caused my thread in LL dead.
voovoov said:
They were re"moved" to the protected plog forum in LL not because of cheating but because of pepe who has such negative attitude towards other's projectors, and caused my thread in LL dead.
I don't have negative attitude towards other's projectors, but towards weaknesses of OUR projectors, and this attitude leads me to investigate what we could improve in this "basic" design.
Sorry, all this effort made in LL to turn the common knowledge into "commercial know-how" is kinda funny. And improving photos is actually counterproductive, the goal is to improve the real projection, not the results in the "gallery".
Regards
pepe303 said:
I don't have negative attitude towards other's projectors, but towards weaknesses of OUR projectors, and this attitude leads me to investigate what we could improve in this "basic" design.
Sorry, all this effort made in LL to turn the common knowledge into "commercial know-how" is kinda funny. And improving photos is actually counterproductive, the goal is to improve the real projection, not the results in the "gallery".
Regards
the purpose of the gallery is to capture results that more closely resemble what you have on screen.
For example, In the images youve posted, Ive noticed some really extreme dark corners, are your corners that dark to the human eye, perhaps you dont have everything alligned.
I try to take my images, to portray what I see in person
Scubasteve2365 said:
the purpose of the gallery is to capture results that more closely resemble what you have on screen.
For example, In the images youve posted, Ive noticed some really extreme dark corners, are your corners that dark to the human eye, perhaps you dont have everything alligned.
I try to take my images, to portray what I see in person
You mean my pictures of a white screen? Yes, the corners are that dark, but you don't realize that when you look at the big screen. If you would move much further back, so the screen would cover only small part of your entile field of view, you would see it clearly. You can't align anything to get rid of the dark corners, and you can calculate how much darker the corners would be in an ideal case, with everyting perfectly aligned. I don't remember the numbers now, but it's something like 2x difference in brightness in the center and in the corners. This is a "feature" of such projectors with a relatively big LCD and short throw distance. Don't be jealous, your projector also has it 🙂
Regards
pepe303 said:
You mean my pictures of a white screen? Yes, the corners are that dark, but you don't realize that when you look at the big screen. If you would move much further back, so the screen would cover only small part of your entile field of view, you would see it clearly. You can't align anything to get rid of the dark corners, and you can calculate how much darker the corners would be in an ideal case, with everyting perfectly aligned. I don't remember the numbers now, but it's something like 2x difference in brightness in the center and in the corners. This is a "feature" of such projectors with a relatively big LCD and short throw distance. Don't be jealous, your projector also has it 🙂
Regards
If youve read any of my replies, I have stated that we all have dark corners, but my corners are NOT as dark, nor taper off as extreme as your pictures indicate.
Thats what Ive been trying to say, the wider aperature setting of the camera lens, lets me recreate the accuracy of the corners not being darker in my pictures as they are in person.
In the beginning, with my old camera I had to take images 20-25 feet back in order to not get the severly dimmed corners, If you look at post 55, you will see the corners are dimmer, but not as EXTREME as yours are.
My newer Sony Camera, allows for me to get CLOSER to the screen, with the bigger aperature setting, thus no being effected by dim corners as much.
Its commonly stated in many peoples results pics, they say things like. My corners arent this dark in person, or the camera is aiding in the FISH EYE results. It is true. The camera lens is more sensitive to light than the human eye is, but the whole purpose is to SHOW pictures that resemble what the HUMAN EYE percieves.
(Edited by moderator at the request of a member. This post now lacks relavance)
So, you are saying that SODA, has altered his image, based off of your examination of pixels when zoomed all the way in??
Just making sure I understand you, Ive looked at the image, and read your description twice, and I cant see what you are getting at.
SODA's picture didnt seem to be soo glorious for it to be fake, I simply cant believe that image has had effects added to it. Doesnt this GIMP program tell you what was done in photoshop ect.
If you examing pics from close up to determine if effects have been done on them, I dont think that is a concrete accurate way of determining so, Many things can very, the Jpeg compression of colors, the compression setting,for example, how would a hi-res image look when saved at high quality setting (12 in photoshop) versus low quality setting (1-3 in photoshop)?
It looks as if you possible raised the brightness or lowered the contrast in your snippet, hard to say. I can see the difference between the two pics, but unless you have two pics to compare, I Just simply cant see how you can look at ONE image and determine an effect was applied to the image
OK,  back to a/g removal. after an easy removal of the viewing side antiglare on the proview 15.4, I tried the a/g on the back side with the wet rag method. It wouldn't budge. even after 24+ hrs, it wasn't coming off. so I gave up on that side for the moment. yesterday, I got the pj back together and tested it. it was only slightly brighter and clearer. still not what I was hoping for. then I went and looked at a sharp QA-1200 I have laying around that a friend left for me to mess around with. holding up the sharp projection panel you can clearly see through the panel. unlike our stripped lcds. at this I decided that I simply must remove the rear a/g or get another lcd. since the rag method was not working on this side, go figure, I used the paint stripper method. This method scared the hell out of me but I was determined to remove the rear antiglare. Even prepared for the possibility of accidentally messing up or removing the rear polarizer. long story short, I got the a/g off but the polarizer got damaged to some extent in the process. diagonal lines were opened up by the stripper leaving small diagonal scrath-looking marks on the polarizer. But fortunately the panel still works fine and the marks aren't as noticable in the projected image as I feared they may be.
After removal of both front and rear a/g layers I can now clearly see through the panel just like the QA-1200 panel. like a tinted piece of glass, glossy on both sides. I reassembled the pj and was impressed with the results. It is now definately brighter. without any kind of reflector in the projector I projected a completely watchable 9' diag. image on a darkish green wall and tan miniblinds through the middle. I am very happy now about the future of this pj. the color was good, and the clarity definately also improved.
I would not recommend anyone use the stripper method on this panel. it will damage the polarizer. I am just lucky it isn't bad enough to ruin the image. I still will probably look into replacing the rear polarizer at some point. part of my problem may have been that the panel was framed and I couldn't get the razor flat with the panel to get under the a/g on the rear with the rag method. the front came right off though, almost too easy. I can't believe the rear was a totally different experience...
Added:
One more interesting note about this was that after the a/g removal of BOTH front and back the heat(no cooling in pj yet) was no longer causing the screen to black out like before. It still did it w/ only the front a/g off. but with both off it would run for 30 minutes before showing signs of darkening. So either it is allowing the panel to passively shed heat better or there is some other thing at work here.
back to a/g removal. after an easy removal of the viewing side antiglare on the proview 15.4, I tried the a/g on the back side with the wet rag method. It wouldn't budge. even after 24+ hrs, it wasn't coming off. so I gave up on that side for the moment. yesterday, I got the pj back together and tested it. it was only slightly brighter and clearer. still not what I was hoping for. then I went and looked at a sharp QA-1200 I have laying around that a friend left for me to mess around with. holding up the sharp projection panel you can clearly see through the panel. unlike our stripped lcds. at this I decided that I simply must remove the rear a/g or get another lcd. since the rag method was not working on this side, go figure, I used the paint stripper method. This method scared the hell out of me but I was determined to remove the rear antiglare. Even prepared for the possibility of accidentally messing up or removing the rear polarizer. long story short, I got the a/g off but the polarizer got damaged to some extent in the process. diagonal lines were opened up by the stripper leaving small diagonal scrath-looking marks on the polarizer. But fortunately the panel still works fine and the marks aren't as noticable in the projected image as I feared they may be. After removal of both front and rear a/g layers I can now clearly see through the panel just like the QA-1200 panel. like a tinted piece of glass, glossy on both sides. I reassembled the pj and was impressed with the results. It is now definately brighter. without any kind of reflector in the projector I projected a completely watchable 9' diag. image on a darkish green wall and tan miniblinds through the middle. I am very happy now about the future of this pj. the color was good, and the clarity definately also improved.
I would not recommend anyone use the stripper method on this panel. it will damage the polarizer. I am just lucky it isn't bad enough to ruin the image. I still will probably look into replacing the rear polarizer at some point. part of my problem may have been that the panel was framed and I couldn't get the razor flat with the panel to get under the a/g on the rear with the rag method. the front came right off though, almost too easy. I can't believe the rear was a totally different experience...
Added:
One more interesting note about this was that after the a/g removal of BOTH front and back the heat(no cooling in pj yet) was no longer causing the screen to black out like before. It still did it w/ only the front a/g off. but with both off it would run for 30 minutes before showing signs of darkening. So either it is allowing the panel to passively shed heat better or there is some other thing at work here.
That was one of the proposed benefits of this mod at the start of the experiment at lumen labs. I know of another member who had heat reduction as well, there are probably more but I think it doesn’t get reported that much because of the excitement of image improvement.One more interesting note about this was that after the a/g removal of BOTH front and back the heat(no cooling in pj yet) was no longer causing the screen to black out like before. It still did it w/ only the front a/g off. but with both off it would run for 30 minutes before showing signs of darkening. So either it is allowing the panel to passively shed heat better or there is some other thing at work here.
to annul the dispersing effect of the light by antiglare
😀
para anular el efecto dispersante de la luz producido por el antiglare.
pintar con barniz transparente el filtro antiglare,esto produce que el antiglare se vuelva tranparente y la luz no se disperse.
yo no lo he probado ,"voire" en el foro de allinbox esta haciendo pruebas actualmente.
este metodo es minimamente destructivo.
si funciona bien,por favor poner fotos del antes y after.
disfrutarlo.
faltaria determinar que esmalte es mejor,
como pintar
(spray,brush),modo de paint.etc
in order to annul the dispersing effect of the light produced by antiglare. to paint with varnish is transparent the filter antiglare, this produces that antiglare becomes tranparente and the light not to disper itself. I have not proven it, "voire" in the forum of allinbox this testing at the moment. this metodo is minimamente destructive. if it works well, please to put photos of before and after. to enjoy it. faltaria to determine that it enamels is better, like painting (spray, brush), way of paint.etc
pour annuler l'effet dispersant de la lumière produit par l'antiglare. peindre avec vernis transparaît le filtre antiglare, ceci produit que l'antiglare se retourne tranparente et la lumière se pas disper. je ne l'ai pas prouvé, "voire" dans le forum d'allinbox il fait des essais actuellement. cette méthode est minimalement destructive. s'il fonctionne bien, s'il vous plaît mettre des photos de le avant et d'ensuite. jouir de lui. faltaria déterminer qu'émail est mieux, comme peindre (spray, avec pincel), mode de pintar.etc
So I got brave this weekend and tried the A/G removal. Here are some pics of the process:
I used plain old paper towels and wet them in the sink until they dripped when I held them in the air. I did cover the towels in plastic wrap to hold in moisture (not shown in pic).
This is what the LCD looks like with no A/G filter; strikingly similar to a "glossy" LCD.
The A/G filter held up in the air. Holding it in the air is a little exaggeration because when it's actually being used it's glued directly to the LCD; not floating 3 feet in front of it.
So I did a little better comparison of A/G vs no A/G. The A/G filter is laid flat on the table. This one is with a flash. You can see the right side (A/G filter side) is more dull, dimmer, and slightly blurred.
This is the same setup with no flash (the light is overhead lighting).
So what do I think? Well, the image is definitely clearer. Sharper, more contrast, a little brighter too. How much more? Well, enough to notice but not night and day. Was it worth it? I think so. It really wasn't hard at all. Soaked it for about 6 hours. Then, used my thumbnail to get an edge started. Peeled right off with no problems. The most difficult part was not breaking the EXTREMELY delicate ribbon cables connecting the LCD to the controller board. That scared me way more than the actually stripping did.
I used plain old paper towels and wet them in the sink until they dripped when I held them in the air. I did cover the towels in plastic wrap to hold in moisture (not shown in pic).
An externally hosted image should be here but it was not working when we last tested it.
This is what the LCD looks like with no A/G filter; strikingly similar to a "glossy" LCD.
An externally hosted image should be here but it was not working when we last tested it.
The A/G filter held up in the air. Holding it in the air is a little exaggeration because when it's actually being used it's glued directly to the LCD; not floating 3 feet in front of it.
An externally hosted image should be here but it was not working when we last tested it.
So I did a little better comparison of A/G vs no A/G. The A/G filter is laid flat on the table. This one is with a flash. You can see the right side (A/G filter side) is more dull, dimmer, and slightly blurred.
An externally hosted image should be here but it was not working when we last tested it.
This is the same setup with no flash (the light is overhead lighting).
An externally hosted image should be here but it was not working when we last tested it.
So what do I think? Well, the image is definitely clearer. Sharper, more contrast, a little brighter too. How much more? Well, enough to notice but not night and day. Was it worth it? I think so. It really wasn't hard at all. Soaked it for about 6 hours. Then, used my thumbnail to get an edge started. Peeled right off with no problems. The most difficult part was not breaking the EXTREMELY delicate ribbon cables connecting the LCD to the controller board. That scared me way more than the actually stripping did.
hey to remove any residue from the adhesive i used a bit of regular ol armorall worked awsome
but use at your own risk
but use at your own risk
Hello,
I'm taking somewhat of a shot in the dark by posting here, and I apologize because this may be considered off-topic (but it's directly related to removing the AG layer from an LCD panel).
I know nothing about projectors, but I come from a similar school of internet-folk: modders. Over at notebookforums.com, some of us have decided to try and find a solution to our laptop screens looking pretty awful (poor viewing angles, terrible contrast/vibrancy, etc). Lo and behold, I see that you guys do some pretty wild stuff to LCD panels that looks very similar to what we're trying to achieve.
In the particular line of notebooks we're looking into modding (Dell Inspiron 9300) there are only 2 screens. One is 1440x900 with the traditional AG screen, the other is 1900x1200 with the shiny stuff. On a 17" screen, 19x12 is ridiculously small and hard on the eyes. So, we've been trying to figure out a way to improve the 1440x900 screens.
So, here's where I have lots of questions.
1. Did removing the AG layer improve the viewing angle at all (or is that irrelevant with a projector)?
2. I noticed the process involves a lot of water. I know this is probably a stupid question, but does that mean that getting the LCD wet causes no damage as long as the electronic parts stay dry?
3. You guys may not be able to answer this, but after removing the AG layer, would applying an AR (anti-reflective) layer over the newly stripped LCD further improve the visual quality?
4. I can't tell from the pictures - how far is the LCD disassembled before soaking it?
5. I suppose this is an important one - How much damage can be caused by this process, if you're very careful and follow directions (i.e. not tossing it into the bathtub overnight)?
I apologize for the mass of questions, but I was extremely excited when I finally found relevant information. We've been researching this for weeks with no luck (a friend of mine has even been calling various LCD manufacturers around the world looking for more information).
Jenny, I actually was one of the early posters on notebookforums.com. I am Asdasl on there. I actually own an I9300 with 1920x1200. Yeah, those darn sparklies. 🙂
Ok to your questions:
1. It is irrelevent to a projector (light comes out the LCD straight, theoretically). But, I do believe the viewing angle was increased. The purpose of the AG (anti-glare, also known as anti reflective) layer is to reduce the glare you get from ambient light shining down on your screen. In a projector, the light goes through the back of the LCD and through the front. No light (theoretically) goes back through the front. I would say the viewing angle has more to do with the polarizer than the AG layer. Please correct me if I'm wrong.
2. It's just like cleaning your screen. The water isn't oozing all over the place, but it is soaked. As long as you let things dry, you should be all set.
3. AG is the same as anti-reflective
4. The LCD is disassembled so that the actual LCD (AG layer, polarizer, LCDs) are exposed and accessable. This might be tricky with the 9300 because when you just take the LCD out of the bezel, you still have a metal frame to remove.
5. You can destroy the LCD by doing this. The biggest risk is breaking the polarizer. When the screens cost something like $250 each (on the I9300), that could be very costly.
If you remove the AG layer off the 1440x900 screen, you'll probably end up with a "shiny" screen like the 1920x1200. Let us know if you try this and your results. Good luck!
I wouldn't recommend doing this to an expensive laptop screen, for couple of reasons:
- you can damage it during the process, it would be best if you could practice on a similar, dead LCD, to get the feeling how easy/difficult it is, how much force you can apply, and so on
- if there is some glue left after AG removal, it will look bad on you laptop screen (not a big problem with a projector, it's hardly noticeable on the big screen), and I bet you will try to somehow remove those traces, trying some solvents, rubbing, and there is a risk that you will make it look worse, or even damage the polarizer
- assuming you wil succesfully remove the ag, then the underlying polarizer is very fragile, and regular cleaning might be problematic (not a problem in a projector, as you don't touch the screen and it's not exposed to any dirt, except some dust). The screen without antiglare will look very shiny and dark, any scratch will be apparently visible and annoying.
In my opinion, you will not improve viewing angle, I think the opposite is true, that the antiglare is supposed to improve this angle, as it serves as a diffusing screen. Imagine it like putting a piece of matte paper on the flashlight. The flashlight without this paper is very directional, light is focused towards it. But when you cover it with a paper, it will become a diffused light source, and loose its directional feature.
Be careful when reading Lumenlab forum. Some people there make very unrealistic claims about benefits of a/g removal. No one from non-commercial forums has yet confirmed those tremendous benefits. You can expect some noticeable difference, but not as huge by any means, while any mistake might cost you a lot of $$$.
Regards
- Status
- Not open for further replies.
- Home
- General Interest
- Everything Else
- The Moving Image
- DIY Projectors
- antiglare removal