Happy new year to you as well. Lack of time and an oversupply of bad luck seems to go in hand with most projects like this. Surely, in the end, it will be worth the effort!
Well, I suspected those 3D-printers to be no better than those office printers we've all learned to hate! 😀
It would be very interesting to see pictures if you are able to provide some. Anyways, looking forward to hearing more from your project!
Well, I suspected those 3D-printers to be no better than those office printers we've all learned to hate! 😀
It would be very interesting to see pictures if you are able to provide some. Anyways, looking forward to hearing more from your project!
Good evening All
Time for another update.
First things first, the printer is printing again. Honestly went round and round the houses a bit. Made the decision that as I needed to replace some parts I may as well upgrade to more fancy aftermarket parts, and really improve the output of the printer. Well after a couple of weeks of faffing about and awfully inconsistent prints, I reverted everything to OEM and it started printing perfectly again.
I have also started making some progress on the speaker stand parts. This is something I have been procrastinating about for a few months, but I finally ripped off the Band-Aid and started making some progress.
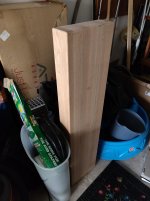
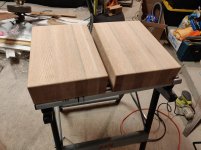
First item required was a solid base for the speakers. They are going to be tall and have a reasonable amount of weight high up in the structure so I was looking for something fairly solid to mount everything too. My father in law (who owns a re-modelling company) brought me what was an unused wooden step. Essentially a 48" x 11" x 4" piece of red oak. After a bit of worrying about ruining it, I took the plunge a cut it up to give me 2 bases approximately 17" x 11" x 4". Each base weights about 18.5 lbs so a decent amount of weight. I have ordered some spikes that I intend to screw into the bottom, and am considering getting hold of something like Herbie's gliders as the target room is carpeted and I am sure there will need to be some placement adjustments in the early days.
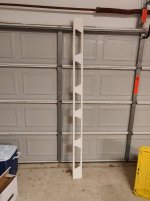
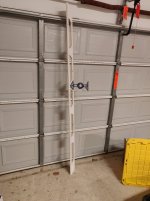
For the side pieces, I started out with some 1" x 6" by 8' primed soft wood boards. I marked out the locations where my printed mounts will connect and cut out as much material between these points as I dared without risking the structural integrity of the wood. The result is still fairly stiff, but I am hoping the stiffness of the 3D printed line will help in this aspect once everything is screwed together. I got hold of a handheld router and put a quarter round edges on every sharp edge I could find, partially for aesthetics but also because I now have an irrational fear of sharp 90 degree edges.
The first article of the side piece didn't really live up to my standards. I had some challenges with an old jigsaw blade making my cuts a bit wobbly, and I also made a rookie mistake in leaving an acute angle in one of the cutouts corners, meaning I couldn't get my router bit into the corner. The second article is much better and will be the template going forward. One of the pics attached shows how the 3D printed mount will interface with the side piece.
I invested in a Kreg pocket hole jig and intend to use 4x pocket hole screws to mount the side pieces to the bases. The top most and bottom most printed mounts have top and bottom connections (respectively) as well as the side connections, so hopefully between all these connection points I will get a good sturdy joint.
My plan is to sand and prime everything before coated with a high gloss white oil based paint. I went back and forth on the finish of the wood, but i think simple white paint will be the best finish so as not to clash with the more colorful 3d printed elements.
One other point of note to share, I have been playing around with the Behringer DEQ2496 which I purchased to help with equalization. Not impressed. Quality control seems poor with the unit cutting out randomly and occasionally needing a whack on the side to turn on. Currently looking into other options but leading candidate at the moment is miniDSP.
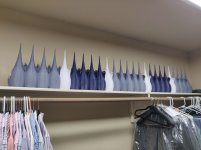
I have included a picture of the first line of driver boxes. It is stored safely away in my closet for now as I don't really have a good place to keep it as it got pretty big once I glued all the pieces together. Hopefully it won't be long before I get my first stand built and can get the line mounted and move onto wiring and stuffing.
As always, feedback and comments greatly appreciated.
Phil
Time for another update.
First things first, the printer is printing again. Honestly went round and round the houses a bit. Made the decision that as I needed to replace some parts I may as well upgrade to more fancy aftermarket parts, and really improve the output of the printer. Well after a couple of weeks of faffing about and awfully inconsistent prints, I reverted everything to OEM and it started printing perfectly again.
I have also started making some progress on the speaker stand parts. This is something I have been procrastinating about for a few months, but I finally ripped off the Band-Aid and started making some progress.
First item required was a solid base for the speakers. They are going to be tall and have a reasonable amount of weight high up in the structure so I was looking for something fairly solid to mount everything too. My father in law (who owns a re-modelling company) brought me what was an unused wooden step. Essentially a 48" x 11" x 4" piece of red oak. After a bit of worrying about ruining it, I took the plunge a cut it up to give me 2 bases approximately 17" x 11" x 4". Each base weights about 18.5 lbs so a decent amount of weight. I have ordered some spikes that I intend to screw into the bottom, and am considering getting hold of something like Herbie's gliders as the target room is carpeted and I am sure there will need to be some placement adjustments in the early days.
For the side pieces, I started out with some 1" x 6" by 8' primed soft wood boards. I marked out the locations where my printed mounts will connect and cut out as much material between these points as I dared without risking the structural integrity of the wood. The result is still fairly stiff, but I am hoping the stiffness of the 3D printed line will help in this aspect once everything is screwed together. I got hold of a handheld router and put a quarter round edges on every sharp edge I could find, partially for aesthetics but also because I now have an irrational fear of sharp 90 degree edges.
The first article of the side piece didn't really live up to my standards. I had some challenges with an old jigsaw blade making my cuts a bit wobbly, and I also made a rookie mistake in leaving an acute angle in one of the cutouts corners, meaning I couldn't get my router bit into the corner. The second article is much better and will be the template going forward. One of the pics attached shows how the 3D printed mount will interface with the side piece.
I invested in a Kreg pocket hole jig and intend to use 4x pocket hole screws to mount the side pieces to the bases. The top most and bottom most printed mounts have top and bottom connections (respectively) as well as the side connections, so hopefully between all these connection points I will get a good sturdy joint.
My plan is to sand and prime everything before coated with a high gloss white oil based paint. I went back and forth on the finish of the wood, but i think simple white paint will be the best finish so as not to clash with the more colorful 3d printed elements.
One other point of note to share, I have been playing around with the Behringer DEQ2496 which I purchased to help with equalization. Not impressed. Quality control seems poor with the unit cutting out randomly and occasionally needing a whack on the side to turn on. Currently looking into other options but leading candidate at the moment is miniDSP.
I have included a picture of the first line of driver boxes. It is stored safely away in my closet for now as I don't really have a good place to keep it as it got pretty big once I glued all the pieces together. Hopefully it won't be long before I get my first stand built and can get the line mounted and move onto wiring and stuffing.
As always, feedback and comments greatly appreciated.
Phil
Attachments
Skip the miniDSP. Get a small computer, a decent DAC and run CamillaDSP instead. If you know your way around computers...
Nice looking project!!
//
Nice looking project!!
//
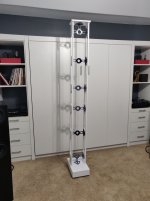
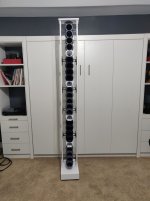

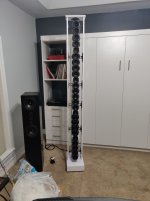
It's making noises! Plan to run it for a few days to get the drivers to loosen up and then start measuring. I have a calibrated mic due to be delivered over the weekend.
So, regarding EQ plans, it totally went over my head that I have a PC in my office where the speakers are located and could do most of my measuring and EQ on the PC.
My current plan (which I'm hoping for some feedback on) is to use a couple of PC tools (REW and Peace EQ maybe) to model my speakers unfiltered performance and what type of EQ filter I need to get the performance where I like it in my room.
My thinking after that was to try and get hold of something like minidsp to put between my preamp and power amp so I can have the relevant correction filter for my setup and still utilize my analog source when the feeling arises.
I do have a lingered niggle about whether I could build a hardware filter based on my "ideal EQ response" to suit my room and build that into my speakers. But that is a thought process for another day, as I have no idea where to even start with that.
I do still plan to try and explore frequency shading further down the road as well, but thought that shouldn't really impact the overall line pre-filter method.
Anyway, speaker number 2 is coming along and probably only a month away from completion. I then need to switch focus to producing the facia plates so I can get the whole assembly together and finalize my measurements and EQ models.
Been a long road to this point, but incredibly exciting to have something producing actual sound! Thanks for all the feedback so far. Going to get more technical from here I think.
Phil
Attachments
Very ambitious project. I had a similar idea last year but I was scared off by the insane amount of print hours necessary. I also am not able to print 24/7 due to noise and bad feeling having the printer without any supervision when at work. The idea is still there using FaitalPro 3FE22s. I think I have 8 at hand to create a 8 element short curved array. I envision a partly CNCd and partly printed speaker somewhere in distant future🙂
What is the amount of filament per box and external dimensions? I like your style, my imagination was very limited when I tried to design some single box elements.
What is the amount of filament per box and external dimensions? I like your style, my imagination was very limited when I tried to design some single box elements.
Hi Pelanj
The "middle" box with 2 flat sides is 84mm tall, 120mm wide, and 350mm deep. With the driver mounted and the facia plate on the overall box gains another 10-15 mm of depth.
I am using Cura as a slicer and have found best results when using a raft plate adhesion method and a fairly liberal amount of support structures. Based on that it takes about 182g of filament to print the middle box.
The boxes on the ends of the line are a different design that is slightly more complex to print so requires a bit more filament to print. There are also the mounts that are printed and the facia pieces that I plan to print.
So in short I've been getting through quite a bit of filament.
I am printing on a Creality CR-10S which has a 300x300x400 print area. I have been sticking to just printing 1 box at a time. I could fit up to 5 boxes in the print space and have enough filament on a new 1kg reel, but I was worried a printing issue somewhere in the process would risk losing a lot more work.
I designed all the modules in an online CAD tool called TinkerCAD. I have been trying to see if I can share my design so someone like yourself can have a play and take it apart to maybe see what I did along the way. Unfortunately at the moment I can only see how to share STL or OBJ files which will share the final module but not allow you to reverse engineer it. Will do some more poking and see if I can find a way to share something that can be inspected.
When I first got my printer it was really noisy. Continuous fan noise but also this sing-song noise as the extruder would track back and forth, that was both annoying, and it turns out completely unnecessary. I was able to buy a "silent board" for my printer which required changing the control board but completely removed the noise from the extruder movement. Now I just have fan noise, which is more bearable. Also, my printer does have a function to pause a print. I have used it most for changing over to a new reel of filament mid print, but I am sure you could find someway to pause a large scale print if you are concerned about leaving it running unattended, which I completely understand.
One good tip I got was to print some scaled down versions of the designs to see if they would print and if the concept works. Also take much less time and filament to run some tests.
It is definitely a big commitment though. Good luck and let me know if there is anything else I can share about my experience that may help.
That is some great info, thank you. I am using the free version of Fusion360. I planned to print the "boxes" on my QQ-S one by one in PETG. 350 mm would fit my printer fine. If you could share the STL, it would be great, since I could have some inspiration just from the shape of it by looking at it from all sides, mine would need to be made from scratch in any case - I am interested especially in the shape of the inside "waves" and walls. My goal was to design something that prints with minimal supports and your shape seems to be quite suitable for that. 50 pcs of FaitalPro 3FE22s can be bought here for ca 1k USD, TC9s or 3FE25s for roughly half of that. So this is still on my list of potential future projects🙂
Hi Pelanj
I have set up an account on Thingiverse and added a few different design files that you can download and have a look at.
404 Not Found
If you want to try and print something that can be functional the "...-Single" module should allow you to build a single speaker with a single TC9 driver. There is also one of the mounts that will work with the single speaker, although it is a bit front heavy.
Let me know if you have any questions about the design choices. I am sure this is not the perfect solution, and a bunch of things I just did because they felt like the right thing to do, but happy to share my thinking.
In answer to a couple of your points, I tried to keep the overall shape as curved as possible to minimize sharp edges which helps from a printing perspective as well as from an audio and over structural strength perspective. Design used lots of spheres, paraboloids, cylinders and torus's in a variety of solid and "hole" shapes to get to the overall shape.
As far as the "waves" I started with a flat plane and then created a wide and shallow cone object which I duplicated multiple times. I tried to lay the cones as randomly as my engineering brain would allow to create a constantly and inconsistently varying inside surface.
I will say one of the hardest parts was getting the interface between the box and the driver correct. I spent a lot of time tweaking the interface and then just printing the first 5 mm of the model to test the interface. Obviously the goal is to get the boxes as close as physically possible without making tolerances so tight that the stack up becomes a problem.
One other comment I will make is a had a little go with PETG and didn't have as much success as I did with PLA. I found the PETG had a bit more flex, which "felt" like it wouldn't be a good thing. But again, I don't have much experience with PETG and it may have been the configuration I used to extrude vs a fundamental material issue. I found something that worked and stuck to it.
Other than that, feel free to have a play with the files, and if anything else comes up just let me know.
It seems Thingiverse has one of its bad days, I could see your profile, but no models. I printed quite a few things out of recycled PET, which is strong and less flexible than PETG, but it needs larger nozzle and high temperatures. I am currently experimenting with 1 mm Volcano hot end nozzle, but still cannot get great results out of it. But it is super strong even with PETG. I know what it takes to try to get a perfect driver mounting hole, the 3FE22 basket was a nightmare and I had to do quite a few test prints as well🙂 I think I will start with simpler elements for a curved array experiment. I really learned some trick or two in your thread.
- Home
- Loudspeakers
- Full Range
- Another TC9 Line Array Project