

You guys are a very lucky bunch, enjoy them 👍
I hope I’ll have a chance one day to hear an amplifier build using these.
I hope I’ll have a chance one day to hear an amplifier build using these.
 ❤️
❤️Further to post #176, here is the GB for 2SK3497, as promised, for those lucky guys with a pair of Semisouths :
https://www.diyaudio.com/community/...ed-2sk3497-pairs-at-55-c.396555/#post-7285990
Patrick
https://www.diyaudio.com/community/...ed-2sk3497-pairs-at-55-c.396555/#post-7285990
Patrick
I finished my F2j with the generous gift as organised and written up in this thread. I am so very happy with the sound. They make my friends and my own fullranges (philips 9710 TQL Fostex 208 Vulcan horn and Lowthers 6 open baffle) sing like never before. IMHO.
Thanks again for the Semisouth miracle give away and all the work to make it happen
Thanks again for the Semisouth miracle give away and all the work to make it happen
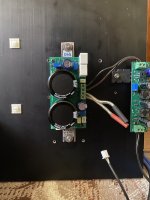
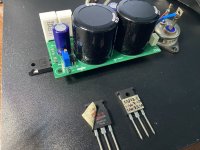
Thing is that I was already building a FW PSU for a mini-dissipante chassis when the SS pair fell into my lap. Now I am thinking that if I want the J2 finished before the summer I should set aside the PSU board kindly provided by Randy for next build and hijack this already-built PSU into the J2.
TBS


TBS
Inspiring stuff!
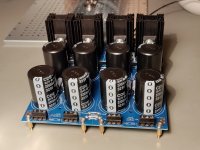
Consider a relay to reduce turn on zap of the caps. Mine bulged in my F5 shortly after building it. But they were very cheap caps.
Consider a relay to reduce turn on zap of the caps. Mine bulged in my F5 shortly after building it. But they were very cheap caps.
Thanks!
The CL-60 on the transformer primary should take care of the inrush current at turn on. We'll see.
The CL-60 on the transformer primary should take care of the inrush current at turn on. We'll see.
Mine did not. I wonder if the Universal PSU needs some fine adjustment for us in 230V countries.
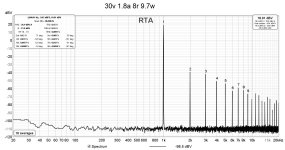
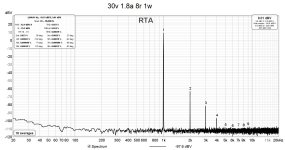
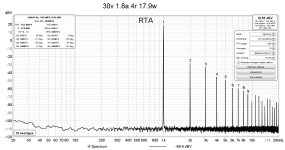
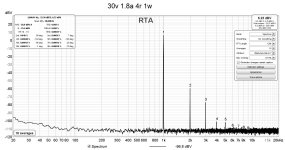
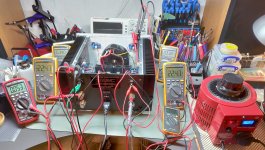
Finally I got to use mine. Same nice sound as with the sits but with a bit less thd.
Attachments
I said this was my summer project but I did not specify in which hemisphere 
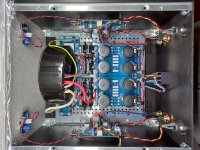
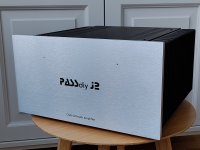
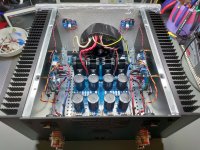
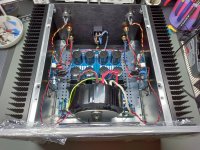
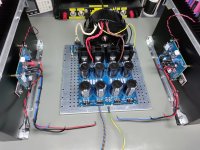
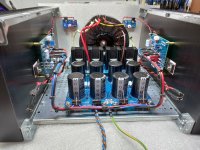
Finally done! Here it comes 🥁
Thanks Cody, Nelson, Randy, Patrick and everyone that shared their knowledge in the J2 thread (the omnipresent ZM of course)
Finally done! Here it comes 🥁
Thanks Cody, Nelson, Randy, Patrick and everyone that shared their knowledge in the J2 thread (the omnipresent ZM of course)
Attachments
-
 2023-12-31 13.20.20.jpg716.6 KB · Views: 132
 -
 2023-12-31 15.38.55.jpg499.4 KB · Views: 123
 -
 2024-01-02 16.50.44.jpg592.7 KB · Views: 135
 -
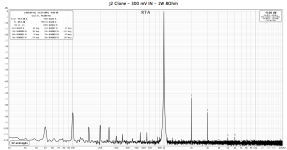 2024-01-03 - J2 Clone - FFT.png53.8 KB · Views: 128
 -
 2024-01-03 - J2 Clone - THD.png30 KB · Views: 135
 -
 2024-01-06 11.38.50.jpg396.1 KB · Views: 119
 -
 2024-01-06 11.39.10.jpg478.1 KB · Views: 123
 -
 2024-01-06 11.42.09.jpg485.9 KB · Views: 128
 -
 2023-12-31 13.19.58.jpg628.1 KB · Views: 120
 -
 2023-12-31 13.18.50.jpg598.2 KB · Views: 119
 -
 2023-12-28 17.52.24.jpg246 KB · Views: 116
 -
 2023-03-09 12.10.46.jpg403 KB · Views: 116
 -
 2023-03-28 17.27.54.jpg518.4 KB · Views: 112
 -
 2023-04-01 13.50.04.jpg397 KB · Views: 116
 -
 2023-12-12 17.36.09.jpg386.9 KB · Views: 122
 -
 2023-12-28 16.17.15.jpg370.1 KB · Views: 119
 -
 2023-12-28 16.19.02.jpg567.2 KB · Views: 114
 -
 2023-12-28 16.26.25.jpg808.1 KB · Views: 124
 -
 2023-12-28 17.32.07.jpg603.5 KB · Views: 125
 -
 2024-01-06 11.42.41.jpg429.6 KB · Views: 132
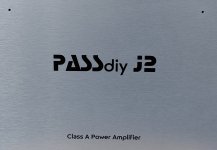
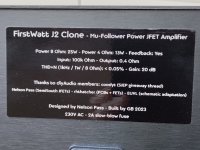
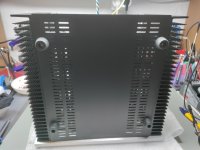
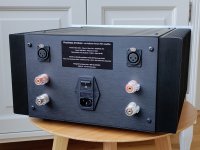
Here it comes a screenshot... and a new sticker for the back panelFugly!

next time, base plate lip up + 10mm distancers, so free clearance to route mains wires underneath
- Home
- Amplifiers
- Pass Labs
- Another SJEP Giveaway