Member
Joined 2003
Tough job, but doable. Sliding large magnets off each other works for me. Be sure to put a wooden block between them where possible.
Above all, be very careful...I still have scar tissue in my left thumb from neo magnets I worked with nearly 10 years ago.
Above all, be very careful...I still have scar tissue in my left thumb from neo magnets I worked with nearly 10 years ago.
Thanks for your opinions tinitus and Paul W. I might have to make one of these 🙂: http://www.youtube.com/watch?v=ybY_wdQ5MS
Can't emphasize how dangerous magnets of that thickness are, could easily take the end of your finger off. You must be aware and very careful at all times, a split second of missed concentration is all it takes for a very nasty accident. I only used 6 mm thick neos, but I was lucky on several occasions.They like jumping quite a lot over quite large distances.Even sliding them is very difficult and dangerous.
Yep, I think those are best to be handled one at a time, away from metal objects. Separate one magnet from the stack, glue it to the pole piece, repeat...
..... Separate one magnet from the stack, glue it to the pole piece, repeat...
might be a good idea to 'train' a bit with smaller magnets
then you get a feeling of how magnets react to each other when placing them on metal, and what to expect
and to orient them coreectly is a hole job of its own
takes some practice to get it right
question is if such huge magnets are better
though brute force might work...it might be even more effective to optimise integration between magnet system diaphragm/ribbon size/design
which reminds me...I think such very big magnet are only any good when used together with iron pole to concentrate the magnet gap force
and then you loose some of it again
smaller magnets and no polepiece might very well outperform it
or at least at a very modest power loss be much simpler to build, and way more cost effective
I think I will order a smaller batch first, 10-30pcs to see the quality and "play" around a little with some thick gloves on.
I have though that pole pieces could be for example 1" x 1". With 1" air gap, I don't get higher flux by increasing the pole piece size from that, according to FEMM. However with 0,5" air gap the 1"x1" pole pieces do saturate, and then it would be better to increase their size to get higher flux. 1"x1" size pole pieces propably make it easier to line the magnets on the pole. I will first polish the pole pieces with a sanding machine, fine grain sand paper and water and then put on a small layer of diluted lacguer with a rag so the steel won't oxidize. Less air gaps between the magnet and the pole piece and the magnets might slide easier on the pole piece.
I might have to use two clamps when glueing the magnets, one squeezing the magnet to the pole piece and one squeezing the magnets together.
Last edited:
Member
Joined 2003
For tall ribbons, be sure to physically brace the poles so the steel cannot bow when using large magnets.
Doubt you will make it to your LF goal, but use at least a 2nd order filter to keep excursion from increasing below XO. My 1"x45" ribbons were good to 600, but 300 would have required 4x the excursion. Experiments with pleating vs embossing showed the embossed style twisted in the gap more than the pleated when overdriven at LF...so I went with pleats.
Enjoy the journey!
try simulate this one
might have some advantage to use wider magnet, instead of squared.... like 0.5" x 1.5" (magnetised through thickness)
I don't get that model going too well? The Bl drops when the ribbon moves forward, and increases when it moves backwards, not good when designing for low XO and high-ish SPL... Side-to-side Bl-linearity also not as good as with basic model, the sides of the ribbon get considerably more driving force than the center. Correct me if I have simulated wrong.
Also that is not dipolar model, which I would like my ribbons to be. I might make them convertible between cardioid (forward firing) and dipolar with detachable steel-ish back chamber that would also redirect magnetic field. Or then I just damp the rear wave with some resistance/damping material, much simpler and might be more transparent acoustically/sound quality -wise.
Mentioned model with 1.5" x 0.5" (magnetization direction 90 and 270):
An externally hosted image should be here but it was not working when we last tested it.
An externally hosted image should be here but it was not working when we last tested it.
Basic model with 1" x 1":
An externally hosted image should be here but it was not working when we last tested it.
An externally hosted image should be here but it was not working when we last tested it.
Last edited:
I don't get that model going too well? The Bl drops when the ribbon moves forward, and increases when it moves backwards, not good when designing for low XO and high-ish SPL...
ahh...no, ok, I forgot....I dont think a ribbon should move that much
I have done tall man high ribbons in the past
sounded great, but I always found them too uncontrolled at more than low to moderate SPL
and I was missing some power in upper midbass and lower midrange
but the sim shows exactly what I have found too

that the magnet field is flat in a very precise spot, right in front of the magnets
anyway, thanks for doing the sim...much appreciated 🙂
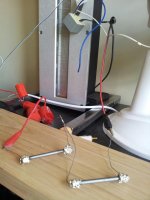
I'm hesitating about the gap between between the magnets.. as you can see in the pictures I'm trying to move them together. Anyway, they seem to work fine.
http://dsl.mine.nu/galleri/misc/band1.jpg
http://dsl.mine.nu/band.jpg
How did you attach the magnets to the U-bar? Did you dare to drill holes in them?

I have a Swedish 50cm long ribbon/1" wide ribbon transmission audio true ribbon driver, and I think he glued the nd magnets to aluminum front and backplates. It is open on both sides so they can
Sensitivity is low compared to TPL-150, maybe just 90dB. But sounds much clearer, but not as powerful sound below 3kHz, so I cut it off above that and use it as a supertweeter.
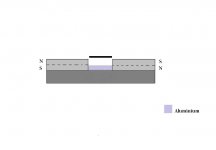
What do you think of this design?
Sensitivity is low compared to TPL-150, maybe just 90dB. But sounds much clearer, but not as powerful sound below 3kHz, so I cut it off above that and use it as a supertweeter.
What do you think of this design?
Attachments


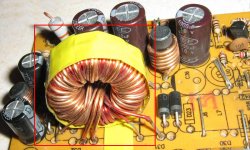
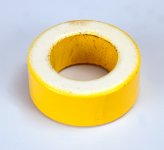
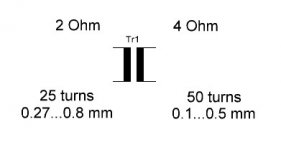
Which is the desired frequency range?can anyone help me? I need to transform from 2 ohm to 4 ohm ribbon in my tw I need some scheme of transformer thanks
 an impedance transformer
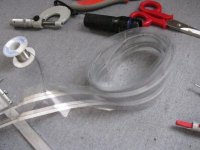
- Home
- Loudspeakers
- Planars & Exotics
- Another DIY Ribbon thread