Added bias trim pots, tweaked bias, and ambled off to the living room to watch a movie while the amp simmered. Bias is stable, involving tweaking the initial bias current level a bit below the desired value. The heat sink is the absolute minimum size for the app, and reaches about 55C. Heatsinks USA probably has an extrusion profile that will do better, should I decide to reproduce this thing.Meanwhile, I need to figure out the rest of the packaging.
I'm afraid it was one of those creations that began life as a result of dragging a quad pad and pencil to the bog with me.
I knew I couldn't be alone on this (assuming bog = dunny can).
This works.
The amp has been playing in my dining room most of the aternoon, powered by a bench supply, tickled by a Discman, and driving a pair of Planet 10 speakers that are efficient enough to do it justice.Last played - Isao Tomita's "Snowflakes are Dancing" - gorgeous. I'm dragging into work again to check out drive and actual clipping levels, to see if I'm getting al the juice out of it that I possible can.
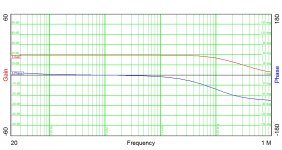
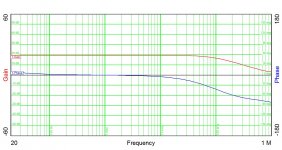
My next move will be to run the amp with a resistive load and function generator to see where it clips, and if it does so reasonably symmetrically.

As I said previously, I persuaded/browbeat (however gently) a colleague at work to construct another instance of the "Amp Cramp" with appended pots for bias and centering adjustment. This 1) proved out the modified design, and 2) served to infect a friend with the audio construction bug.
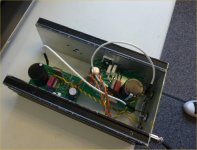
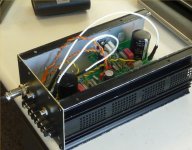
I helped out with stuffing. mechanicals, and debugging to move the project along. The amp was built inside a chassis that was originally home to a smallish Acopian linear power supply. This came apart readily (8 screws, sliding sheet metal panels), was easily eviscerated, and had two side panel heat sinks that I was gambling were suitable for this project if I mounted the two channels on opposite side walls.
The pictures show an interior view, and the busier end panel, fitted for RCA inputs, a 2-pin microphone connector for power, and (already in place) a barrier strip for outputs.
The amp came up with no issues powered by a bench supply, and subsequently with a 24V/2.5A adapter scored from local surplus.
Audio testing was quite satisfactory, and we were both well-chuffed.... Speakers are next on the list, though likely something from a thrift store.
Attachments
Added bias trim pots, tweaked bias, and ambled off to the living room to watch a movie while the amp simmered. Bias is stable, involving tweaking the initial bias current level a bit below the desired value. The heat sink is the absolute minimum size for the app, and reaches about 55C. Heatsinks USA probably has an extrusion profile that will do better, should I decide to reproduce this thing.Meanwhile, I need to figure out the rest of the packaging.
Hi wrench, looks cool and simple. Do you have an updated schematic that shows the bias pots? How much current are the outputs biased to?
Regarding the pc brick supply, have you considered using 2 bricks to create split rails? If I’m not mistaken, the DC output ground is isolated. I thought about using bricks for my own bi-amp’d active crossover but decided against it and in favor of a cheaper route — bought a Dayton audio stereo amp and repurposed it (power supply, case, heat sink, connectors, etc).
If I choose split rails for this type of deal, I would use a different design with differential front end and ditch the output coupling capacitor. Retaining the single supply rail and output cap keeps the project relatively simple and idiot-proof.
I need to tweak the values around the pots for more adjustment range. My colleague's amp came up reasonably centered with unselected IRFP240 and 9240, but just barely - I'd like some more adjustment range.
I need to tweak the values around the pots for more adjustment range. My colleague's amp came up reasonably centered with unselected IRFP240 and 9240, but just barely - I'd like some more adjustment range.
Agreed, it’s simpler and don’t need to worry about dc offset in the output. And probably no thermal tracking to worry about for the bias.
Any updated schematic?
Edit: I can’t find the tang band driver on parts express, or don’t they carry it?
Any updated schematic?
Edit: I can’t find the tang band driver on parts express, or don’t they carry it?
Last edited:
The drivers I cite at the beginning of this thread may not be around any more. I got mine on Ebay - basic 4" paper cone w/whizzer. If you don't mind the extra money, the 4" bamboo cone full rangers would most likely be better - still available at Parts Express.
I'm using my experience with the "Half Nelson" upgrade to improve the balance between top and bottom output stages of this amp, as this greatly improved the THD on the "Half Nelson". I designed to get DC balance at the output, but did not pay adequate attention to the drive balance of the output stage - needs tweaking, just like an Aleph...
The enhancement of the Amp Cramp is not proceeding as smoothly as in the case of the Half Nelson, as there is a global feedback in the case of the Amp Cramp. So far, my efforts have only been successful in increasing the THD. My best approach may be increasing the gain of the input stage.
Probably it is too hot for my brain today, but.... is that positive feedback to the first transistor? (I may just have run out of thumbs to count on.)there is a global feedback in the case of the Amp Cramp. So far, my efforts have only been successful in increasing the THD.
- Home
- Amplifiers
- Pass Labs
- "Amp Cramp" Low Power Class A Amp