Wow, I fired mine up for the first time this afternoon..man I'm really having a hard time taking off my headphones to go eat dinner.
This sounds excellent, even without R4 dialed in properly, and even driving my 80 ohm DT770. Wow
Anyone used an ACP+ with the MoFo? thinking about building that next
This sounds excellent, even without R4 dialed in properly, and even driving my 80 ohm DT770. Wow
Anyone used an ACP+ with the MoFo? thinking about building that next
A good experiment to see if MoFo will work for you is to hook up your speakers to the head phone out of your ACP+, like Papa did at the end of his ACP article. If you can get to your normal listening level, then MoFo will give your ACP an easier load to drive, with lower distortion. Also less strain in the bass.Wow, I fired mine up for the first time this afternoon..man I'm really having a hard time taking off my headphones to go eat dinner.
This sounds excellent, even without R4 dialed in properly, and even driving my 80 ohm DT770. Wow
Anyone used an ACP+ with the MoFo? thinking about building that next
It all depends on source levels and speaker sensitivity.
Have fun experimenting.
ACP+ Power AMP?
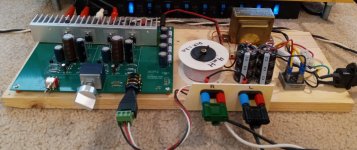
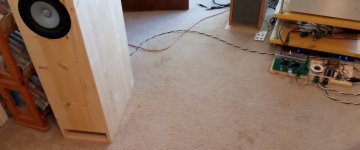
Oh that Papa, he's always provoking me into trying things I never would have thought of on my own. Towards the end of his ACP+ article he's showing a picture of the ACP driving some speakers. I had been wanting to give a one watt amplifier a try and thought... hey this is about a watt... well almost.
So I built it without modification to start and hooked up my speakers. It worked ok but very low power and not much low end.
What if I beef up the power supply and crank up the bias some? Thankfully Papa left ample room for beefing up the heat sinking.
Attachments
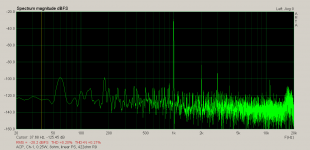
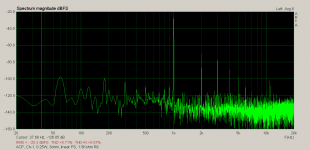
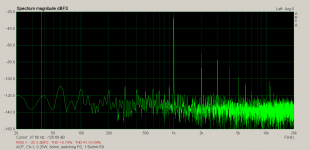
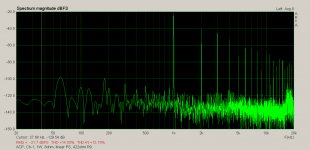
So here's the distortion profile with switching power supply, linear 2A power supply, R9 at original 1k5 and R9 at 422R. Power supply differences don't show up in these spectrum but the bias differences sure do. Beefy power supply helps the low end and at higher power.
Attachments

Last edited:
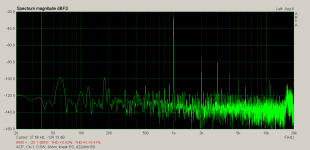
So how much power does the ACP+ have? The rest of the spectrum plots are all with the higher bias and linear PS. It makes it to about a 1/2 watt and still sounds pretty good. Perfect for light listening. 
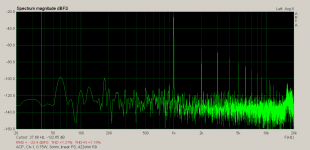
3/4W distortion becomes audible. 🙂
1W it starts sounding not so good, higher ordered harmonics all the way up.
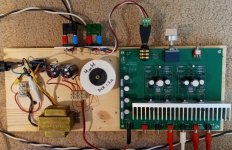
I was running fan on the original little heat sinks, this bigger sink will still fit in a 1U chassis, no fan. Probably will get a little toroid transformer to get it all in one chassis.
My favorite use is still as a head phone amp , but now I have a totally versatile Pre/Head/Power amp...
Cool... Thanks Pa 😀
3/4W distortion becomes audible. 🙂
1W it starts sounding not so good, higher ordered harmonics all the way up.
I was running fan on the original little heat sinks, this bigger sink will still fit in a 1U chassis, no fan. Probably will get a little toroid transformer to get it all in one chassis.
My favorite use is still as a head phone amp
, but now I have a totally versatile Pre/Head/Power amp...Cool... Thanks Pa 😀
Attachments
Last edited:
Mine are 92dB, Markaudio 12P. The point being it helped lower the distortion profile to get it to a usable 1/2W. My normal listening levels are at about 1/2W and yes I can hear the difference.Not going to make much difference. That trick was more about Nelson’s efficient speakers. 😀
I just wanted to measure for conformation of what my ears were hearing.

ACP+ and ACA combo
I am very intrigued by the ACP+ and have a few questions for you guys:
1. Why is there no parts kit for this one? Reading through the thread, it sound like a bit of a PITA to source all the right parts (and match the JFETs) 🙁 If anyone prepared a parts-list for Digi-Key or Mouser - PLEASE share.
2. Did anyone try to position the ACP+ inside the ACA v1.8 case? The ACA case mid-section is pretty vacant, but I do not know the actual clearance dimensions. Could not find official dimensions of the ACP+ PCB, but someone posted here: 203mm x165mm.
3. Can I use the 24V power brick that comes with the ACA V1.8 kit to power both the ACA and ACP+ boards? If so, do I just connect the wires from the power jack to both PCBs?
My plan is to order a custom front panel for the ACA V1.8 - adding holes for the volume pot and headphone jack.
Obviously, if someone has already done exactly that - PLEASE post a photo 🙂
Thanks,
Zachi.
I feel like the standard issue ACP board is probably too big for what you’re trying to do. That said, there have been several people post their own, more condensed PCB layouts in this thread. I’m sure one of those variations would work.
Zachi -
1) There will be a parts kit, in the future, at some (currently unknown) date. Everything at diyAudio moves at the pace of volunteerism. 😀
2) ACP+ will not fit in ACA chassis at all. The ACP+ circuit board is at least 50mm too wide, nevermind the internal clearance of all the various components...
3) Yes, that would work.
Last edited:
However the ACP+ will fit in a Galaxy chassis (since it has no chassis heatsinks) with the same footprint of the ACA.
The parts kit is delayed due to the recent huge demand for the ACA . It should arrive within 6 months. Build your ACA’s first!
The ACP+ PCB is large because Nelson like a lot of space around the components, and it has a S.ton of filtering to be sure that the SMPS doesn’t pollute the signal at all. It sounds great! Including on my Q701 AKG headphones....
Last edited:
I think one exists. But I don’t see a problem with putting it in a chassis that is the exact width and height of the ACA. It will look cute side by side on a shelf with one or two ACAs
I feel like the standard issue ACP board is probably too big for what you’re trying to do. That said, there have been several people post their own, more condensed PCB layouts in this thread. I’m sure one of those variations would work.
Hire someone to lay out a less luxuriously spacious PCB using the existing schematic.
I guess I have 2 options, if I want to use a single case for both ACA and ACP+
1. Find one of those smaller / more condensed PCBs that some folk here have designed.
2. Use a bigger (wider) chassis from modushop.
Zachi -
1) There will be a parts kit, in the future, at some (currently unknown) date. Everything at diyAudio moves at the pace of volunteerism. 😀
2) ACP+ will not fit in ACA chassis at all. The ACP+ circuit board is at least 50mm too wide, nevermind the internal clearance of all the various components...
3) Yes, that would work.
Thanks Jim!
At least one bit of good news re: I can use the ACA's 24V power brick to power both 🙂 Less mess, less power outlets needed, less power bricks laying around.
However the ACP+ will fit in a Galaxy chassis (since it has no chassis heatsinks) with the same footprint of the ACA.
The parts kit is delayed due to the recent huge demand for the ACA . It should arrive within 6 months. Build your ACA’s first!
The ACP+ PCB is large because Nelson like a lot of space around the components, and it has a S.ton of filtering to be sure that the SMPS doesn’t pollute the signal at all. It sounds great! Including on my Q701 AKG headphones....
I have so much equipment already (mostly headphone amps) - I am really really trying to make this DIY project a single-chassis integrated amp...
I will definitely build the ACA first, but want to do it in a case that can later accommodate an ACP+
My plan is to mod the front panel from the get-go, to have a volume knob and 1/4" headphone jack. The 1/4" jack would be un-connected for now, and the volume knob, for now, will connect between RCA input and the ACA PCB.
So, the big question for preparing for stage 2 (adding ACP+) is:
Look for smaller PCB, or go bigger with the ACA case?
Thoughts? Tips?
Jim - how can I help?Everything at diyAudio moves at the pace of volunteerism. 😀
I am more than happy to volunteer my time and leg-work!
Without reading all of this thread is there a BOM at all? and would this be good to drive an M2X?
Cheers
Cheers
- Home
- Amplifiers
- Pass Labs
- Amp Camp Pre+Headphone Amp - ACP+